Outcome
Types of 3D Printers:
STEREOLITHOGRAPHY
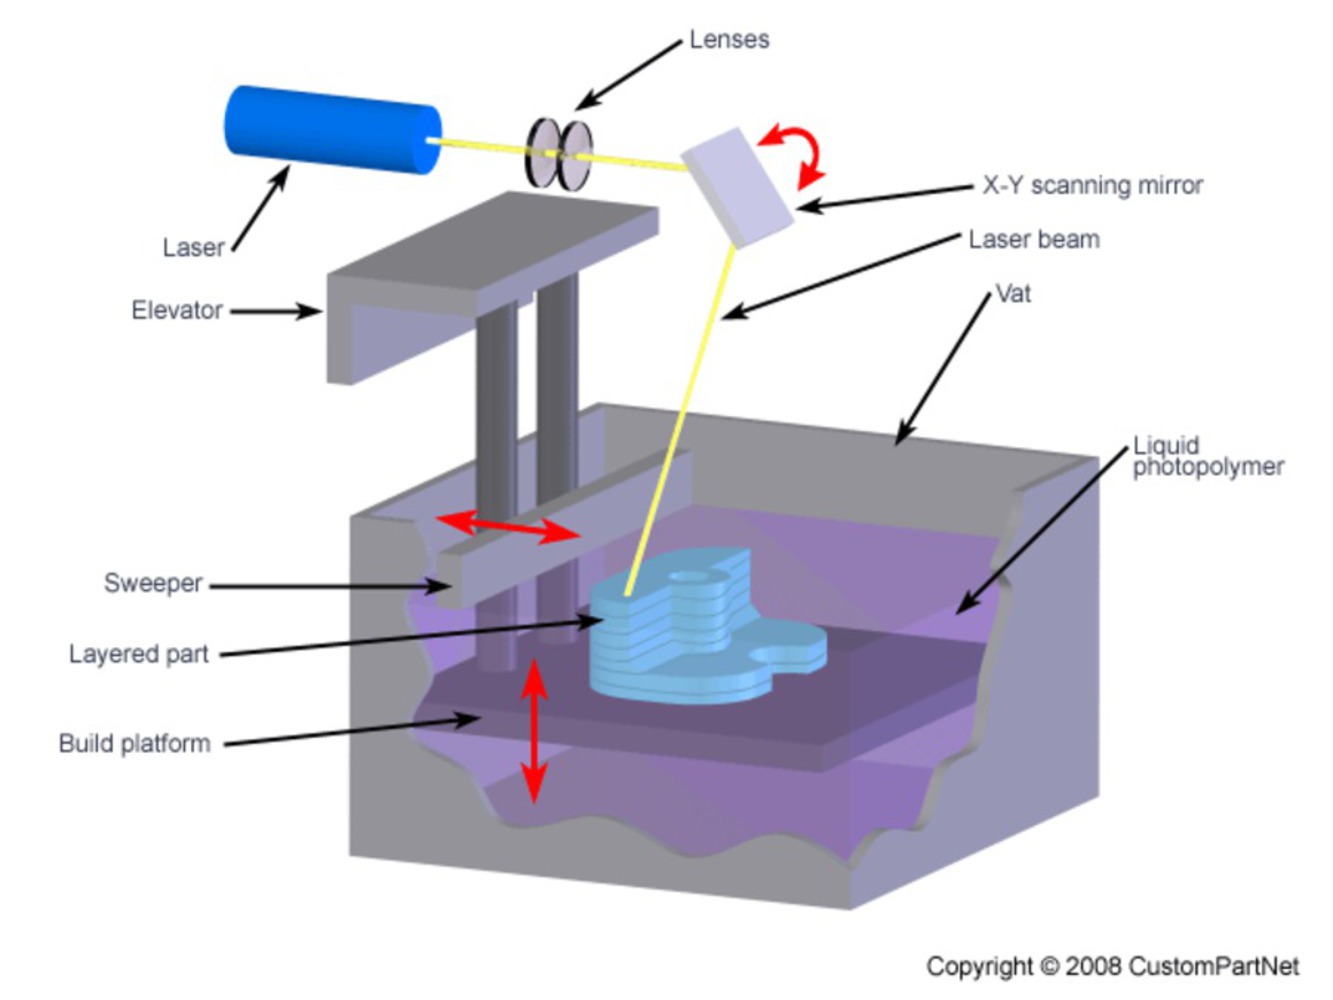
Despite being one of the oldest methods of 3D printing, stereolithography is one of the most commonly used processes or techniques for creating 3D objects. Invented by Charles Hull in 1986, stereolithography utilizes a computer-controlled laser beam to build up the desired structure (layer-by-layer) using a liquid polymer which hardens upon contact with laser light. It's primarily used in prototyping due to its quick turn-around and relatively cheap cost (compared to other prototyping means).
DIGITAL LIGHT PROCESSING
Digital light processing is actually a form of stereolithography that makes uses digital micro mirrors laid out on a semiconductor chip. Although DLP and SLA work with photopolymers, DLP uses a projector light instead of a laser to cure photo-sensitive polymer resin. First, an image of the object's cross section is projected onto the surface of the resin. The exposed resin then hardens while the machine’s build platform descends with each new layer of fresh resin being coated and cured in the same fashion. The results are products with smooth surfaces and excellent resolutions. Furthermore, using less materials for detail production lowers the manufacturing cost and results in less waste.
FUSED DEPOSITION MODELING
Fused deposition modeling (FDM) technology allows not just for the printing of functional prototypes, but also concept models and final end-use products. FDM is the only 3D printing technology that builds parts with production-grade thermoplastics hence, printed parts have excellent mechanical, thermal and chemical qualities. FDM Technology builds objects layer by layer from the bottom up by heating and extruding thermoplastic filament. Printing time depends on size and complexity of the object to be printed. Although slower in processing than stereolithography, this process allows for the creation of more complex geometries and cavities. FDM is mostly used for new product development, model concept, prototyping, and in some special cases--manufacturing development. It is considered to be one of the simplest and most environmentally friendly of the 3D printing technologies.
Materials
- ABS plastic
- PLA
- Polyamide (nylon)
- Glass filled polyamide
- Stereolithography materials (epoxy resins)
- Silver
- Titanium
- Steel
- Wax
- Photopolymers
- Polycarbonate, etc.
Uses
- Advantage of design types (things that cannot be machined)
- Rapid prototyping tool
3D printing makes it possible to make a part from scratch in just hours. It allows designers and developers to go from a flat screen to an exact part.
Nowadays almost everything from aerospace components to toys are getting built with the help of 3D printers. 3D printing is also used for jewelry and art, architecture, fashion design, art, architecture and interior design.
Medical industry:
- low-cost prosthetic parts
- tissues w/ blood vessels
- organ models from patient scans
- replacement organs
- synthetic skin
Process:
1. Save the CAD of what you want to print as a .STL file (most common file format for 3D printers).
2. Open the affiliated software for the 3D printer control (in this case Cura, but for the Cube printers they should use Cubify).
3. Orient the part such that it is:
- flush against the base of the 3D printer
- it needs minimum supports to keep the part intact
4. In the software or in 3D printer set up, set the appropriate layer heights, shell thickness, etc. you wish to set if doing a specialty print. NOTE: It is crucial to make sure you have the right material temperatures, or your print will turn out badly.
5. In the software or 3D printer set up, you will have the option to use a raft (a base layer of plastic that gives the base of your part a cleaner finish/diminishes any warping or breaking of your piece) and supports (which will support any free hanging sections of your piece). Rafts are generally a good practice, but supports are often optional based on your piece.
6. Send the 3D printer ready file to a USB/SD card (whatever is used for the printer), and insert it into the 3D printer.
7. For the 3D printer, change the filament as necessary (usually guided through this process on the Cubes).
8. If needed, apply tape or glue to the 3D print plate (sometimes needed if the 3D printer does not have a heated bed).
9. Step away, and start your print!
10. Make sure to monitor your print occasionally (especially at the beginning if something messes up in the plastic layers). Stop if there is an issue, and often restart (sometimes the plastic just doesn't stick that well, or excess gets dragged around).
If you are having trouble in the IDeaTE lab and need help, run over to the Booth help! They generally can help out with the basics.
Time:
- It can take hours to complete on part
- Very slow compared to other manufacturing processes
Accuracy:
- Getting the part to be to the exact specifications is tough
- This can become a problem for engineers
Size:
- The size of an object made with a 3D printer is directly related to the size of the build chambers
Process Errors:
- It is not as easy and simple as it is sometimes portrayed
- Have to learn how to create the CAD file and layer it properly
- Structure needs to be able to support itself while being manufactured
- Other things can go wrong while making it (heat, finish, wrong axis)
Where To Find a 3D Printer
Hammerschlag Hall (MechE Cluster): access granted to those in Mechanical Engineering
Hunt Library (Basement): access granted to those in Ideate
Porter Hall (Design Lab): access granted to those in Design
Doherty Hall (Digital Arts Studio): COMING SOON according to online website
College of Fine Arts (Computational Design Lab): access granted to those in Architecture
You can upload files of up to 20MB using this form.


