Back to Parent

Outcome


Intent

We are interested in exploring the concept of divination and fortune-telling, especially how that holds the power to influence relationships between individual humans, or even change how people view each other (ie. matchmaking and compatibility tests). The fact that people willingly believe (to varying degrees) the results from such tests is closely related to System 1 thinking in psychology. The small, happy coincidences in a fortune-telling context are interpreted as signs from unseen forces directing people’s fate.

Another relevant concept we explore with this project is illusory correlation. This is an idea in psychology that describes the phenomenon where people perceive relationships between variables when no relationships actually exist. It points out the fact that correlation is not equal to causation.

We find similar themes in the widespread use (and overuse) of machine learning in today’s society to power decision-making, be it policy, economic, or even personal. As people aim for efficiency and neglect proper design of models or data curation, they blindly follow machine predictions in a manner similar to superstition, or exaggerate the capabilities of large language models like GPT4 which still produces groundless or biased statements.

Context

We were inspired by projects like BIY™- Believe it Yourself, which raised questions around the issue of arbitrary data collection practices and training of machine learning models, as the technology becomes more easily accessible.

Another inspiration comes from the fact that large language models like GPT3 or 4 are “high capability, but low alignment”, which means that they are highly capable of generating human-like text, but are less good at producing output that is consistent with human’s desired outcome. However, reaction from the general public reveals blind trust or overhype of such models, overshadowing their important limitations. This was something we wanted to question with the introduction of superstition (compatibility test and fortune generation) as well.

Installation4.thumb
Show Advanced Options
Fortunes.thumb
Show Advanced Options

For our project, we decided to create a “palm reader" that would read the length of the user's ‘love line’ (i.e. the uppermost palm crease line) and print an ‘oracle symbol’ and a short piece of text describing the user’s love fortune. With the fortune slip in hand, the user would then look for their ‘palm-mate’ who had received the same ‘oracle symbol’.


(System Diagram)


(Final Working Prototype)

On the top, we have a line of IR proximity sensors which would read values from the person’s palm. Each of the IR sensors are soldered onto a protoboard which connects each sensor to a power line, ground line, one of two CD4051 multiplexers, and 220Ω and 5.6kΩ resistors respectively. On the side is the thermal printer which would print the ‘love fortune’. This is connected to the Arduino Nano 33 BLE and an external 9V power supply. Due to the physical complexity of the project, installation into the physical housing was split into two compartments. The IR sensors and protoboard and the thermal printer sit in a smaller top level. All of the wires thread through a hole down to a lower compartment that houses two breadboards - one for the multiplexers, the other for the Arduino BLE.


(Before Assembly)


(Internal housing structure)

In order to parse the values read by the IR sensors, we had to split them up and connect them to two CD4051 multiplexers. In the code this required writing our own ‘readMux’ function that would iterate through each of the pins on the multiplexer and compile the values from both multiplexers into an array.

Additionally, we use ML twice. First, we pass the array of values from the IR sensors into an Edge Impulse model that returns a prediction of the current user’s palm length, and a reading of ‘good’, ‘bad’ or ‘ambiguous’. Depending on the reading (i.e. ‘good’, ‘bad’, ‘ambiguous’), one of 9 ‘oracle images’ is chosen. The reading is then sent as a prompt to OpenAI via the OpenAI API, asking it to generate a ‘good love fortune’, ‘ambiguous love fortune’ or ‘bad love fortune’ within 100 words. This is printed below the image.

Bill of Materials:


Working Code:

Show Advanced Options

Process


Phase 1 - Collecting Data / Deciding Sensors for Input

Due to the small size and scope of the built-in sensor in the Arduino Nano 33 BLE Sense, we decided to use external sensors to widen the range of data collection.

We started off trying to use TCS34725 Color Sensors. While we were able to follow the pinout and successfully interface with one sensor, we ran into difficulties when trying to connect more. Not only was each sensor quite big, but also each had a fixed I2C address, meaning all the data was coming in under ‘one sensor’. In order to communicate with each sensor individually, we would need to use a multiplexer.

After meeting with Robert Zacharias, we took his advice and switched from using the larger color sensors to smaller individual IR sensors with the intention of building a 'primitive camera' out of an array of them. As we had little experience in the realm of physical computing, we took this work session to figure out:

  • how to read the circuit diagram - in particular using ground and power lines and finding the right resistors
  • how to interface with the IR sensors via Arduino and checking how different colors/ materials led to different values within the Serial Monitor

We started out by wiring a single IR sensor to the Arduino to see the difference in values read between dark and light colors, following the iDeaTe circuit diagram and tutorial.


  Source: https://courses.ideate.cmu.edu/60-223/s2023/tutorials/IR-proximity-sensor

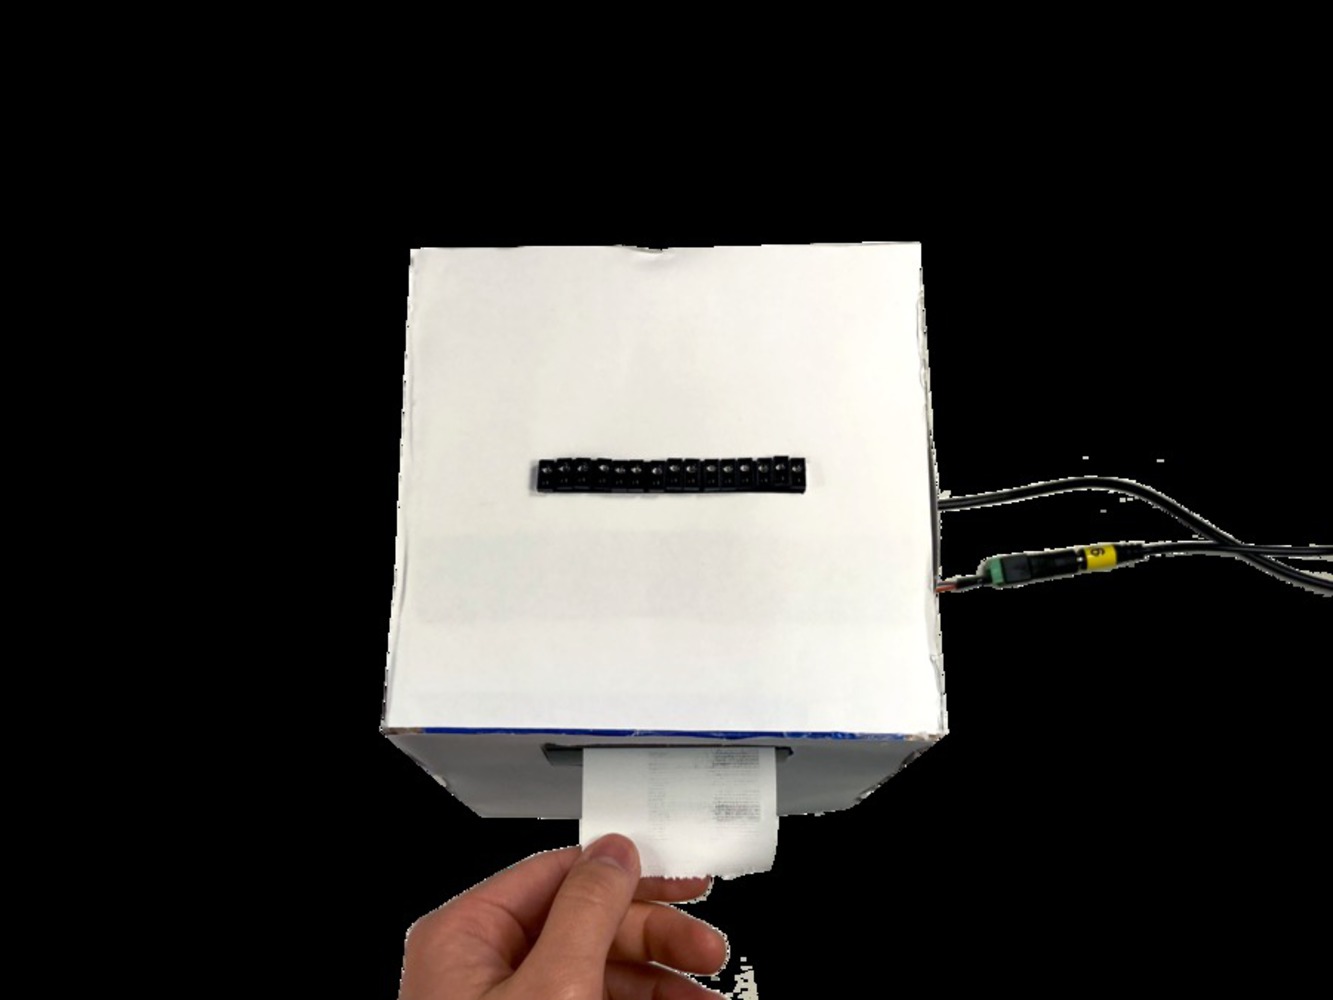
After testing each sensor to ensure it was functioning, we arranged 15 IR sensors in a line and soldered them to a protoboard, so we could record more data in order to determine the ‘length’ of the palm line. This part required a lot of discipline and diligence, not only was it Clover’s first time soldering, but also because of the large quantity and density of components. Each IR sensor had to be connected to 2 separate resistors, 1 Arduino/ Multiplexer Analog pin, a power source, and a ground line, totalling to 5 * 15 = 75 unique connections overall. To help legibility, Clover kept each resistor (220Ω on the left, 5.6kΩ on the right) and each power and ground connection on separate sides. The wires were color coded accordingly:

  • Red (ground)
  • Black (power)
  • Blue (Multiplexer/ Arduino Analog pin)

Additionally, wire length was kept short to prevent tangles. This entire process took around 4 hours in the Digital Fabrication lab, as we took our time double checking at each step, and checking each sensor after it was soldered. We wanted to make sure we weren’t making major mistakes as we were aware that they would be difficult and even more time consuming to fix.

The wire endings on the other side were also trimmed down to ensure no accidental connections or shorting.


One difficulty that we encountered was after we had soldered all these sensors, we realized that there were 15 sensors that needed their own unique Analog pin, but there were only 8 Analog pins on the Arduino Nano. This meant we would need to use Multiplexers to increase the number of Analog pins in order to parse the data from each sensor. In another meeting, Robert Zacharias pointed us in the direction of the CD4051 which would act as a 8 pin expander. Since we had 15 sensors, we would need to use two. Here, the main difficulty was understanding how to call the 8 different channels via an array of 3 ints in the code:

Show Advanced Options

After asking a friend in Robotics to explain, we wrote a custom function called readMux (i.e. void readMux) that was a nested loop. The outer loop would iterate through each of the sensors, and set the channel via digitalWrite to the associated control pin by iterating through an inner loop of length 3. It would then read the value at the associated control pin and add it to an array in the same position as the sensor.

Show Advanced Options

Phase 2 - Thermal Printer (output)

While Yvonne had gotten the thermal printer to print previously, Clover could not get the thermal printer to physically print. After struggling for several hours over zoom with Yvonne, we decided that Clover would go in early before the demo and try to get it fixed in person. It turned out that the TX and RX cables were switched and the paper was stuck. Fortunately, these were easily fixed.

Phase 3 - ML model

This part was more complicated than either of us had expected, due to our lack of experience in interfacing with ML using Arduino.

Firstly, we couldn't import the Edge Impulse model into the Arduino. The zip file that Yvonne downloaded wasn't the correct one so when we tried to add it as a library to the Arduino file, it resulted in errors such as: "Error 13 INTERNAL: Library install failed: archive not valid: multiple files found in zip file top level"

Secondly, we only had 20 samples with which to train our model. This meant that the predictions our model were giving were not very accurate, but we decided this uncertainty would only add to the charm of the project as well as the idea of the ‘supernatural’. After looking at the examples given in the Edge Impulse Examples library and asking Zhenfang (TA) and other friends to explain parts that we did not understand, we were able to get parse the data so that it printed the length of the palm line when a hand was in range and the message "Hand is too far away; please move closer to sensors." when a hand was not.

Show Advanced Options

Based on the length, we were able to allocate one of the following predictions: ‘good’, ‘ambiguous’, ‘bad’. Yvonne worked on interfacing with the OpenAI API to get it to generate a text fortune based on the ML prediction, while Clover worked on a function that would choose one of the symbols (associated with that prediction) to print on the thermal printer.

Show Advanced Options

While this was not difficult, we had 8 symbols and each symbol needed to be converted from PNG to BMP and then to a .h file, making it very tedious.  

Open Questions and Next Steps: 

There are many different areas of palmistry we have yet to explore. For instance, there are the other palm lines, such as the Head Line, Life Line, Marriage Line, Fate Line and Sun Line. There are also broader areas of the palm which are each associated with a planet, which could tie into some concepts from astrology.

Furthermore, Golan Levin proposed a really interesting idea we would love to follow up on which gave a ‘Missed Connections’ - type spin to the project. He really liked the idea of a ‘palm-mate’/ soulmate and that despite the information given by the fortune teller, there was no guarantee you would find someone with a matching symbol. He proposed that we should install the machine at a bus stop next to a bulletin board. The machine would print 2 copies: one for the user to keep and carry around, the other for the user to pin up on the bulletin board, waiting for its future matching ‘partner’. This narrative of ‘fate’ ties really well into the core concept of palmistry which believes that our fates are encoded in our hands. Moreover, it was ‘spooky’ because there were so many uncertainties - you never really knew if there was ever going to be a ‘palm-mate’, whether they would ever respond to your posting, or whether they actually were ‘compatible’ with you, yet you couldn’t help but hope. 

Reflection

This project ended up being significantly more complicated than either of us had anticipated. Despite our best efforts to start early and remain open minded, we ran into major complications at almost every step of the way, resulting in us being unable to present a working demo at the live demo session. Soldering the physical computing units was a new workflow, and communicating with multiplexers required learning new coding concepts. Integrating the ML model into the Arduino code was something very new and unfamiliar to us, and required a lot of cross-referencing examples and seeking external help.

Furthermore, Yvonne had to leave for a conference the week before the demo meaning that all work on site could only be done by Clover. As testing the code required uploading and running on the Arduino, and the wiring had to be done physically in person, our progress was capped by the limitations in manpower. However, once she returned, we were able to divide the tasks up and progress as much faster.

Overall, this project was very difficult and took a lot of time to complete. While it may not have been the resounding success at the live demo that we wanted. Nevertheless, we did manage to complete it in all its necessary complexity, and learned a lot of different skills along the way. 

Drop files here or click to select

You can upload files of up to 20MB using this form.