Stove Alert
Made by Himanshu Rasam
Made by Himanshu Rasam
Create an alert system (local and remote alerts) in case you happen to leave your stove on unattended in your house!
Created: January 27th, 2016
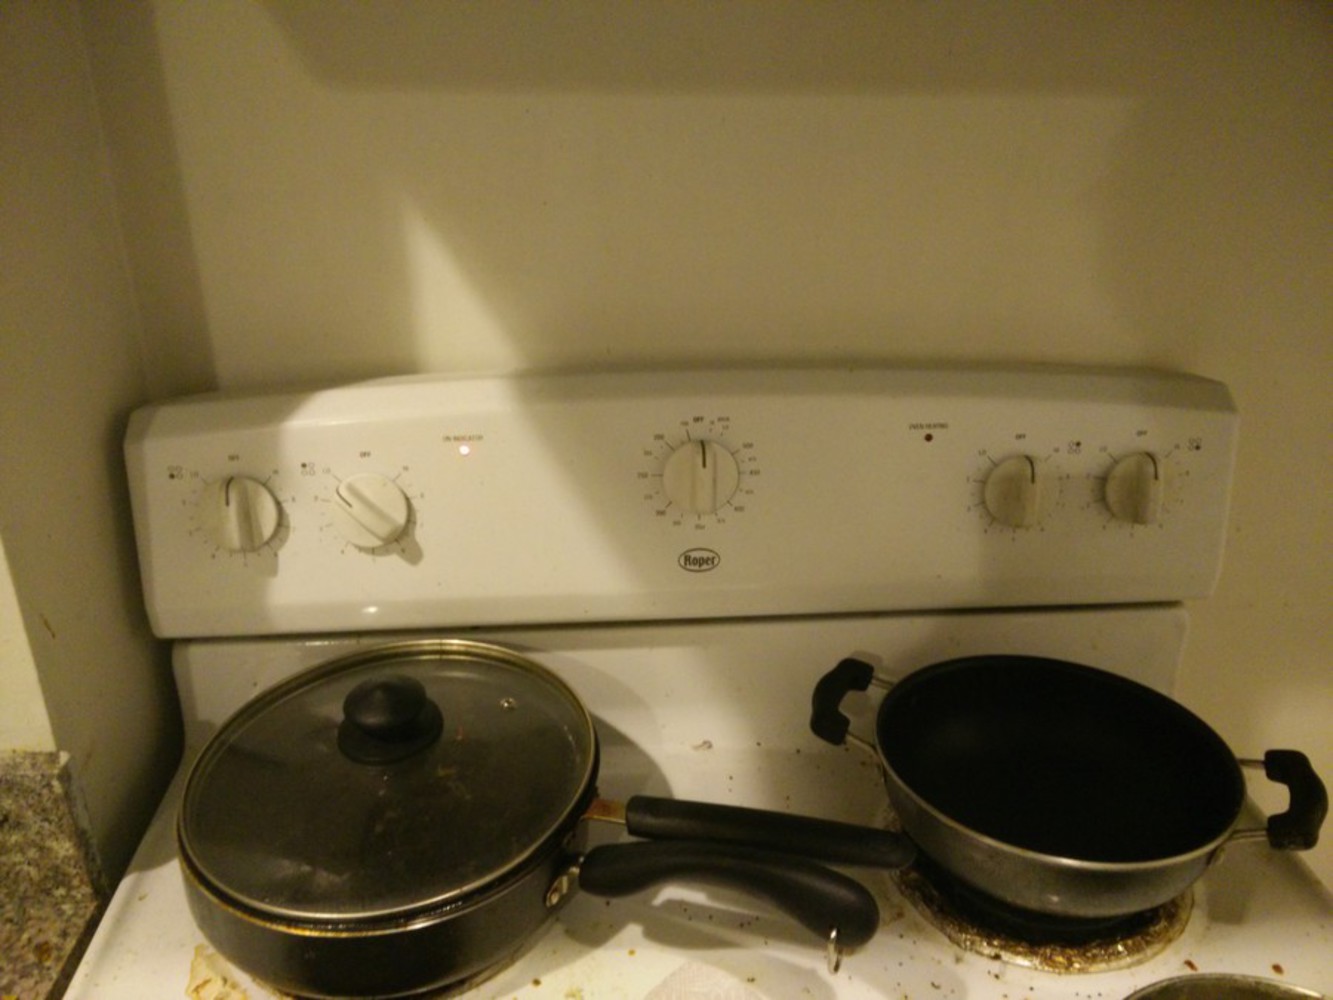
One of the common problems we face in our busy lives is forgetting to switch off an appliance in our home. Sometimes its a harmless act- but occasionaly it can be dangerous if it is a tap in the bathroom or the stove in your kitchen. The ‘stove-alert’ device senses if the stove has been left on for more than 10 minutes unsupervised and immediately notifies the user on his/her phone. The user can then take suitable action to let the building management/neighbor know about the stove and get it switched off.
This device has been designed specifically for my flat mate (Anshuman Kumar) who has this habit of forgetting things and has left the stove on a couple of times in the past three months itself. The interesting thing was- both of those times, I was present in the house but couldn’t know about the stove as I was upstairs in a different room. Thus, I felt a need of placing a sensor which could send him and all the housemates notifications via internet so that either of us could go downstairs and switch it off.
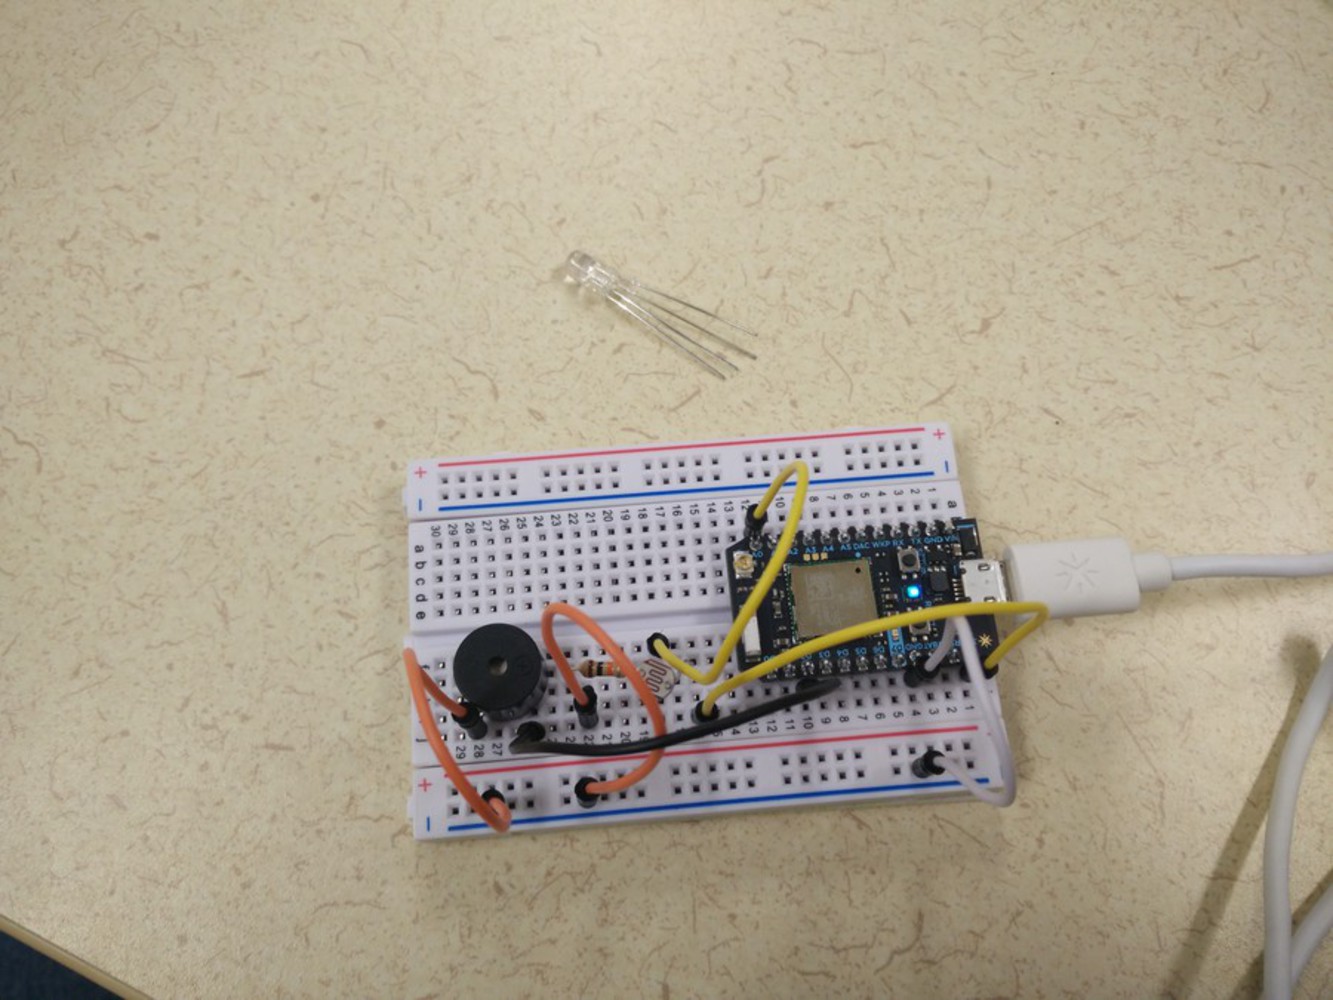
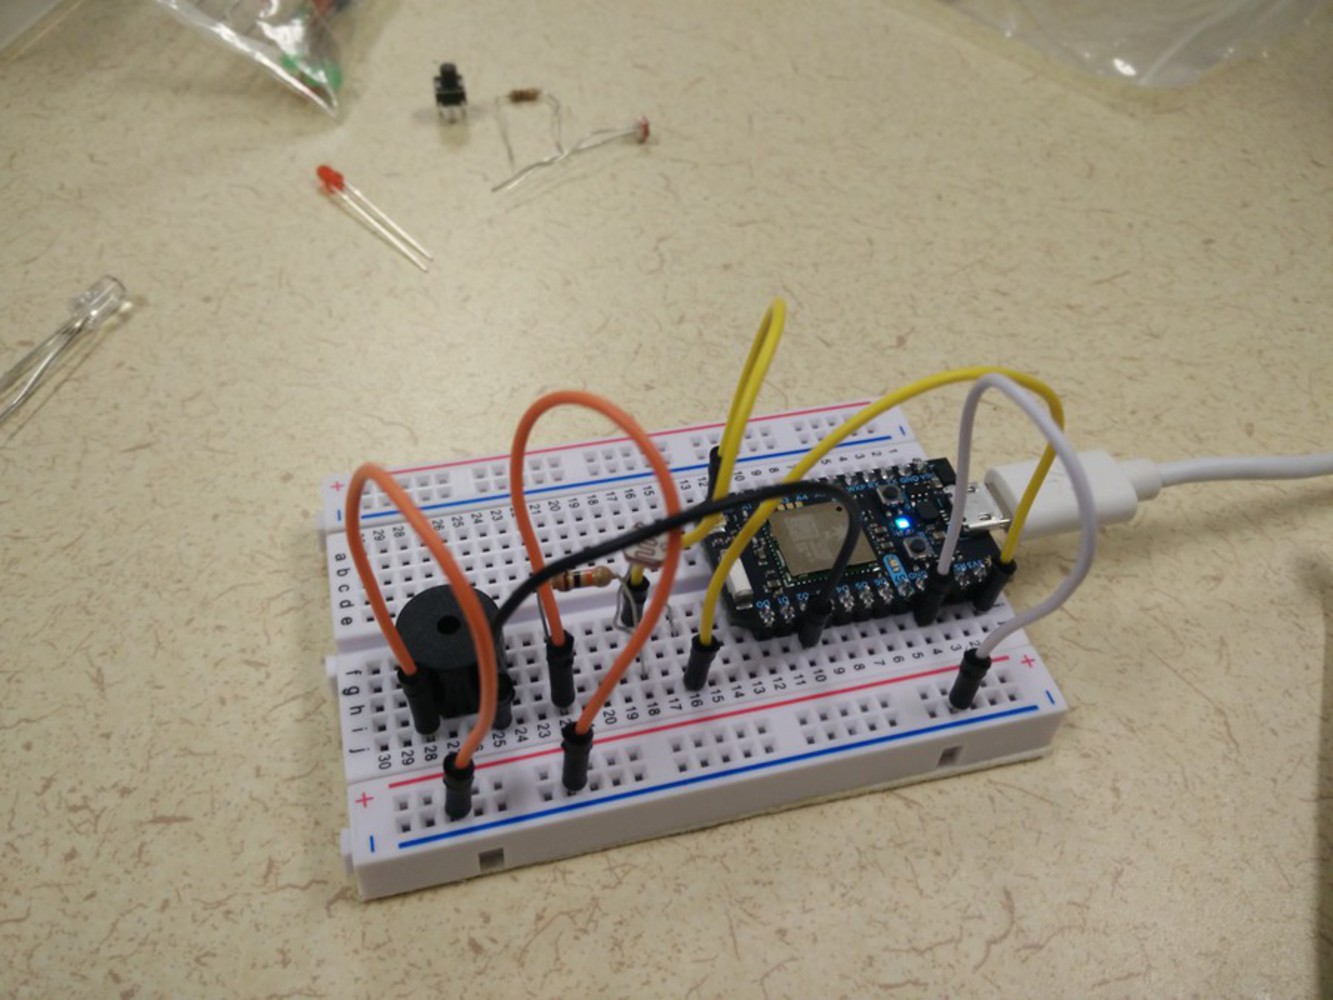
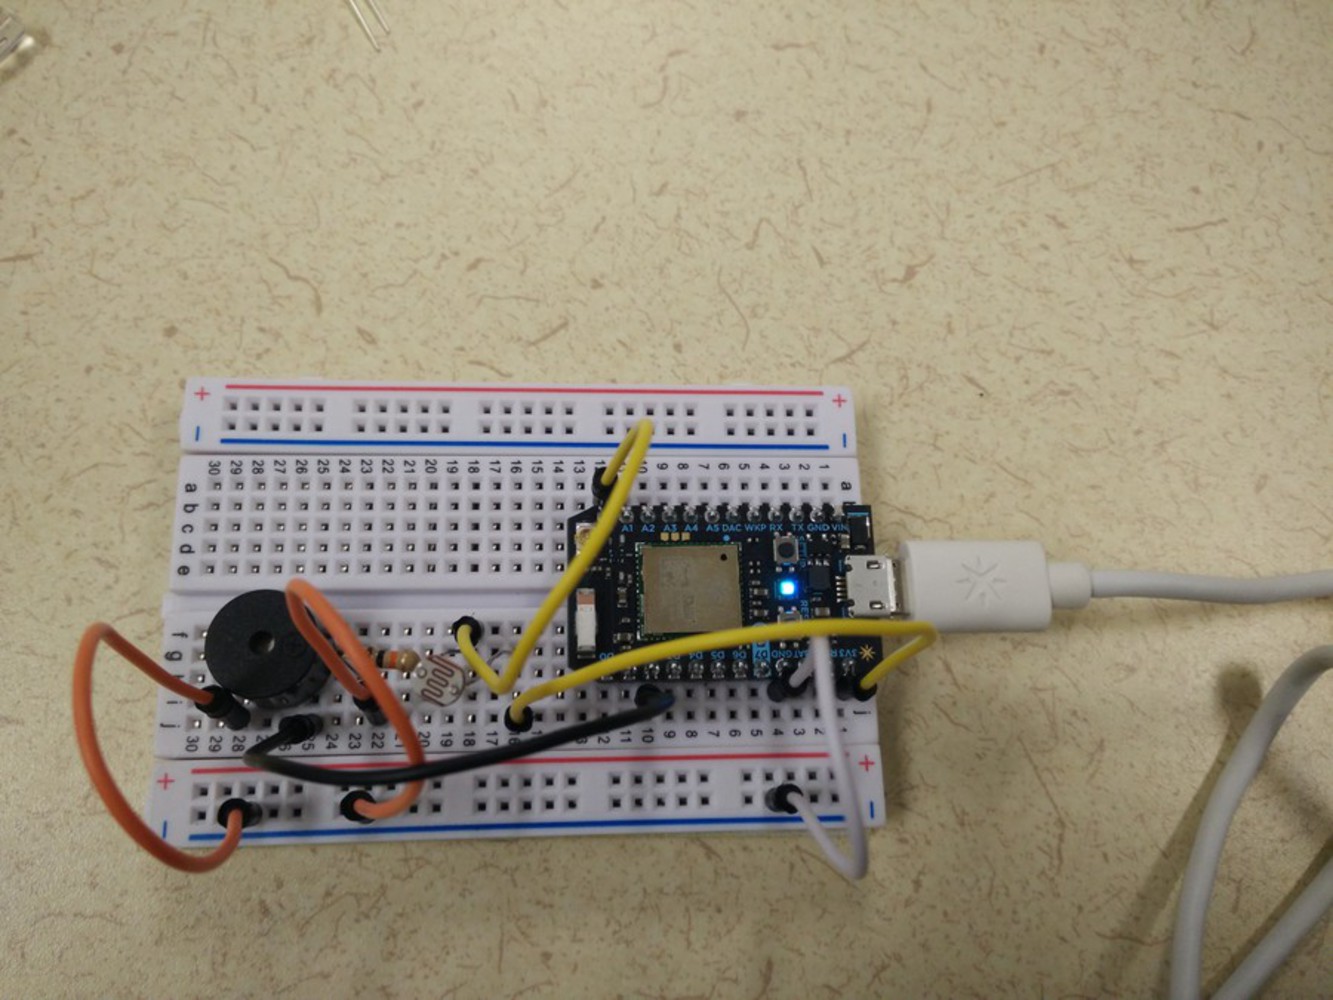
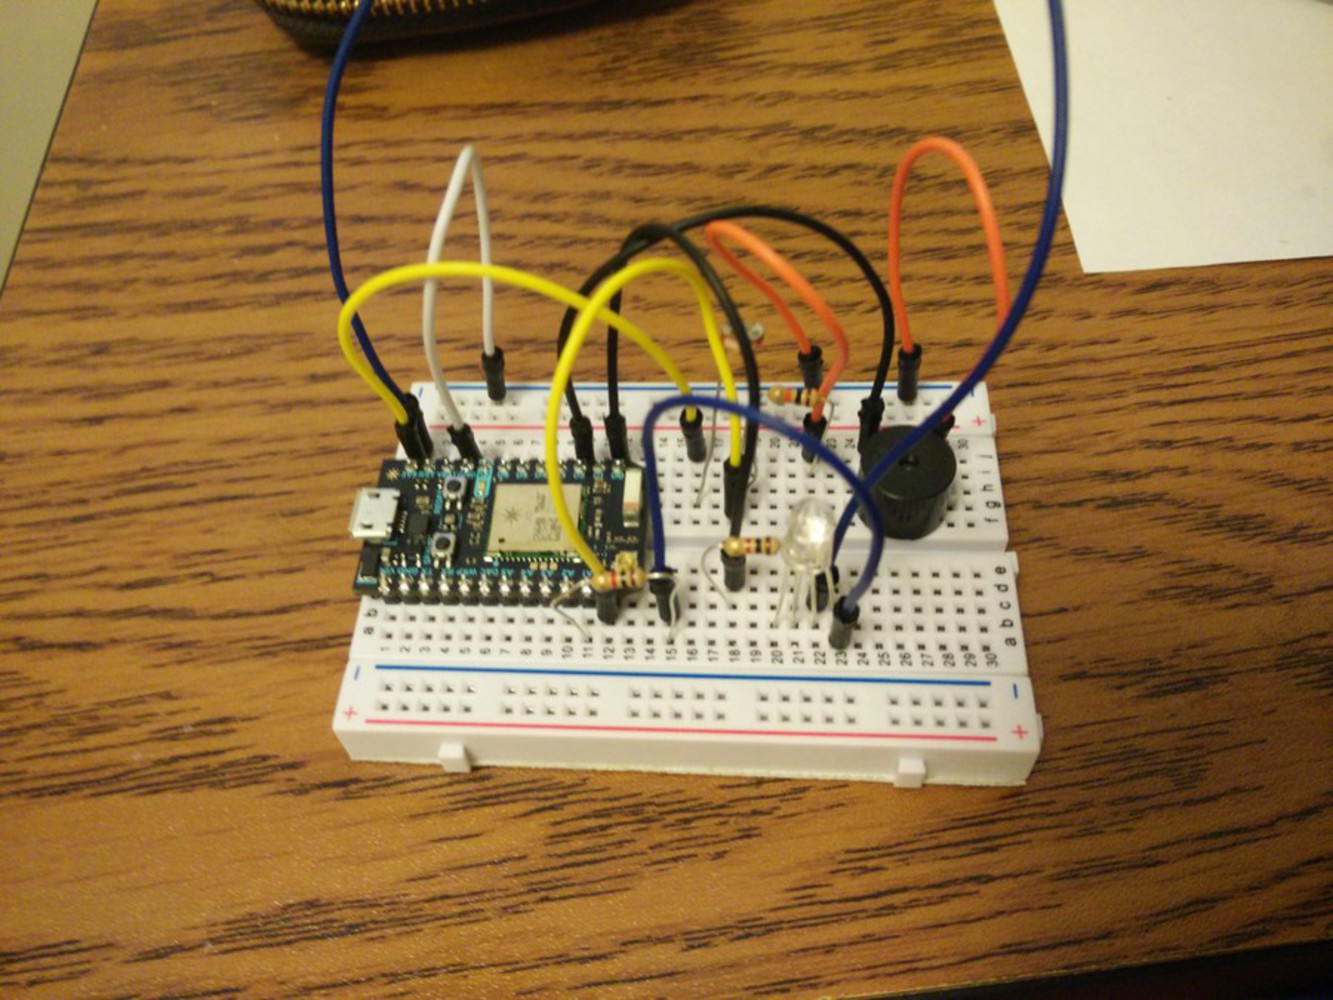
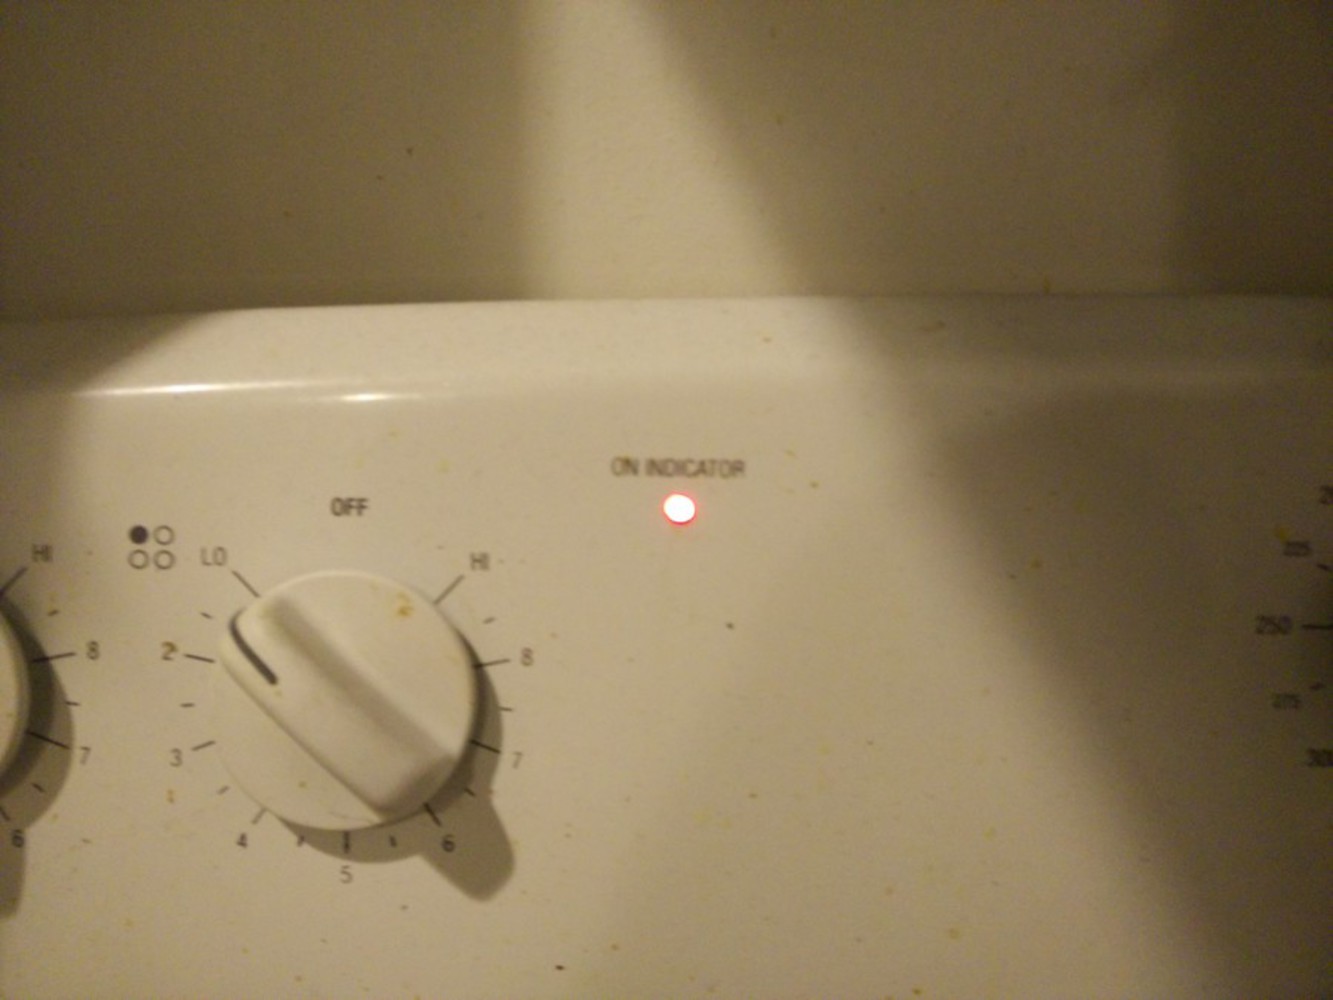
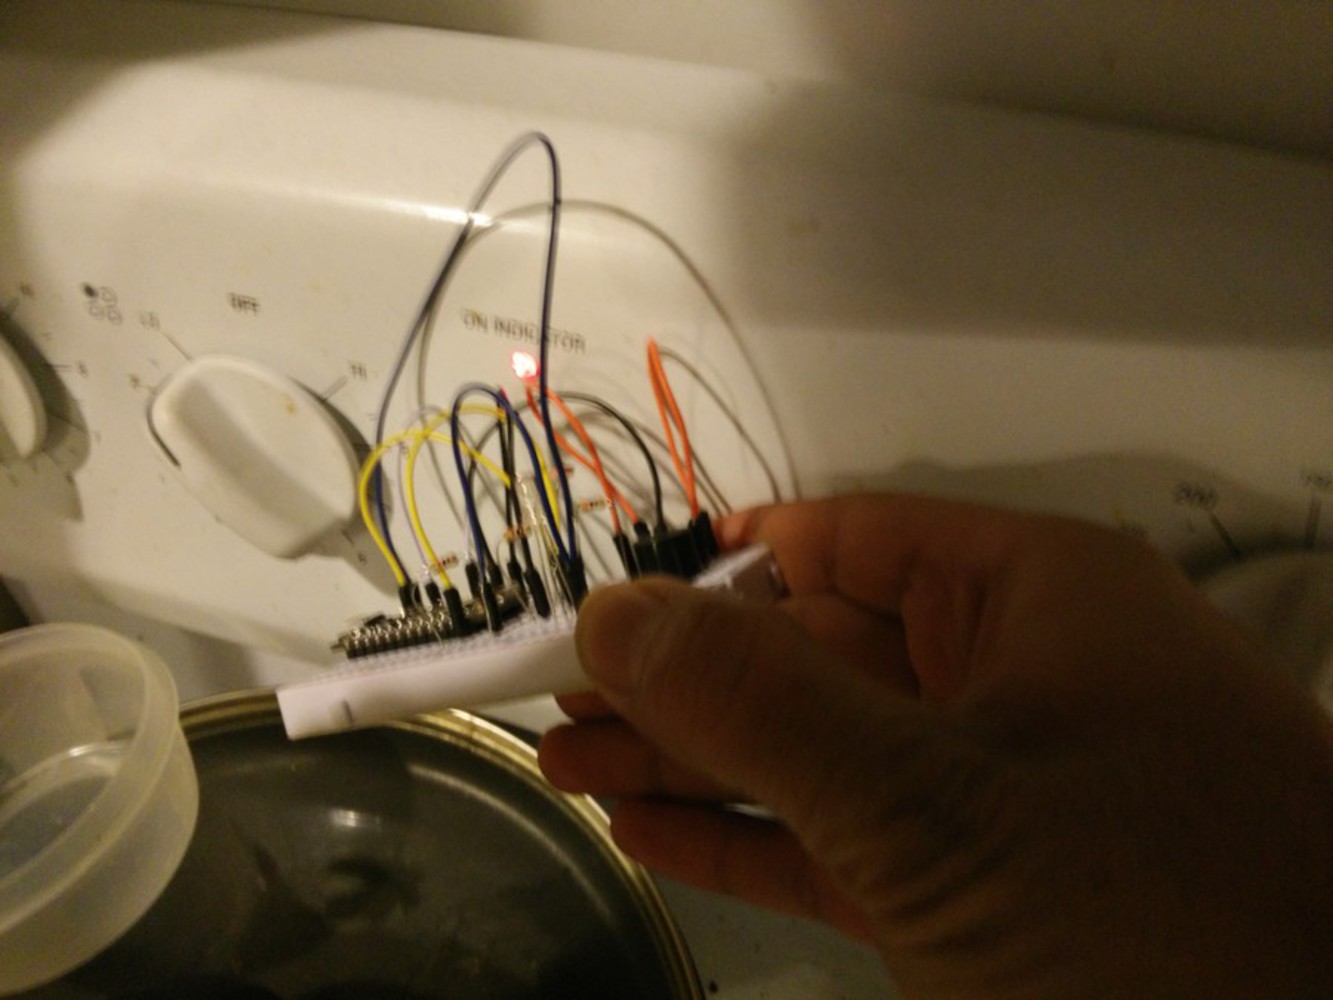
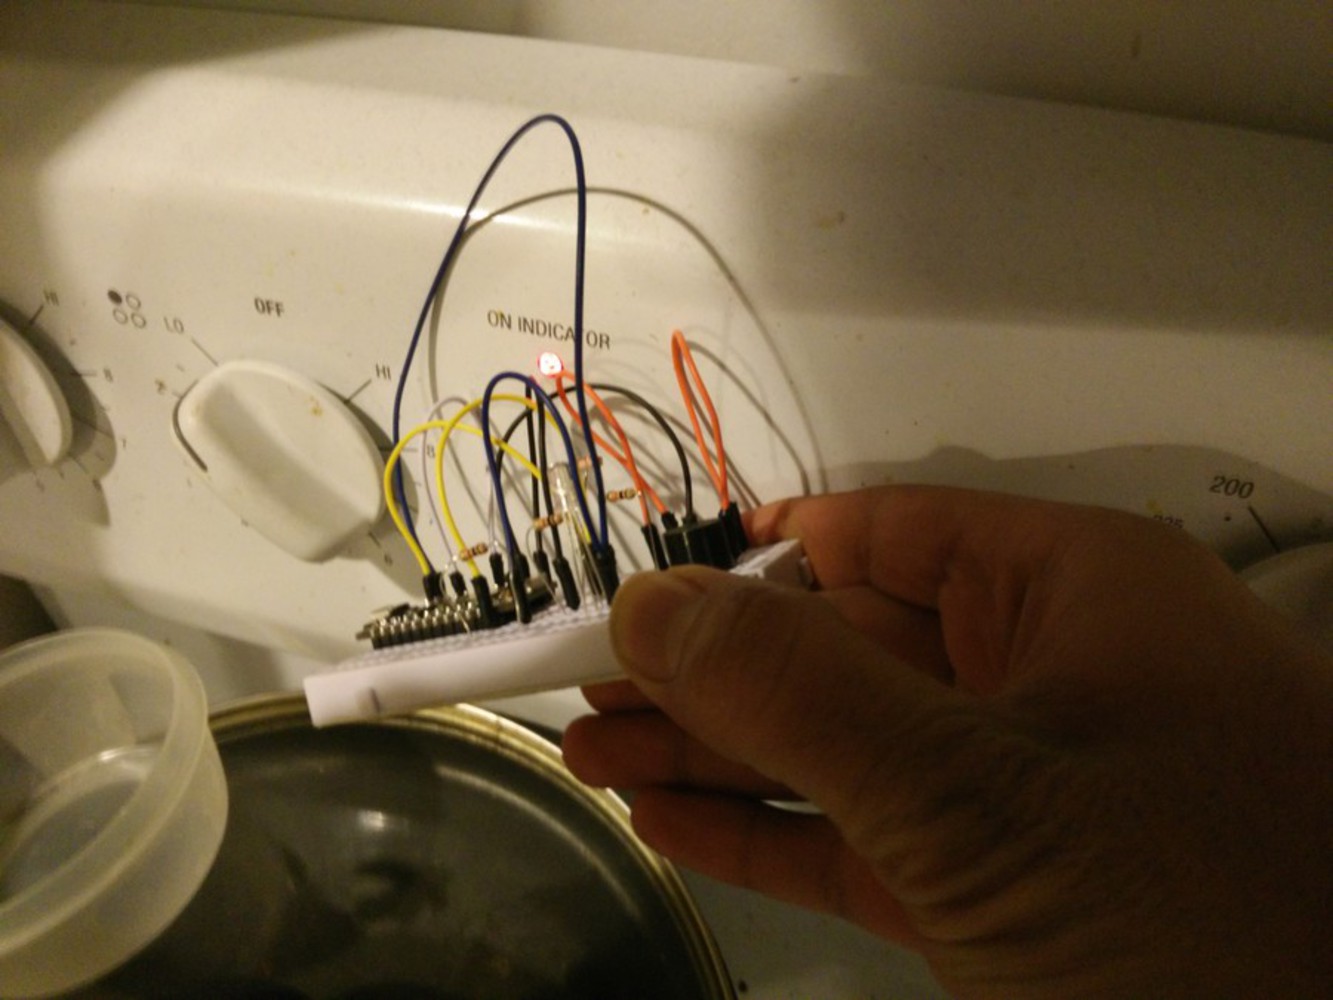
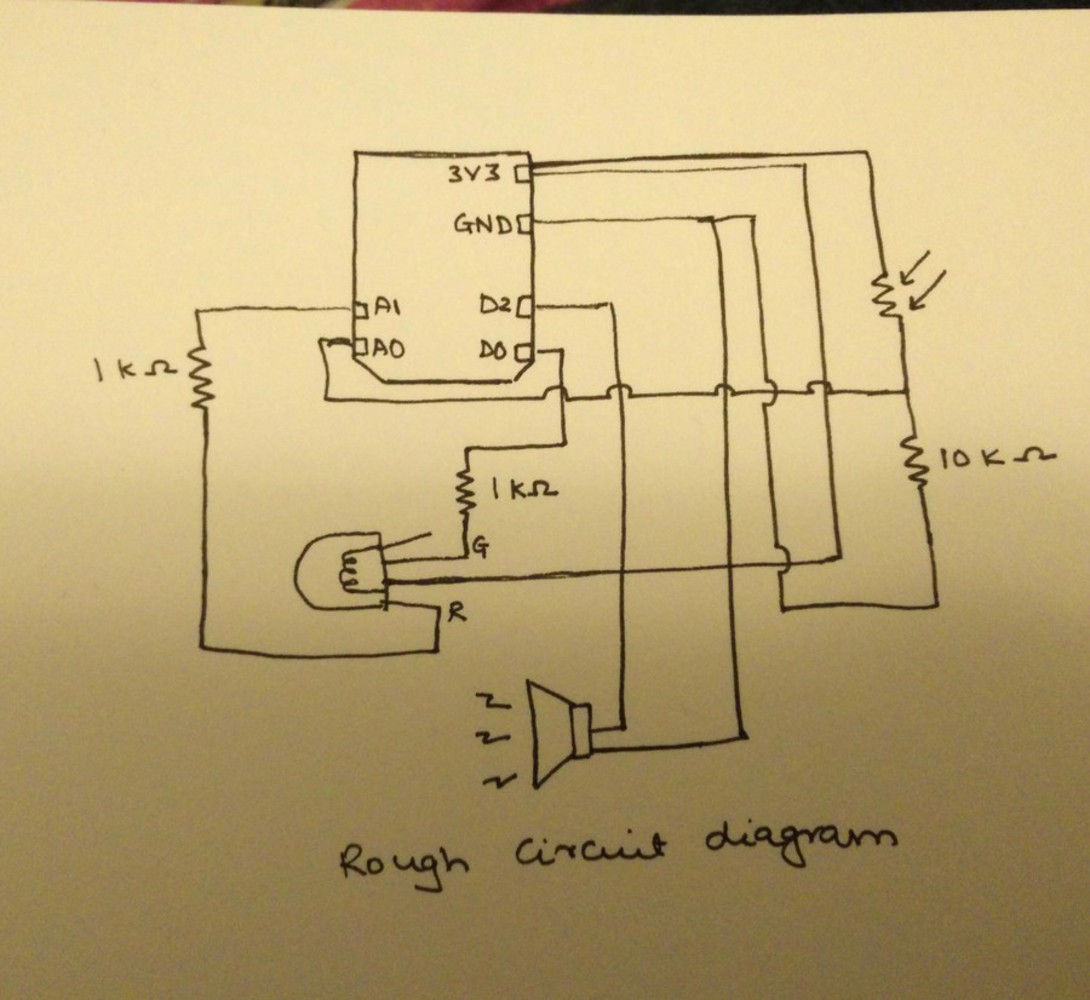
The process I followed to develop this device was iterative in nature. There were 3 major components involved in making of this device: 1. Photosensor (to sense the light falling on the device), 2. Piezo Speaker (to give a sound alert from the device), 3. Color LED to switch between red and green colors. (Red when stove is turned on for more than ten minutes and green rest of the times)
I integrated one component at a time. First, I installed the speaker and checked if the code for that was functioning. (Code source: https://learn.sparkfun.com/tutorials/sparkfun-inventors-kit-for-photon-experiment-guide/experiment-5-music-time)
Then
I integrated the photosensor in the circuit and calibrated the code to play
music if the photosensor value crossed a certain threshold. I modified the
above code and integrated it with the photosensor code we used during the
workshop. (https://designingiot.slack.com/messages/help/)
The
only problem I faced was during circuit building which was resolved immediately
after consulting the teacher. After that I integrated the LED and coded to
switch colors as per the condition mentioned above. After all the circuit was
complete, I tested it on the stove and calibrated the threshold for the sensor
to match with the stove light. The device gives a visual alert when the stove
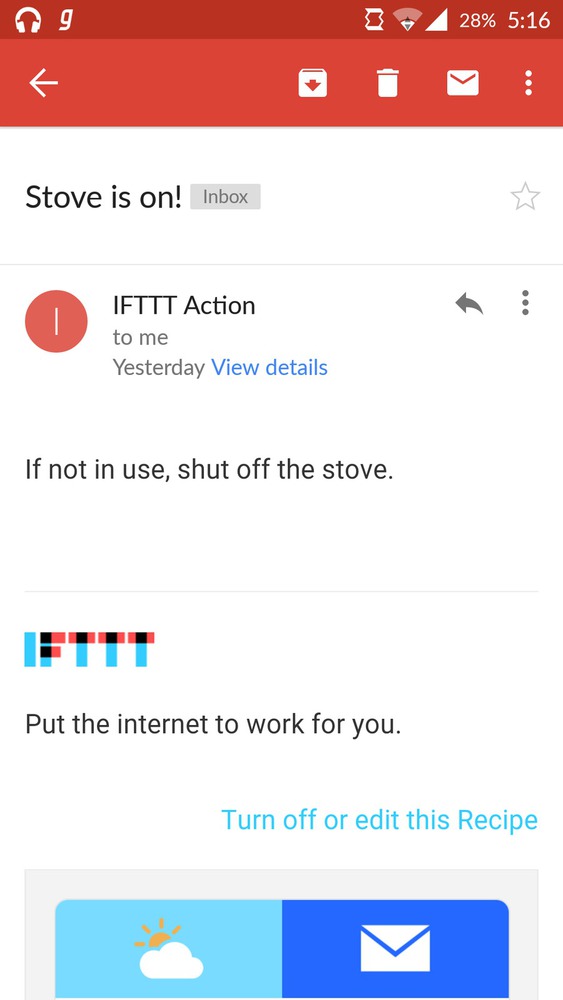
is on by switching the LED to red from green and a push notification/ text
message on your phone. I connected the device to the particle cloud and stored
the threshold as a ‘particle.variable’. Then I used that to make IFTTT recipe
that sends a message to me and my housemates’ phone. The data from the particle is also logged and can be monitored using Spark.publish() on: https://dashboard.particle.io/user/logs
The process taught me several important things about building circuits and writing codes. Even though the device seems to have a lot of functionalities, it is not that hard to put together if done step-wise i.e. integrating one sensor/part at a time. The code also works in a similar panel. I kept adding code as I kept integrating more sensors on the circuit.
I did get the device I wanted but it is bulky to be used on a stove panel. Designing a smaller and more compact device could provide a better user experience. I got hands on approach using a variety of sensors and learnt how to use codes from them (Thanks to the open-source material!). Overall- it was a great experience successfully building my very own house hack.
//Code for music: taken from https://learn.sparkfun.com/tutorials/sparkfun-inventors-kit-for-photon-experiment-guide/experiment-5-music-time)

const int speakerPin = D2;

// We'll set up an array with the notes we want to play
// change these values to make different songs!

// Length must equal the total number of notes and spaces

const int songLength = 18;

// Notes is an array of text characters corresponding to the notes
// in your song. A space represents a rest (no tone)

char notes[] = "cdfda ag cdfdg gf "; // a space represents a rest

// Beats is an array of values for each note and rest.
// A "1" represents a quarter-note, 2 a half-note, etc.
// Don't forget that the rests (spaces) need a length as well.

int beats[] = {1,1,1,1,1,1,4,4,2,1,1,1,1,1,1,4,4,2};

// The tempo is how fast to play the song.
// To make the song play faster, decrease this value.

int tempo = 150;


void setup()
{
  pinMode(speakerPin, OUTPUT);

  // We only want to play the song once, so we'll put it in the setup loop
  int i, duration;

  for (i = 0; i < songLength; i++) // step through the song arrays
  {
    duration = beats[i] * tempo;  // length of note/rest in ms

    if (notes[i] == ' ')          // is this a rest?
    {
      delay(duration);            // then pause for a moment
    }
    else                          // otherwise, play the note
    {
      tone(speakerPin, frequency(notes[i]), duration);
      delay(duration);            // wait for tone to finish
    }
    delay(tempo/10);              // brief pause between notes
  }

  //If you want your song to loop forever, place that code in the loop() below.
}


void loop()
{
//do nothing
}


int frequency(char note)
{
  // This function takes a note character (a-g), and returns the
  // corresponding frequency in Hz for the tone() function.

  int i;
  const int numNotes = 8;  // number of notes we're storing

  // The following arrays hold the note characters and their
  // corresponding frequencies. The last "C" note is uppercase
  // to separate it from the first lowercase "c". If you want to
  // add more notes, you'll need to use unique characters.

  // For the "char" (character) type, we put single characters
  // in single quotes.

  char names[] = { 'c', 'd', 'e', 'f', 'g', 'a', 'b', 'C' };
  int frequencies[] = {262, 294, 330, 349, 392, 440, 494, 523};

  // Now we'll search through the letters in the array, and if
  // we find it, we'll return the frequency for that note.

  for (i = 0; i < numNotes; i++)  // Step through the notes
  {
    if (names[i] == note)         // Is this the one?
    {
      return(frequencies[i]);     // Yes! Return the frequency
    }
  }
  return(0);  // We looked through everything and didn't find it,
              // but we still need to return a value, so return 0.
}int redPin = A1; // RED pin of the LED to PWM pin **A0**
int greenPin = D0; // GREEN pin of the LED to PWM pin **D0**
int redValue = 255;
int greenValue = 255;
// Photo Resistor
int photoCellPin = A0;
// Store the sensor reading
int photoCellReading = 0;
// threshold for being covered
int threshold = 3850;
// hold a state to say if it's covered or not
bool isCovered = false;
// store the time value since it was first covered
long timeSinceFirstThreshold = 0 ;
const int speakerPin = D2;
// We'll set up an array with the notes we want to play
// change these values to make different songs!
// Length must equal the total number of notes and spaces
const int songLength = 5;
// Notes is an array of text characters corresponding to the notes
// in your song. A space represents a rest (no tone)
char notes[] = "cdfda"; // a space represents a rest
// Beats is an array of values for each note and rest.
// A "1" represents a quarter-note, 2 a half-note, etc.
// Don't forget that the rests (spaces) need a length as well.
int beats[] = {1,1,1,1,1};
// The tempo is how fast to play the song.
// To make the song play faster, decrease this value.
int tempo = 150;
void setup()
{ // connect the photo cell reading to the cloud
Particle.variable( "stove_on", &photoCellReading, INT );
Serial.begin( 9600 );
pinMode(speakerPin, OUTPUT);
pinMode( redPin, OUTPUT);
pinMode( greenPin, OUTPUT);
analogWrite( redPin, redValue);
analogWrite( greenPin, greenValue);
}
void loop()
{ // reading from the sensor
photoCellReading = analogRead( photoCellPin );
if (photoCellReading > threshold)
{
analogWrite(redPin, 0);
analogWrite(greenPin, 255);
}
else {
analogWrite(greenPin, 0);
analogWrite(redPin, 255);
}
// see if the sensor is covered
if( photoCellReading > threshold ){
if( timeSinceFirstThreshold == 0 ){
timeSinceFirstThreshold = millis();
}else if( timeSinceFirstThreshold+ 5000 < millis() ){
isCovered = true;
music();}
}
Serial.print( "Sensor reading is: " );
Serial.println( photoCellReading );
delay( 50 );
}
int frequency(char note)
{
int i;
const int numNotes = 5; // number of notes we're storing
// The following arrays hold the note characters and their
// corresponding frequencies. The last "C" note is uppercase
// to separate it from the first lowercase "c". If you want to
// add more notes, you'll need to use unique characters.
// For the "char" (character) type, we put single characters
// in single quotes.
char names[] = { 'c', 'd', 'e', 'f', 'g', 'a', 'b', 'C' };
int frequencies[] = {262, 294, 330, 349, 392, 440, 494, 523};
// Now we'll search through the letters in the array, and if
// we find it, we'll return the frequency for that note.
for (i = 0; i < numNotes; i++) // Step through the notes
{
if (names[i] == note) // Is this the one?
{
return(frequencies[i]); // Yes! Return the frequency
}
}
return(0); // We looked through everything and didn't find it,
// but we still need to return a value, so return 0.
}
void music ()
{
int i, duration;
for (i = 0; i < songLength; i++) // step through the song arrays
{
duration = beats[i] * tempo; // length of note/rest in ms
if (notes[i] == ' ') // is this a rest?
{
delay(duration); // then pause for a moment
}
else // otherwise, play the note
{
tone(speakerPin, frequency(notes[i]), duration);
delay(duration); // wait for tone to finish
}
delay(tempo/10);}
}This course charts the emergence of the now "connected world" to explore the possibilities for future products and connected spaces.
Create an alert system (local and remote alerts) in case you happen to leave your stove on unattended in your house!