Focus Flowers
Made by Kevin Chou, Shih-Hsueh Wang and Yi Sun
Made by Kevin Chou, Shih-Hsueh Wang and Yi Sun
Mechanical flowers that serve as telepresence devices to encourage concentration and focus.
Created: November 30th, 2022
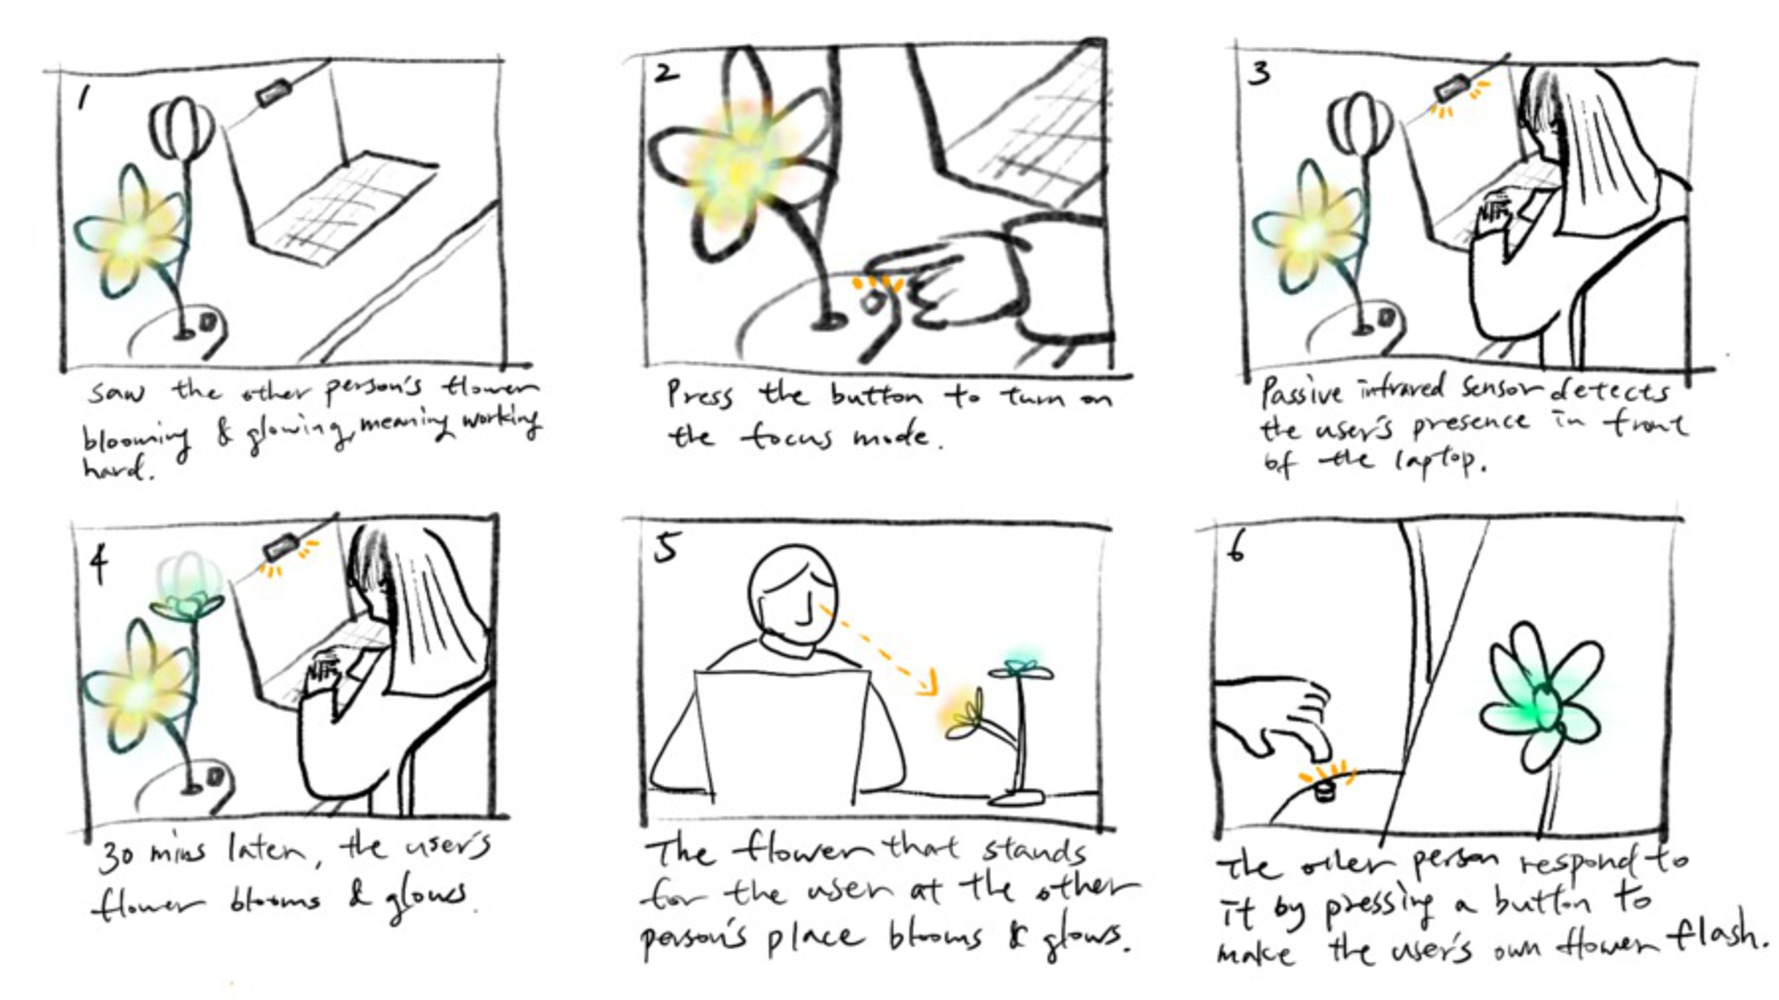
People often work better when they’re with their peers, rather than when they’re alone, so our device is meant to passively indicate and simulate doing work alongside someone, motivating the user knowing that their peers are also working hard. It consists of a set of mechanical flowers with a sonar sensor that detects the user’s presence. As time passes and the user continues to be at their desk, one of the flowers will bloom and glow. The other flower shows the behavior of a partner who also has set of flowers paired with this one, blooming and glowing so that the user’s behavior can be observed elsewhere by them. A button will allow minimalist interaction with their partner through their flower, such as blinking their paired flower’s lights and opening/closing the petals. Two people both possessing a flower set paired to each other would allow them to see when each other are working, and have minimal interactions of encouragement without distracting them too much from their work. When users leave their work area and are no longer detected by the sonar sensor, their flower will gradually close up and their light fade, with the same reflected in the flower representing them in the paired set.
Floower
Floower is a stunning handmade bionic flower developed by Flower lab. It will bloom if user touches its leaf. It is connected with its own application, so user can control its blossom size and speed or change its color on his cell phone, according to his needs. This artificial flower can be used under various scenarios, such as proposing or decorating home. This gives us an idea that artificial flower is an excellent way to present data or some certain events. It can fit naturally into the surrounding environment, and since it is a smart device, it can also be used to deliver some electronic messages.
References: https://floower.io/
In touch
InTouch enables people who are separated by distance to interact with each other “physically” through force-feedback technology. Rollers on one side behave as though they are physically linked to rollers on the other side. It uses touch as a media to let people feel the presence of others and support interpersonal communication.
References:
https://tangible.media.mit.edu/project/intouch/
“The Design and Implementation of inTouch, A Distributed, Haptic Communication System”
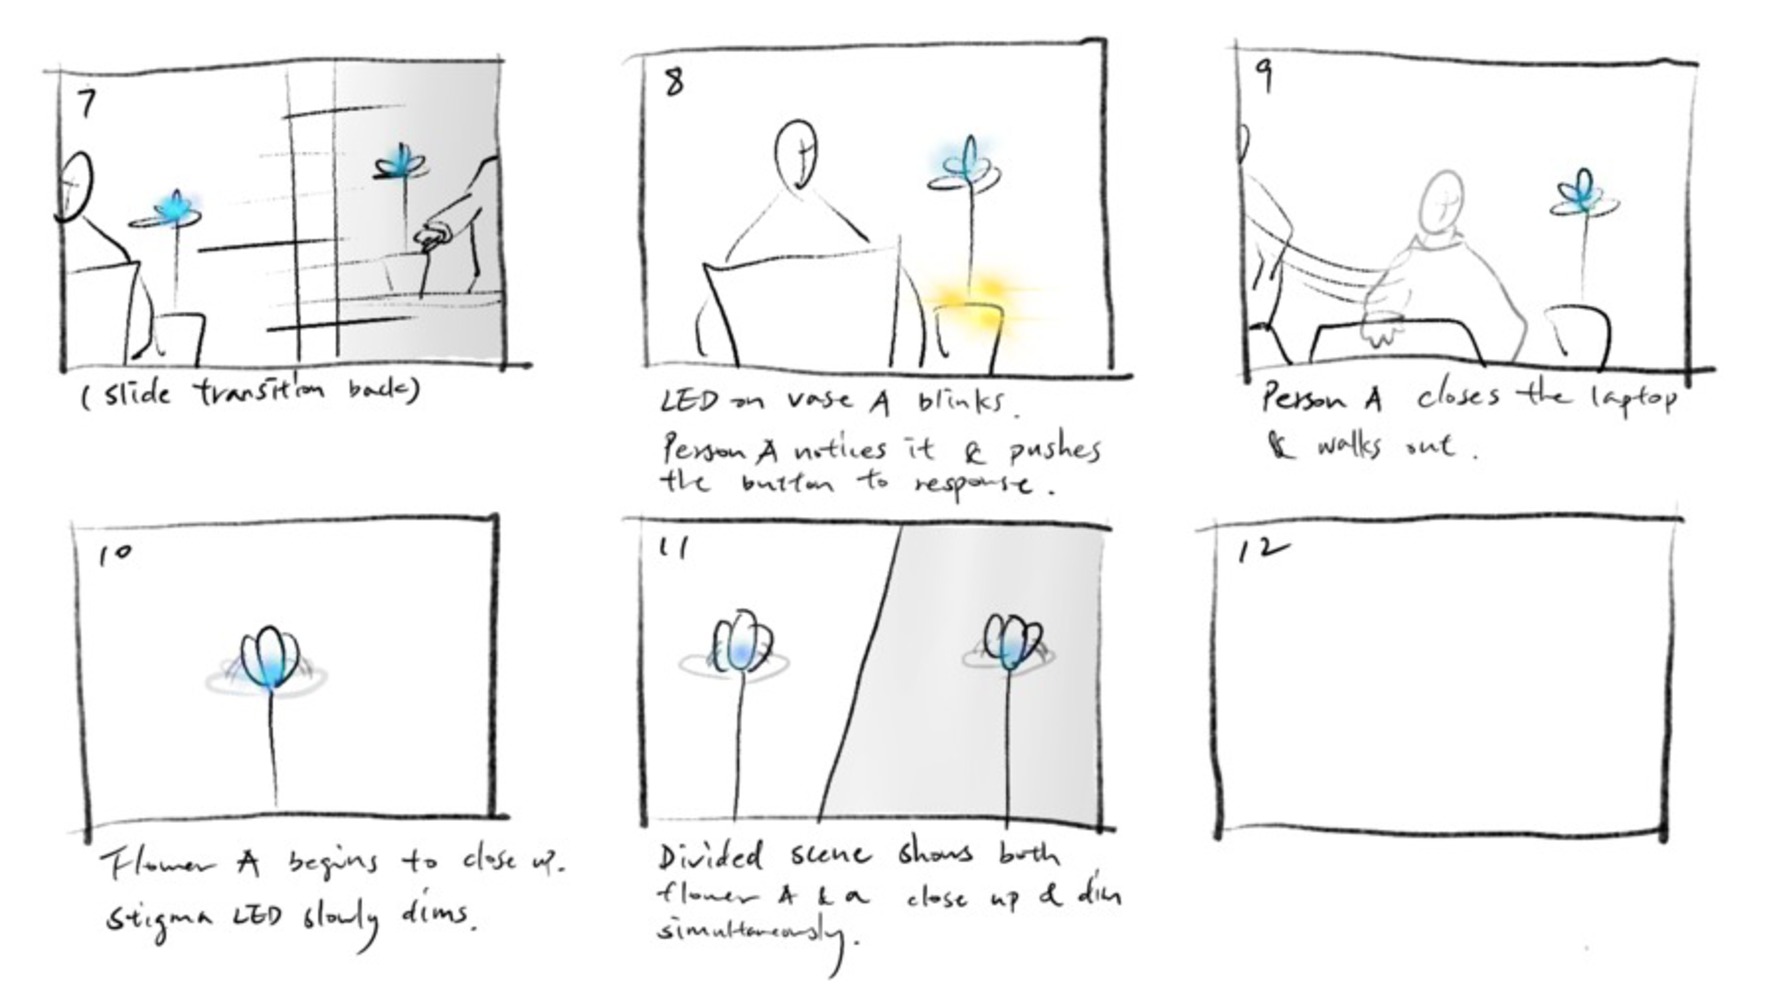
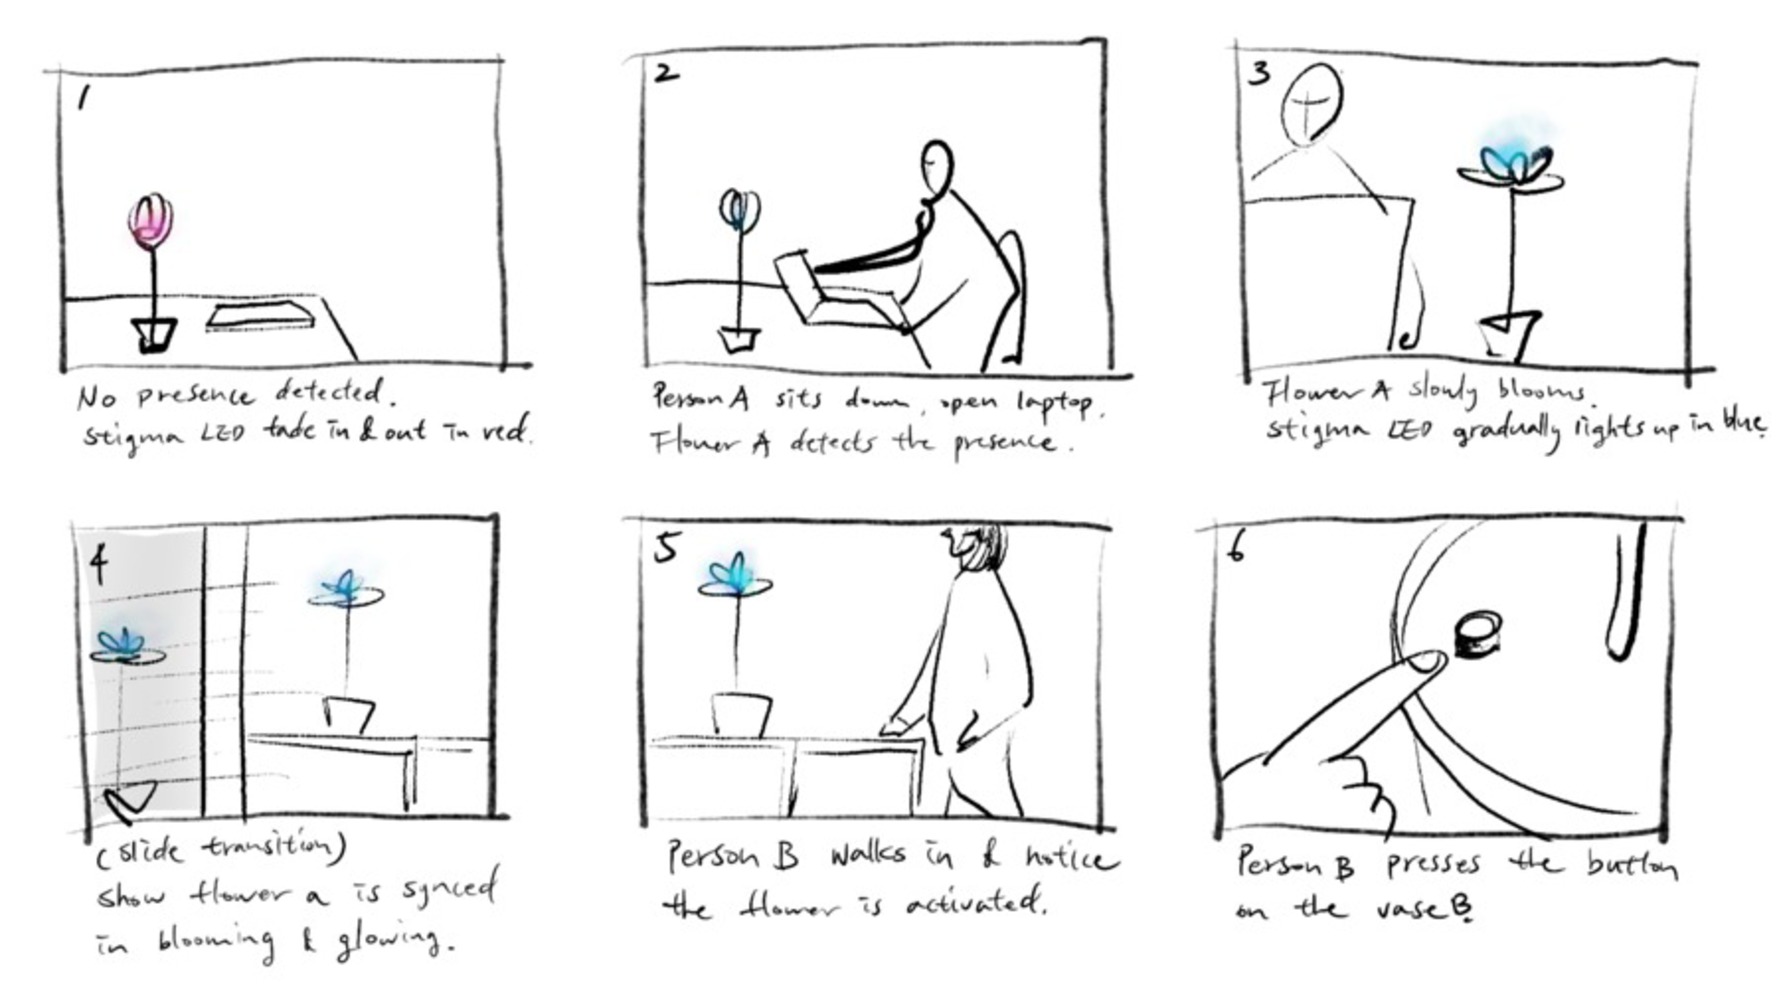
Floower gave us idea that we can use this model to realize more meaningful and useful functions. We decided to apply the artificial flower to a new scenario, using it to present user's focusing time and passing it to another user, enabling interactions between them. We created a model and built a mechanical flower using 3d printing. The following is the concept sketch.
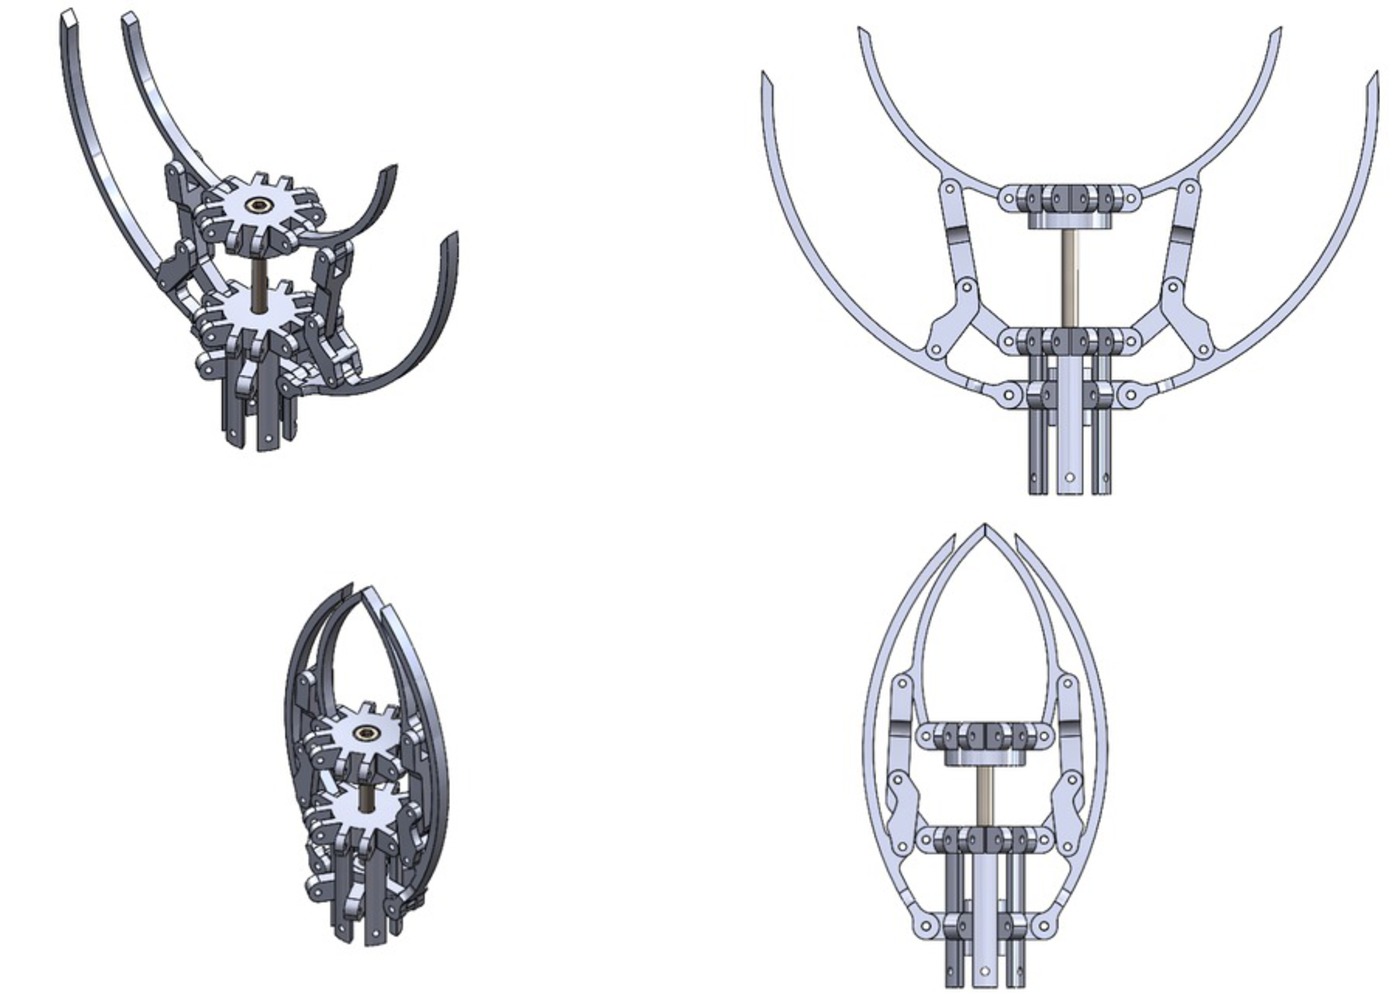
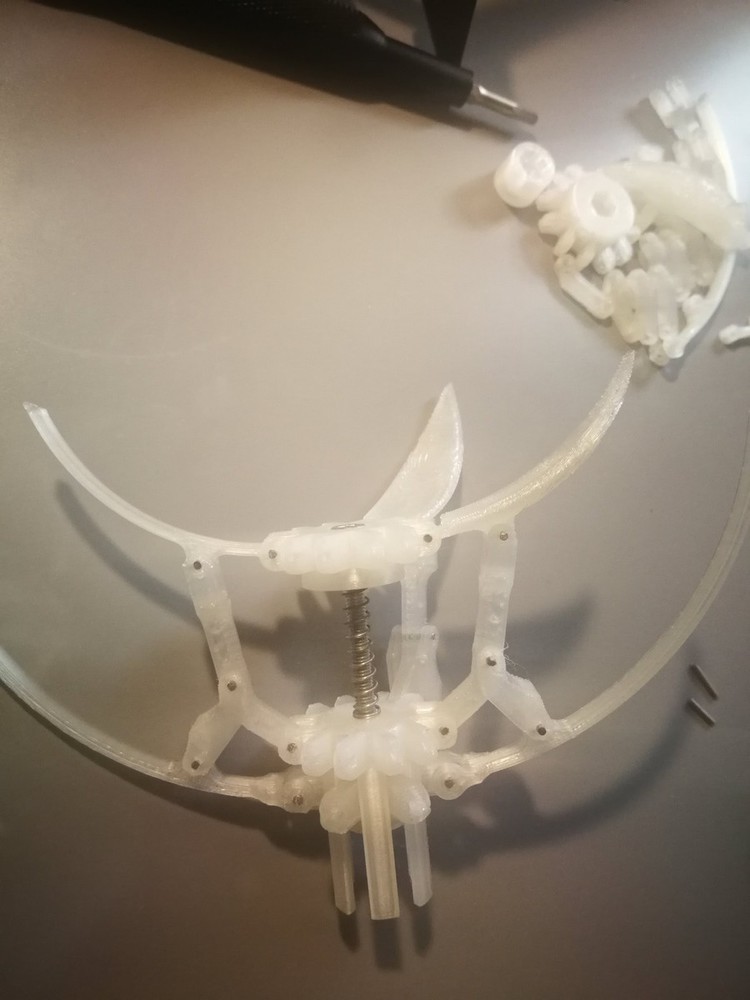
Once we decided to make a mechanical flower inspired by the arduino project by circuit.io (see acknowledgements section) , the design process began with testing different linkage lengths in Solidworks sketches to get the range of motion we wanted, and then printing a 2D slice of the petal linkage to test the motion, range differences compared to the model, tolerances between printed pieces, and tolerances with the steel pins. All the parts were designed from scratch, with an extra layer of larger petals added on the outside. A spring taken from a broken pen was used to have the mechanism function like a single-acting piston, as we knew we would want the flower to be triggered via a string pull from the base, to allow for a stem that was any length/shape. As we knew we would want the flower to light up at some point, natural PLA was chosen for our printing material, with infill reduced wherever possible to increase transparency and diffuse light.
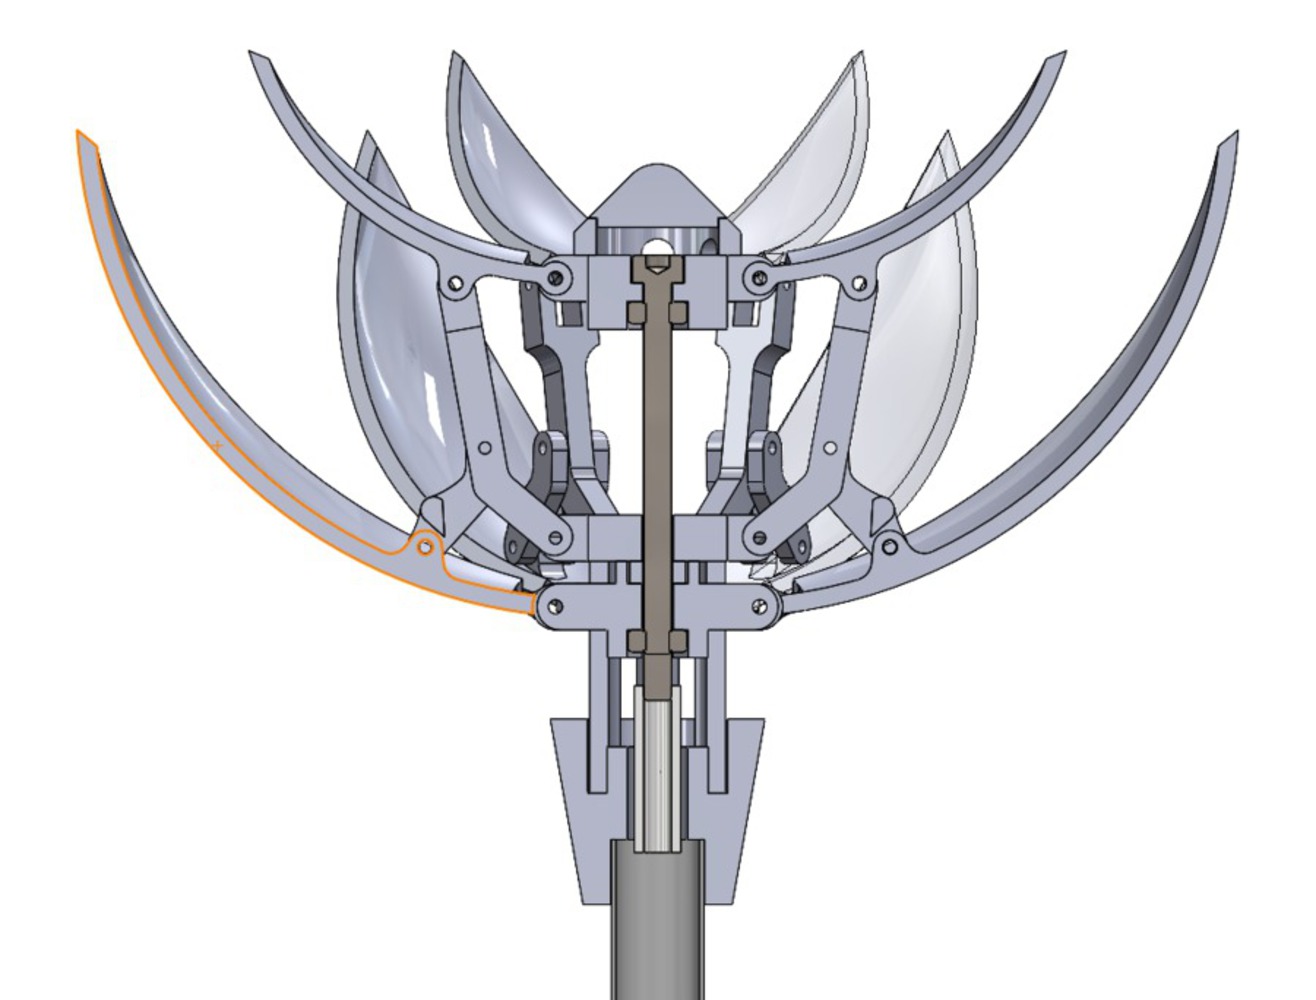
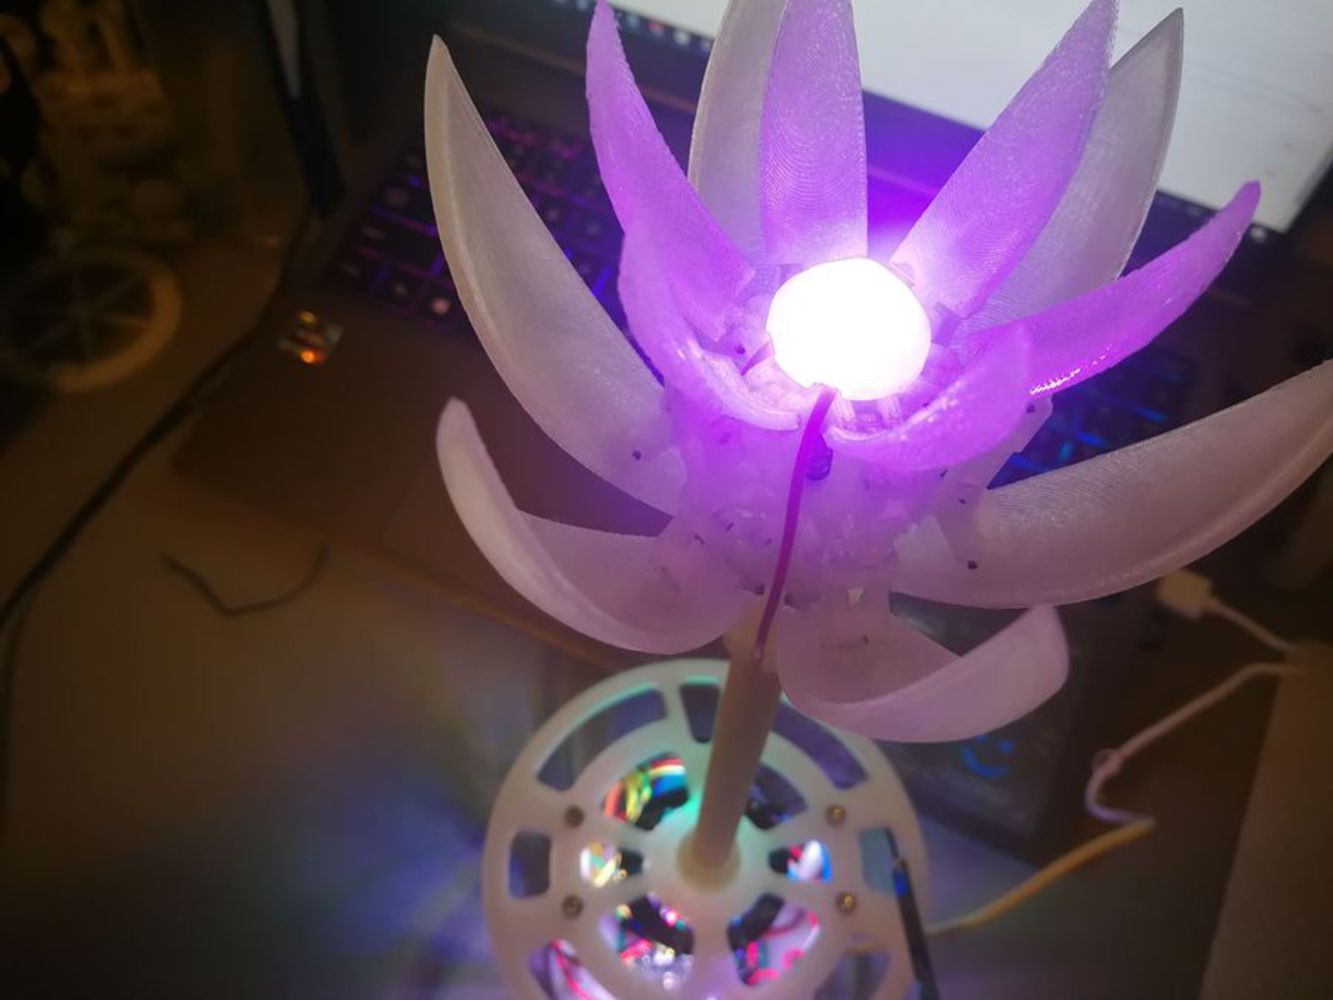
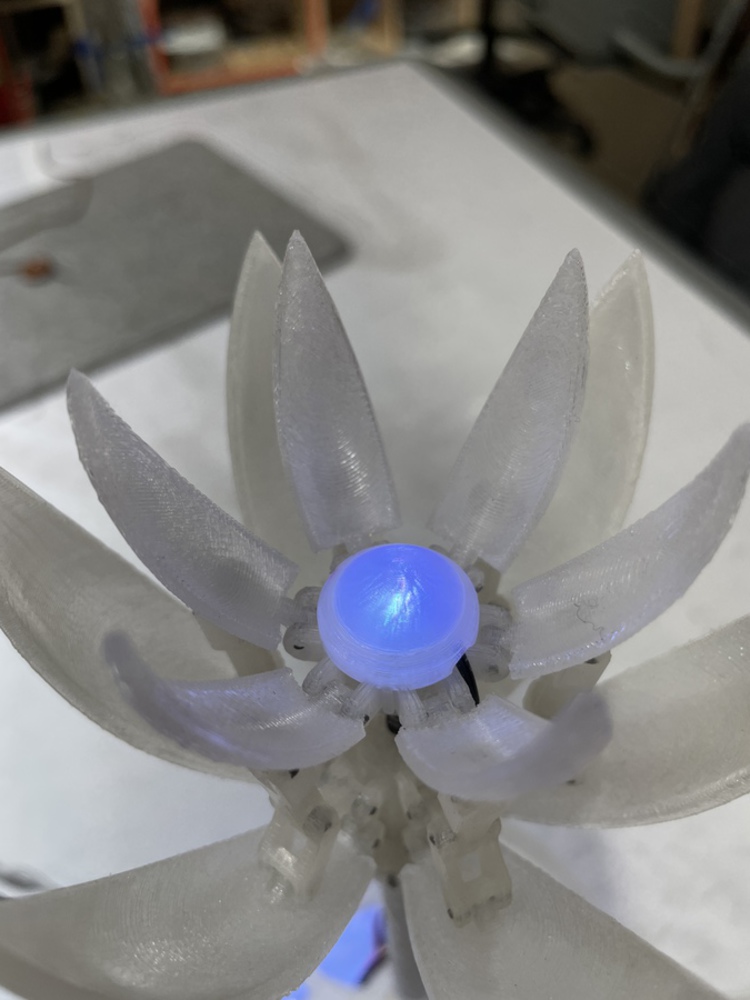
Once enough adjustments were made for the 2D prototype to work well enough, full petals replaced the 2D test slices, and the entire mechanism was mounted on a white straw to act as the stem. A single Flora RGB Smart Neopixel was mounted within the flower, and the flower adapter to the straw was designed to allow the 3 wires from the neopixel to feed from outside into the straw. Unfortunately since the mechanism wasn't designed with housing wires in mind, required some glue, and took a lot of time to assemble, the center pieces weren't replaced with ones with holes, so the 3 wires are still exposed a bit on the outside of the flower.
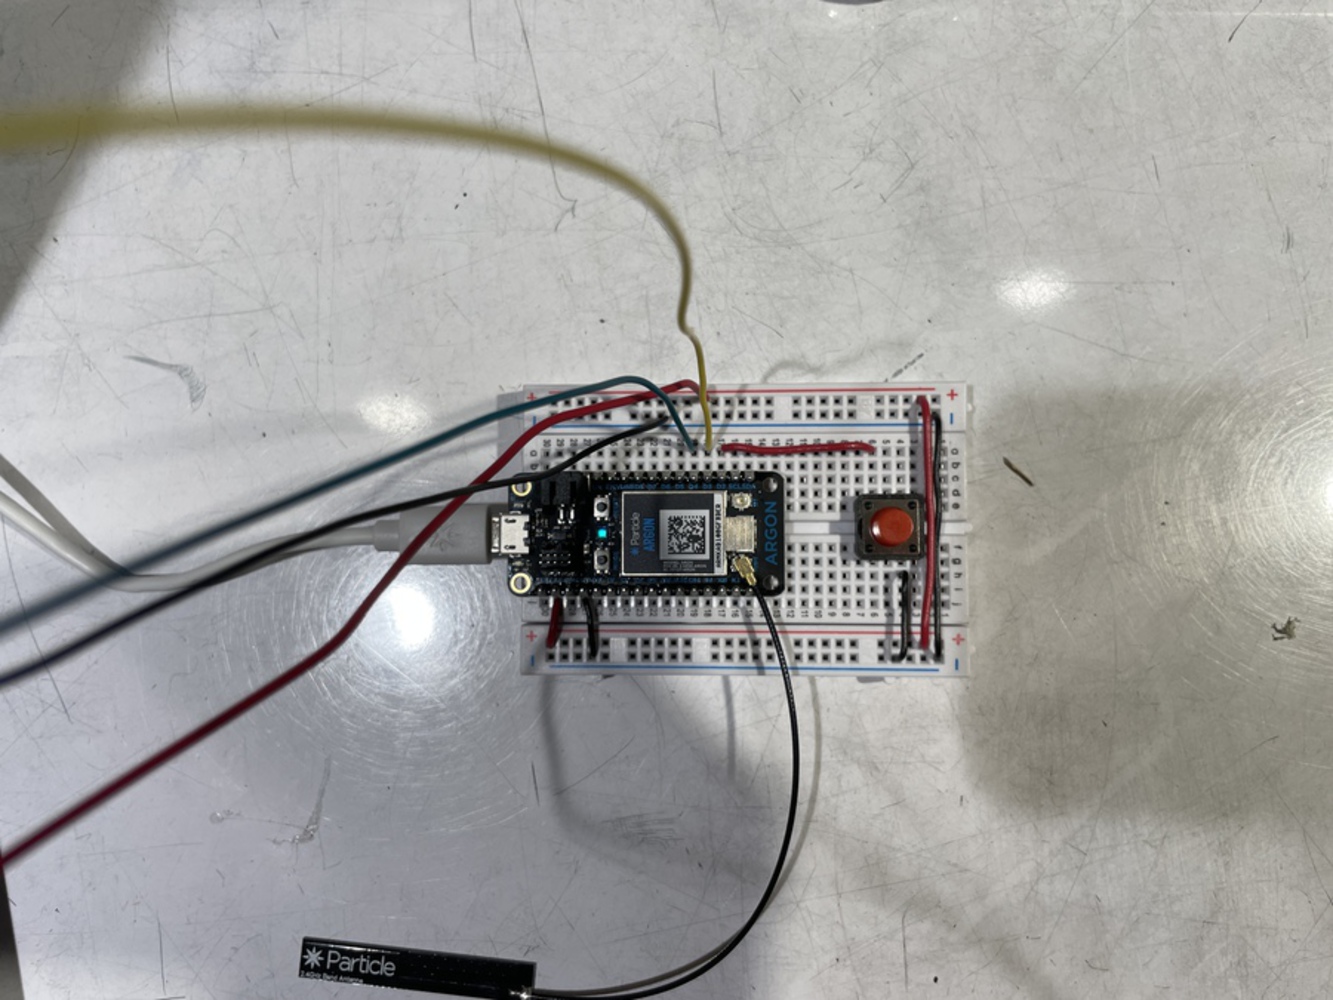
With the flower was complete, we began making a breakout board for the argon as we knew a breadboard was a little too big for the footprint we wanted the base of the pot to have. The breakout board has a single row of female headers for all of the GPIO pins, as well as a power/ground row of headers, with the ground pins soldered on the back, along with the power and ground wires for the dc barrel plug adapter.
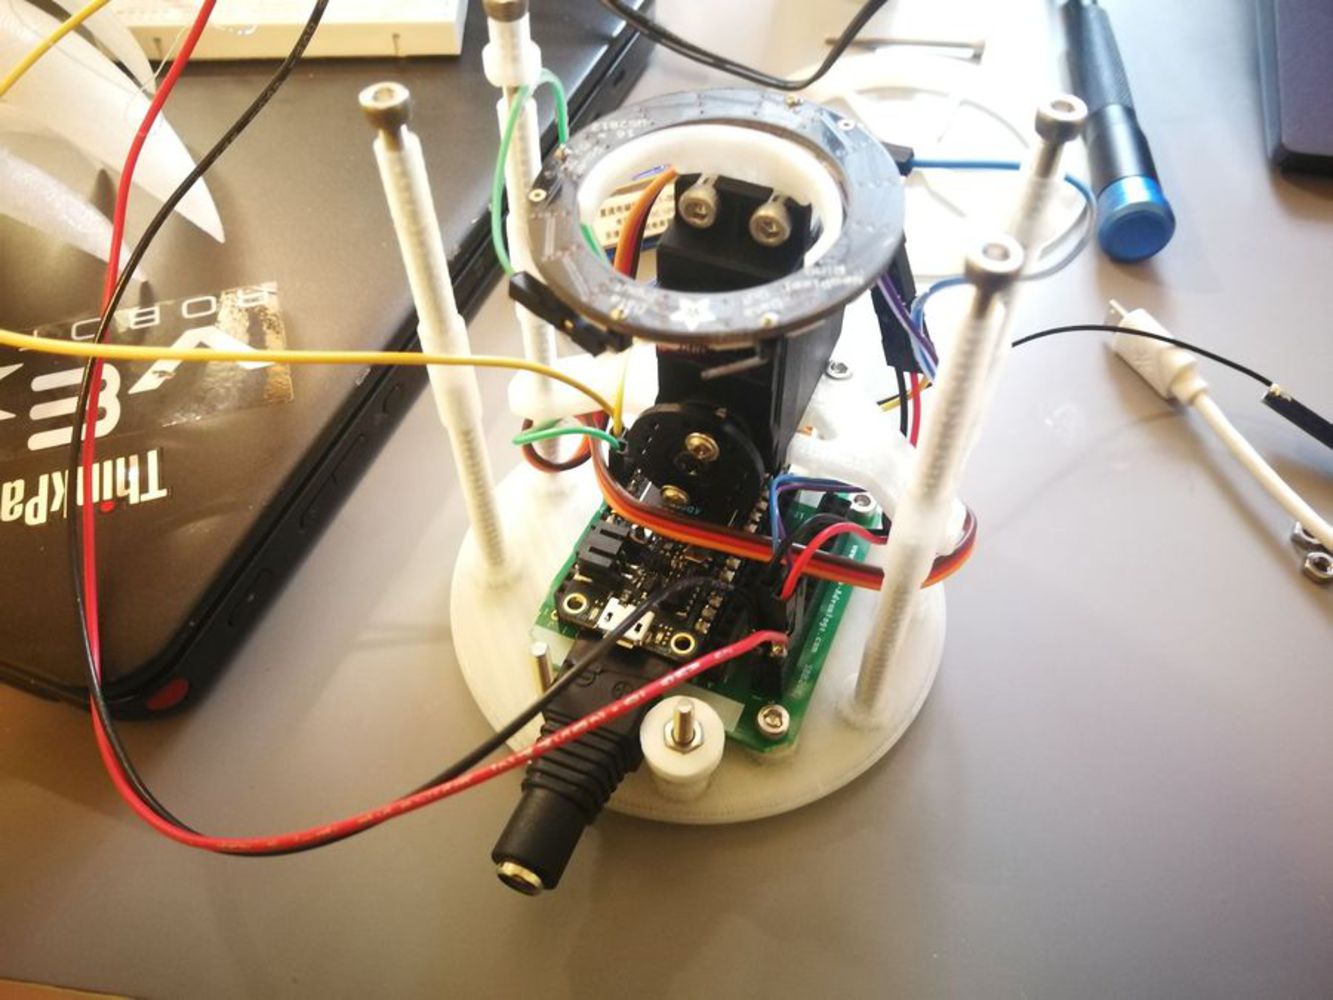
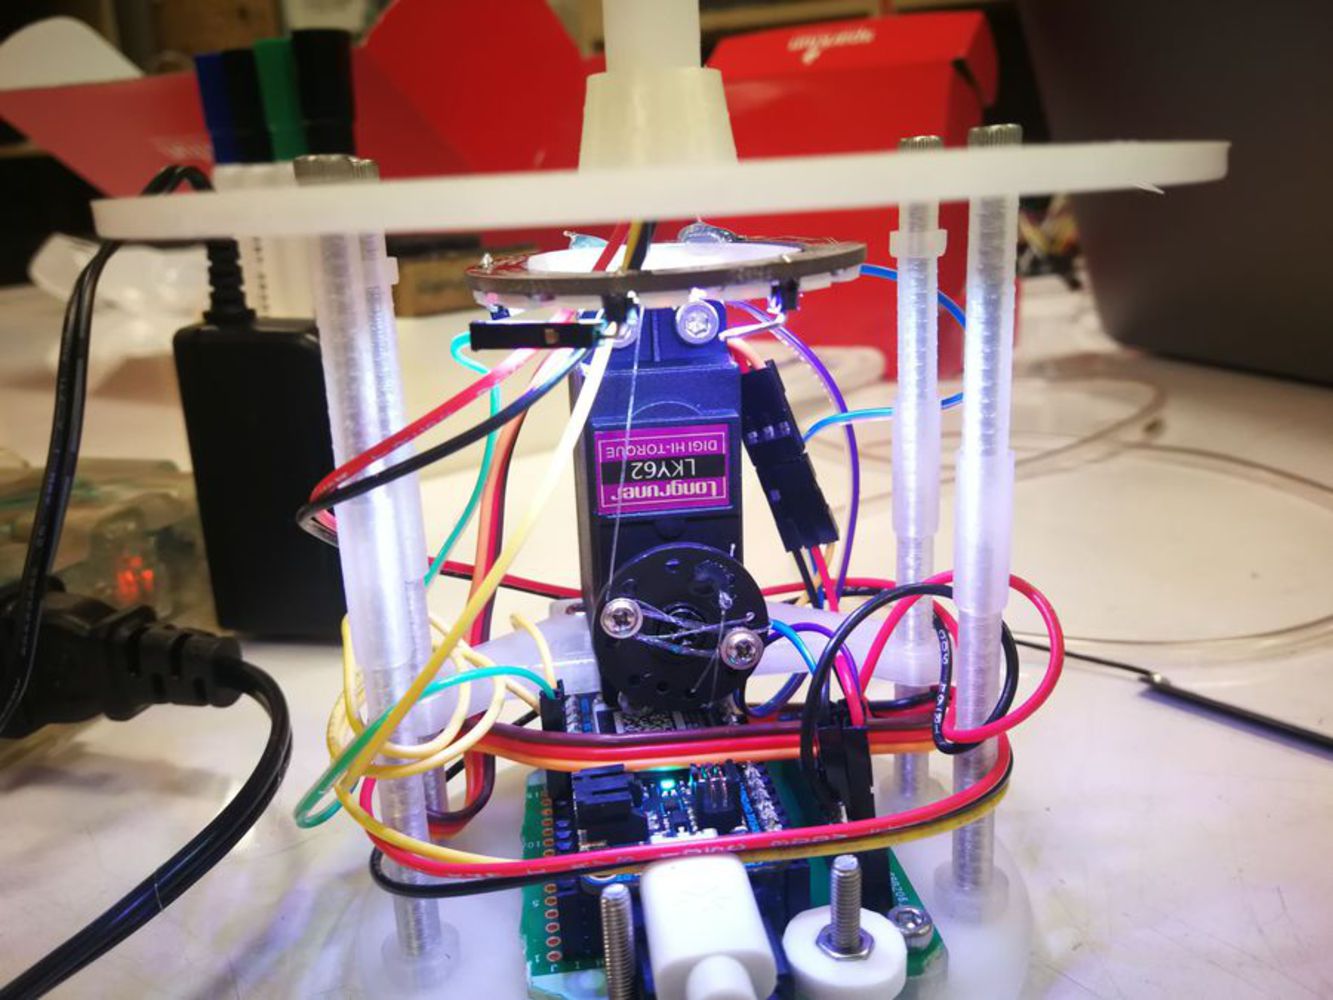
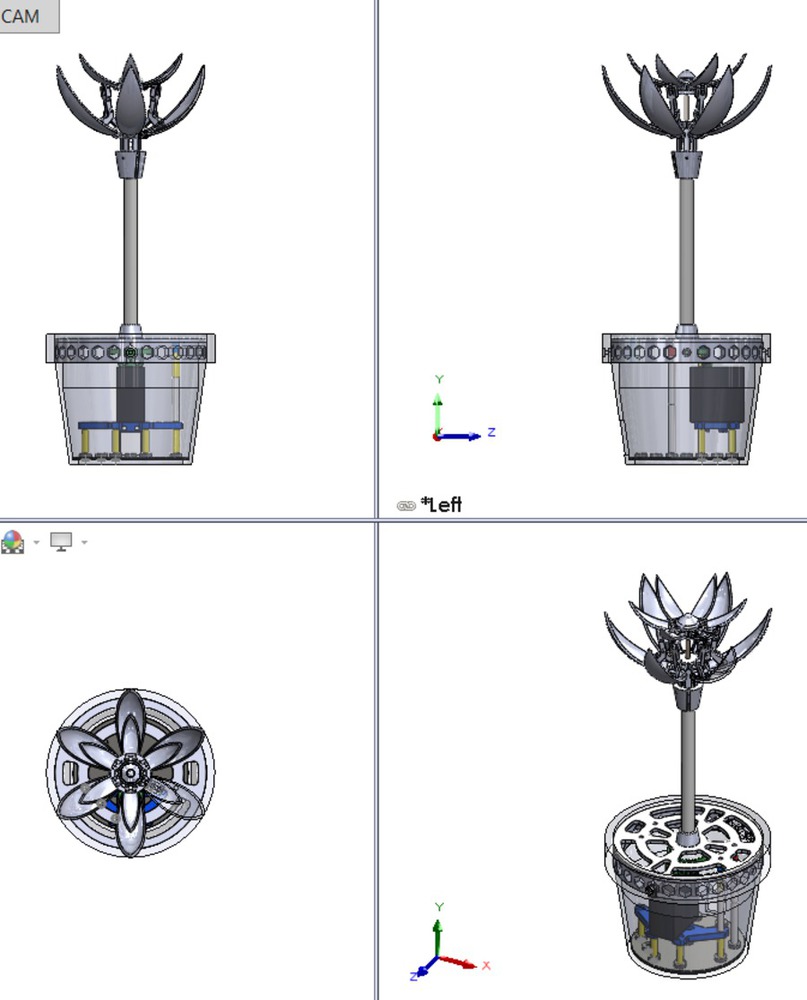
Afterwards, a platform was designed to mount the servo vertically so that the wire to actuate the flower could be centered in the pot while allowing the servo to fit within the footprint, and a neopixel ring holder was designed to mount on top of the servo to illuminate the walls of the flowerpot. We picked a decently large servo rather than using a microservo in case the friction between all the links of all 12 petals was too much for them to hold, and because we didn't want to make the servo work to burn out from working too hard as the closing state of the flower is the default, and requires constant actuation of the servo.
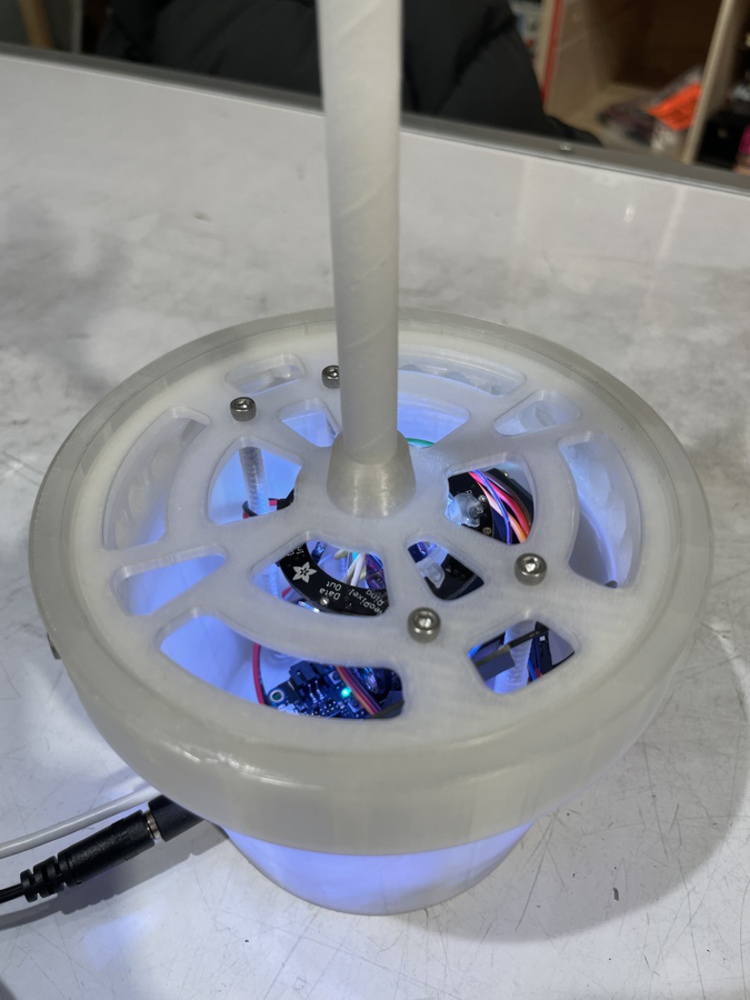
With the servo mounted, some spacers were used to space the top plate above the neopixel ring using 8 sets of long M3 bolts, with a lot of weight relief cut into it to reduce printing time. When attaching the flower to the straw and top plate, the fishing wire had a hard time passing through the straw, so nuts and bolts were used as weights to allow it to fall through the straw, before being removed after the neopixel wires were passed through as well. The wire was wrapped around two screws on the servo horn to allow the string to be pulled down when the servo was actuated, and hot glue was used to hold down the neopixel ring, some of the wires, and the dc barrel plug adapter to ensure that they wouldn't move much.
The last parts to be designed for the flower prototype were for the walls of the flower pot, as we wanted to ensure everything would fit first before it was all closed up. They were modeled after generic terra cotta flower pots, with the main lip at the top printed separately to remove the need for support material and reduce printing time. It also served to reduce the height of the pot, and ensure that the rest of the assembly would have enough space to assemble properly as the barrel plug adapter sticks out and required the whole thing to be slid in at an angle to have enough clearance. The lip itself was further split into 3 pieces- an outer ring with an inner diameter larger than the rest of the pot/stem plate so that it could be slid on at the very end, and two halves of a ring that could be assembled from the sides that would be sandwiched by the stem plate and pot walls and provide mounting points for the ring to bolt into. These two halves had a lot of hexagonal weight relief cut into them as well to reduce printing time since they basically acted like large spacers.
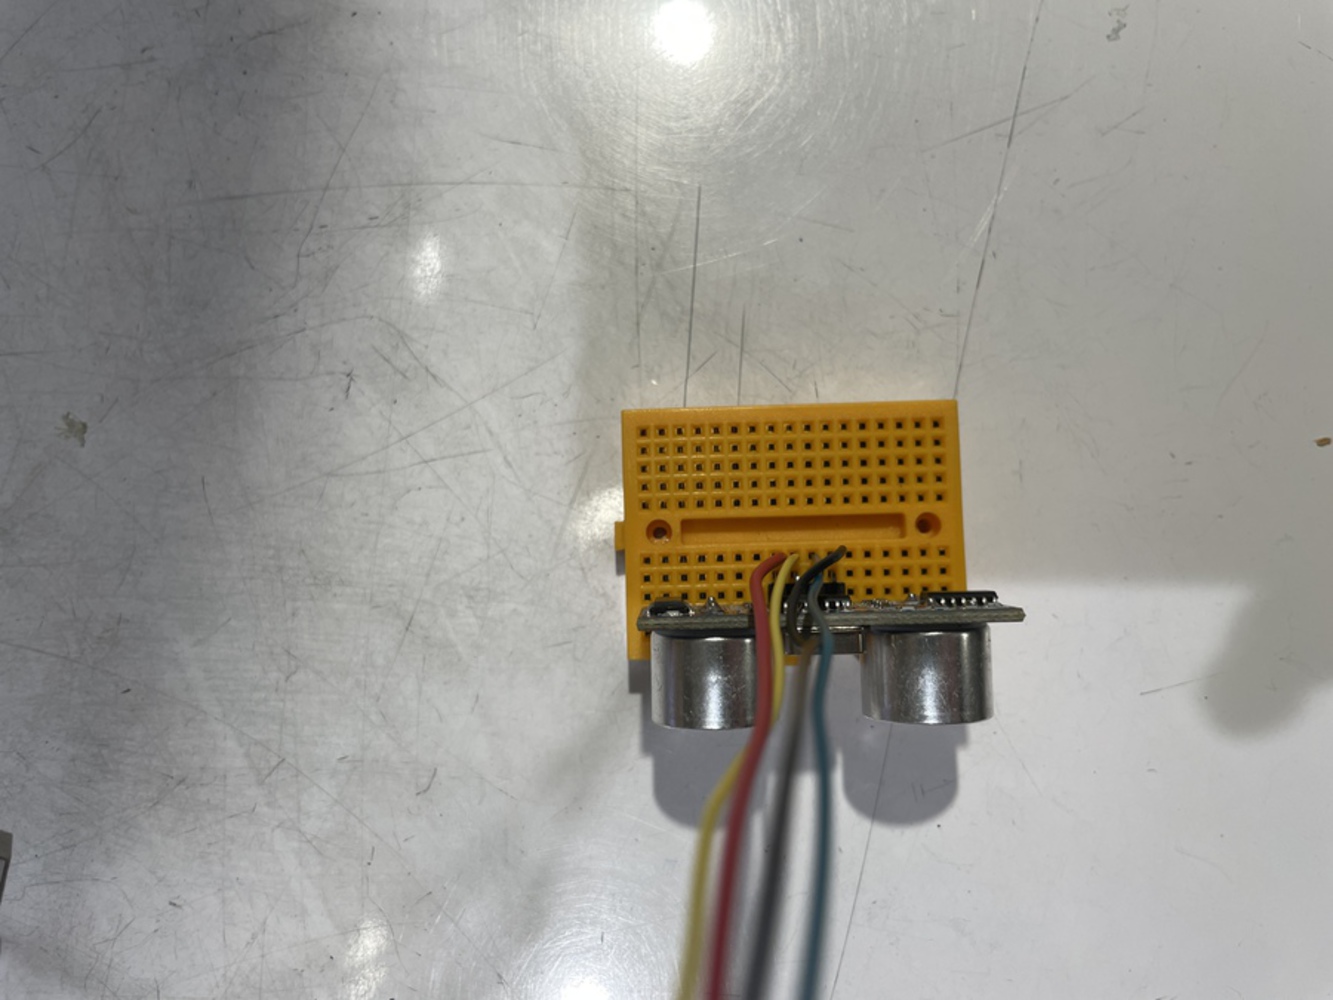
For the sonar sensor part, we first built the basic circuit and got the proper range of distance that represented presence. Then we designed the logic of our focusing flower, it will detect the distance between laptop and user every 30 second, and if it keeps detecting presence for 5 minutes, the flower will open five degrees. In the testing process, we found that ultrasonic sensor sometimes will give some invalid/strange results, such as 98cm. To make our program more flexible, we adjusted the program, and prevented the counter from being interrupted by just a mis-measurement.
We created two webhooks, one is used to pass servo value to the flower to open/close it based on focusing time. The other one is used to notify that button is pushed on one side, the LED on the other side should be lighted up.
Then we integrated the code on two sides, adjusted the range of servo, with proportional to focusing time.
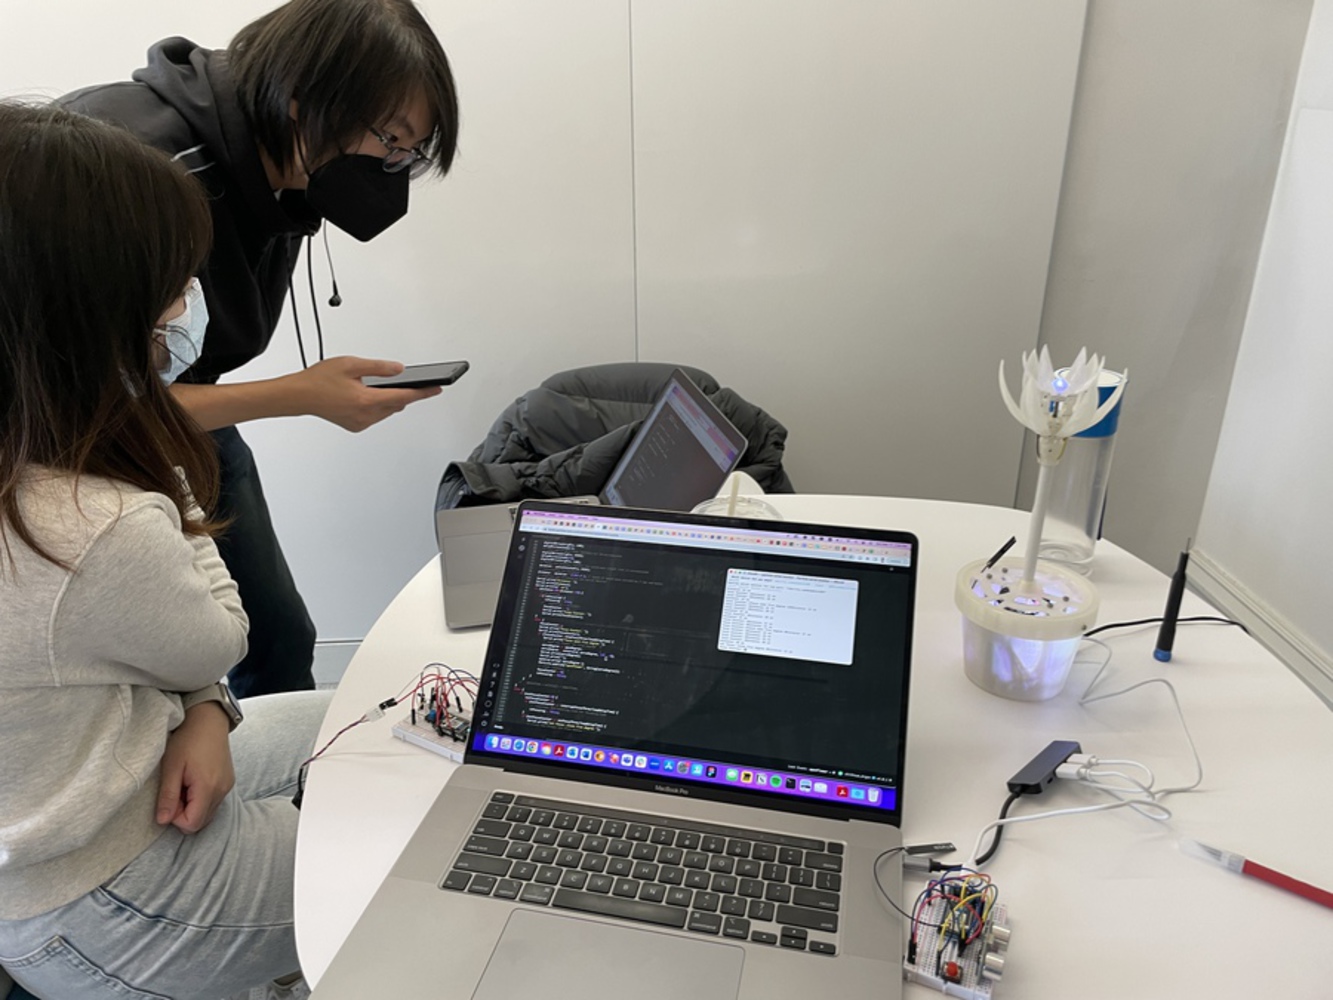
Then we improved the circuit and made it much clearer and simpler, to enable it to fit into a wrapper box which can be nicely put on the laptop.
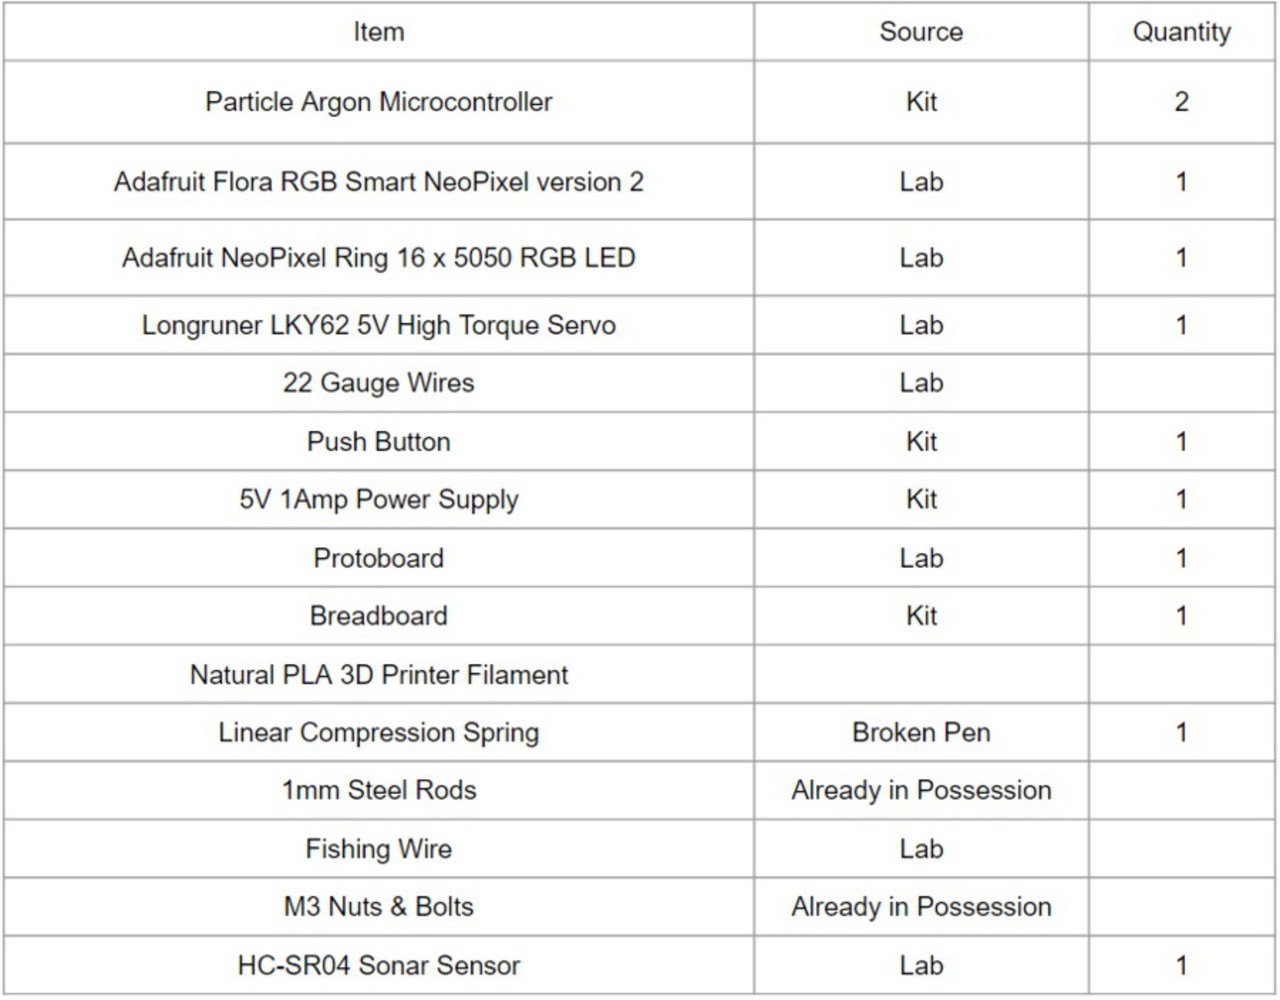
Deliver a functional mock up of the device(s) prototyped using Particle. Document the outcome itself (code, circuit diagrams, photos, design files, 3d models, video demonstrations, etc. as required) and provide a short narrative. This should include: a workflow diagram and a bill of materials (sensors, input devices, actuators, and other components). This documentation should be sufficiently rich to allow anyone to repeat / recreate it.
#include <neopixel.h>

int ledPin = D3;
int buttonPin = D4;
bool doLED = false;

int buttonVar =0;
int buttonValue;
bool LEDvar = false;

Servo flowerServo;
int servoPin = D6;
int servoValue = 0;
#define servoMin  0
#define servoMax  125


#define PIXEL_PIN D5
#define PIXEL_COUNT 1
#define PIXEL_TYPE WS2812B
Adafruit_NeoPixel flowerLED = Adafruit_NeoPixel( PIXEL_COUNT, PIXEL_PIN, PIXEL_TYPE);
#define PIXEL_PIN_POT D7
#define PIXEL_COUNT_POT 16
#define PIXEL_TYPE_POT WS2812
Adafruit_NeoPixel potLED = Adafruit_NeoPixel(PIXEL_COUNT_POT, PIXEL_PIN_POT, PIXEL_TYPE_POT);
int redValue = 40;
int greenValue = 40;
int blueValue = 40;
bool pulseDirection = true;
int pulseDifference = 0;
int pulseMax = 28;

int test = 0;

void setup() {
    pinMode( buttonPin, INPUT_PULLUP);

    flowerServo.attach(servoPin);
    flowerServo.write(servoMin);
    // get servo value based on focusing time
    Particle.subscribe( "servo", servoControl);
    // trigger LED when button is pushed on the other side
    Particle.subscribe( "triggerLED", blinkPotLED);
    Particle.variable(  "servoValue" , &servoValue , INT );
    Particle.variable(  "testValue" , &test , INT );

    flowerLED.begin();
    potLED.begin();
    // can be controlled through cloud
    Particle.function("Red_Value", setRedValue);
    Particle.function("Green_Value", setGreenValue);
    Particle.function("Blue_Value", setBlueValue);

    //lightup flower LED
    flowerLED.setPixelColor(0, redValue, greenValue, blueValue);
    for(int i=0; i<potLED.numPixels();i++){
        potLED.setPixelColor(i, redValue, greenValue, blueValue);
        //potLED.show();
        test++;
    }
    flowerLED.setPixelColor(0, redValue, greenValue, blueValue);
    flowerLED.show();
    potLED.show();
}

void loop() {

    buttonValue = digitalRead( buttonPin );

    if( buttonValue == LOW ){
        if(servoValue == servoMin){
            servoValue = servoMax;
        }else{
            servoValue = servoMin;
        }
        flowerServo. write(servoValue);
    }

    colorPulse(); //for flower tip single pixel, not pot ring
    flowerLED.show();
    for(int i=0; i<potLED.numPixels();i++){
        potLED.setPixelColor(i, redValue, greenValue, blueValue);
        //potLED.show();
    }
    potLED.show();
    delay(1000);

}

// set LED to red
int setRedValue(String command)
{
    // Convert
   redValue = command.toInt();
   flowerLED.setPixelColor(0, redValue, greenValue, blueValue);
   for(int i=0; i<potLED.numPixels();i++){
        potLED.setPixelColor(i, redValue, greenValue, blueValue);
        //potLED.show();
    }
   return 1;
}

// set LED to green
int setGreenValue(String command)
{
    // Convert
   greenValue = command.toInt();
   flowerLED.setPixelColor(0, redValue, greenValue, blueValue);
   for(int i=0; i<potLED.numPixels();i++){
        potLED.setPixelColor(i, redValue, greenValue, blueValue);
        potLED.show();
    }
   return 1;
}

// set LED to blue
int setBlueValue(String command)
{
    // Convert
   blueValue = command.toInt();
   flowerLED.setPixelColor(0, redValue, greenValue, blueValue);
   for(int i=0; i<potLED.numPixels();i++){
        potLED.setPixelColor(i, redValue, greenValue, blueValue);
        potLED.show();
    }
   return 1;
}

// let LED color breathing
void colorPulse(){
    flowerLED.setPixelColor(0, redValue-pulseDifference, greenValue-pulseDifference, blueValue-pulseDifference);
    // for(int i=0; i<PIXEL_COUNT_POT;i++){
    //     potLED.setPixelColor(i, redValue, greenValue, blueValue);
    // }

    if(pulseDirection){
        pulseDifference++;
        if(pulseDifference>=pulseMax){
            pulseDirection = !pulseDirection;
        }
    }else{
        pulseDifference--;
        if(pulseDifference <=0){
            pulseDirection = !pulseDirection;
        }
    }
}

// open/close the flower
void servoControl(const char *event, const char *data)
{
   int newPos = String(data).toInt();
   // Make sure it is in the right range
   // And set the position
   servoValue = constrain( newPos, servoMin , servoMax);

   // Set the servo
   flowerServo.write( servoValue );

   // done
   return;
}

// blink LED, respond to pushed button
void blinkPotLED(const char *event, const char *data)
{
    setRedValue("80");
    flowerLED.show();
    delay(5000);
    setRedValue("40");

    for(int i=0; i<potLED.numPixels();i++){
        potLED.setPixelColor(i, redValue, greenValue, blueValue);
        potLED.show();
    }
   return;
}Code on ultrasonic sensor side: detect distance between laptop and user every 2.5 s. If the user is present or not present for one minute (changeable), pass event to the other side to open/close the flower for a certain degree; keep monitoring button, when button is pushed, trigger event on the other side to light up the flower.
#include <neopixel.h>

#define echoPin D4 // attach pin D2 Arduino to pin Echo of HC-SR04
#define trigPin D3 //attach pin D3 Arduino to pin Trig of HC-SR04
#define PIXEL_PIN D5
#define PIXEL_COUNT 8
#define PIXEL_TYPE WS2812
Adafruit_NeoPixel strip = Adafruit_NeoPixel(PIXEL_COUNT, PIXEL_PIN, PIXEL_TYPE);
int servoPin = A1;
int buttonPin = D2;
Servo myServo;

// variables about ultrasonic sensor distance
long duration;
int distance;

long focusTime;
bool isFocusing;
int buttonValue;
// for interval detection
unsigned long startTime;
unsigned long deltaTime;

long keepFocusThres = 10000; // one minute, 10s for testing
long notFocusThres = 10000; // one minute, 10s for testing
long interruptFocesThres = 10000; // 30 seconds, 10s for testing
long loopDelayTime = 2500;
int openDegree = 20; // open/close degree every time
int servoDegree;
int focusCounter;
int notFocusCounter;
unsigned long lastDetect = 0;
unsigned long now;

void setup() {
    pinMode(trigPin, OUTPUT); // Sets the trigPin as an OUTPUT
    pinMode(echoPin, INPUT); // Sets the echoPin as an INPUT
    myServo.attach( A1 );
    pinMode( buttonPin , INPUT_PULLUP);
    strip.begin();
    strip.show(); // Initialize all pixels to 'off'
    Serial.begin(9600); // Serial Communication is starting with 9600 of baudrate speed
    isFocusing = false;
    focusTime = 0;
    focusCounter = 0;
    notFocusCounter = 0;
    servoDegree = 125;
    myServo.write( 90 );
}

void loop() {
    buttonValue = digitalRead( buttonPin );

    // button pushed, trigger LED
    if( buttonValue == LOW ){
        Particle.publish("remoteCom");
    }
    // detect every "loopDelayTime" ms
    now = millis();
    if (now-lastDetect<loopDelayTime){
        return;
    }
    lastDetect = now;
    // Clears the trigPin condition
    digitalWrite(trigPin, LOW);
    delayMicroseconds(2);
    // Sets the trigPin HIGH (ACTIVE) for 10 microseconds
    digitalWrite(trigPin, HIGH);
    delayMicroseconds(10);
    digitalWrite(trigPin, LOW);
    // Reads the echoPin, returns the sound wave travel time in microseconds
    duration = pulseIn(echoPin, HIGH);
    // Calculating the distance
    distance = duration * 0.034 / 2; // Speed of sound wave divided by 2 (go and back)
    // Displays the distance on the Serial Monitor
    Serial.print("Distance: ");
    Serial.print(distance);
    Serial.println(" cm");
    if (distance<=60) {
        // is focsing
        if(!isFocusing) {
            isFocusing = true;
            focusCounter = 1;
            Serial.print("focus Counter: ");
            Serial.print(focusCounter);
        }
        else {
            focusCounter++;
            Serial.print("focus Counter: ");
            Serial.print(focusCounter);
            if (focusCounter>=keepFocusThres/loopDelayTime) {
                Serial.print("focus open five degree ");
                // open the flower for five degree
                servoDegree -= openDegree;
                servoDegree = constrain( servoDegree, 0 , 125);
                Serial.print(servoDegree);
                Serial.print("");
                myServo.write( servoDegree );
                Particle.publish("openFlower", String(servoDegree));
                // clear counter
                focusCounter = 0;
                isFocusing = false;
            }
        }
    }
    else {
        if (notFocusCounter>0) {
            notFocusCounter++;
            if (notFocusCounter >= interruptFocesThres/loopDelayTime) {
                // interrupt the counting time for focusing time
                isFocusing = false;
            }
            if (notFocusCounter >= notFocusThres/loopDelayTime) {
                Serial.print("not focus: close five degree ");
                // close the flower for five degree
                servoDegree += openDegree;
                servoDegree = constrain( servoDegree, 0 , 125);
                Serial.print(servoDegree);
                Serial.print("");
                myServo.write( servoDegree );
                Particle.publish("openFlower", String(servoDegree));
                // clear counter
                notFocusCounter = 0;
                isFocusing = false;
            }
        }
        else {
            notFocusCounter = 1;
        }
    }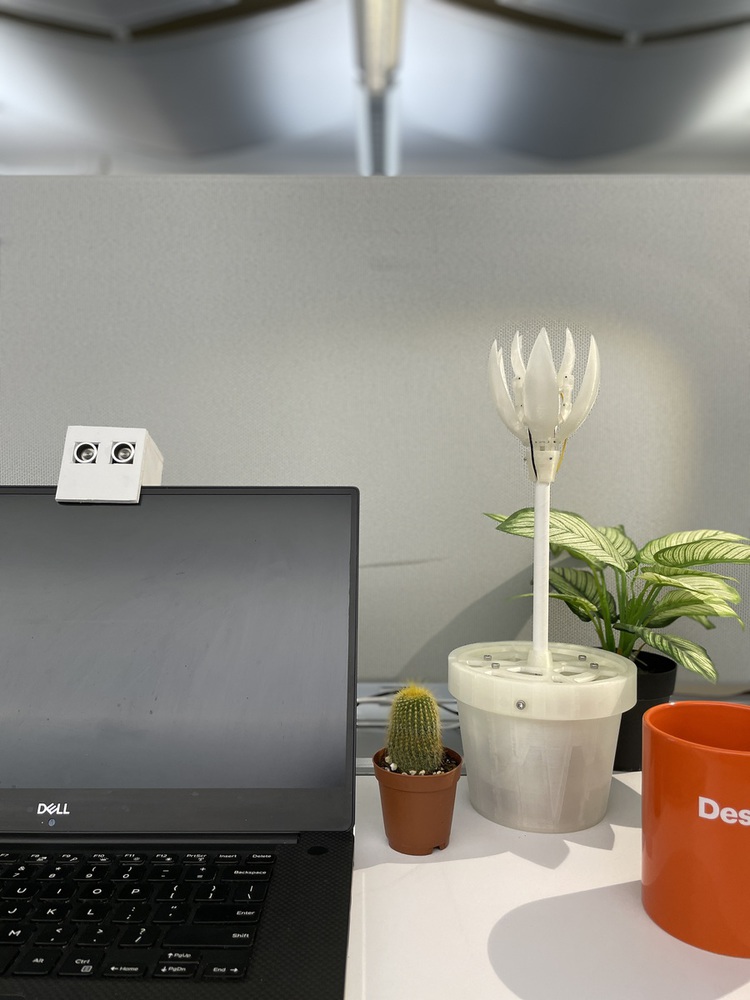
}Focus Flower
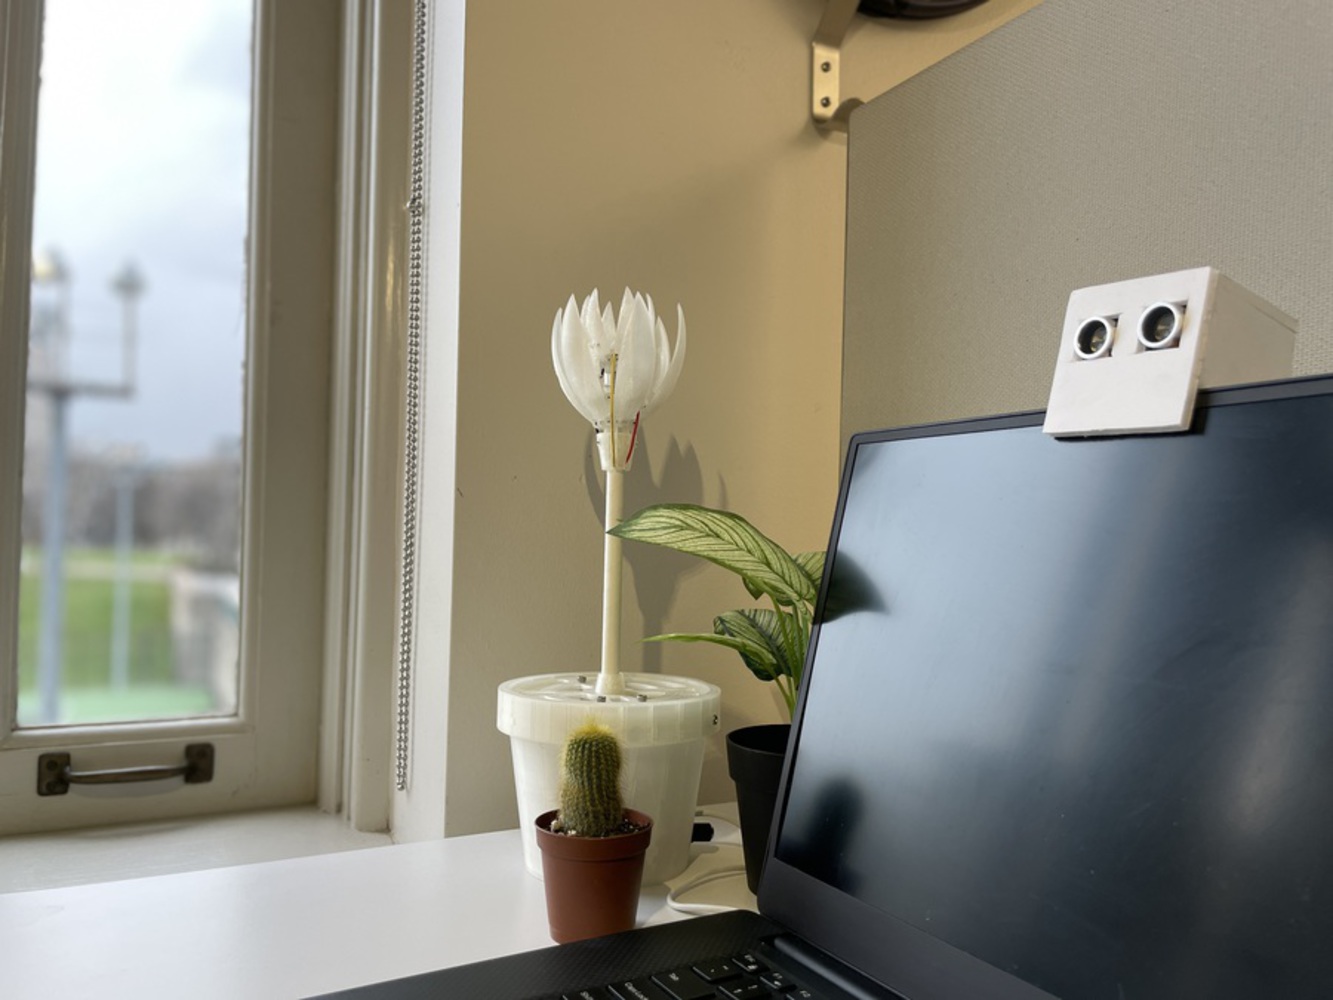
It’s a focused state facilitator, rewarding people as flowers bloom while they are paying attention to their work for a period of time by detecting the human presence.
It connects people when there are flowers in pairs. When there is a set, including two flower buds and a vase, one bud represents the user, and the other bud represents the user's friend.
In the scenario that each person has a set of flowers, paired flowers will be synchronized in real-time to show the blooming and glowing of the other flower, which means people are informed about their partner’s focused state by seeing how the paired flower moves. Meanwhile, people can push the button on their vase to trigger the LED on the paired flower to send a “good job” message to their partner.
Once people leave their sit, the flower can’t detect its presence anymore. It will lead the flower to wilt, gradually closing up if the person doesn’t return. Ths state will also be synchronized to the paired flower, too.
We used an ultrasonic sensor to detect whether a person is located within a certain distance in front of the laptop. We initially wanted to get screen usage time or particular apps usage time as the input to determine how focused the person is. However, due to the tight time frame, we chose the more straightforward but effective way to prove the concept.
On the demo day, people suggested that users could set their preferred focus time, and the flower would bloom according to the customized duration. Another critic pointed out that what if people are focused on work that is not digital such as reading a book or crafting? What sensors or other methods could we use to identify the focused state?
In terms of what we can improve, we can use a passive infrared sensor to detect human motion/body temperature rather than an ultrasonic sensor in order to avoid arbitrary inputs such as distance between the user and the computer. Furthermore, we can dig into collecting screen usage time, email reply times, particular software usage time, etc., or even corporate productivity tracking software to get a more accurately defined focused state. Regarding the experience design, we can research more on different motions of LED, such as fading in and out to indicate users to interact or blinking in certain patterns to represent different messages from their partners. The motion of flower blooming and wilting can also be improved to be less mechanical and more natural and smooth. Moreover, If there are conductive leaves, users can touch different parts of the leaves to trigger various interactions more naturally rather than pressing a button.
Provide credits to any sources of code, images, etc. that you have used directly within this project.
https://create.arduino.cc/projecthub/circuito-io-team/valentine-s-sunflower-3cdd90 -The arduino project by circuit.io from which we drew inspiration from for the flower mechanism.
https://diotlabs.daraghbyrne.me/docs/working-with-data/webhooks/paired_devices_with_webhooks -Webhook setup we modified to connect the two microcontrollers for flower interaction.
https://diotlabs.daraghbyrne.me/docs/controlling-outputs-neopixels/programming-neopixels/ -Neopixel code we modified to control our neopixel LEDs.
https://create.arduino.cc/projecthub/abdularbi17/ultrasonic-sensor-hc-sr04-with-arduino-tutorial-327ff6 - basic use of ultrasonic sensor code
Provide a list of academic papers, articles, videos, etc that you make reference to in your documentation.
https://www.forestapp.cc/ This application gives reward to users if they put away their phone and keep focusing on one stuff for an hour. Zhengfang helps us get an idea about developing mechanical flower to encourage users to stay focused from this application.
https://tangible.media.mit.edu/project/intouch/ “The Design and Implementation of inTouch, A Distributed, Haptic Communication System”
https://floower.io/ The historical case, an artificial flower