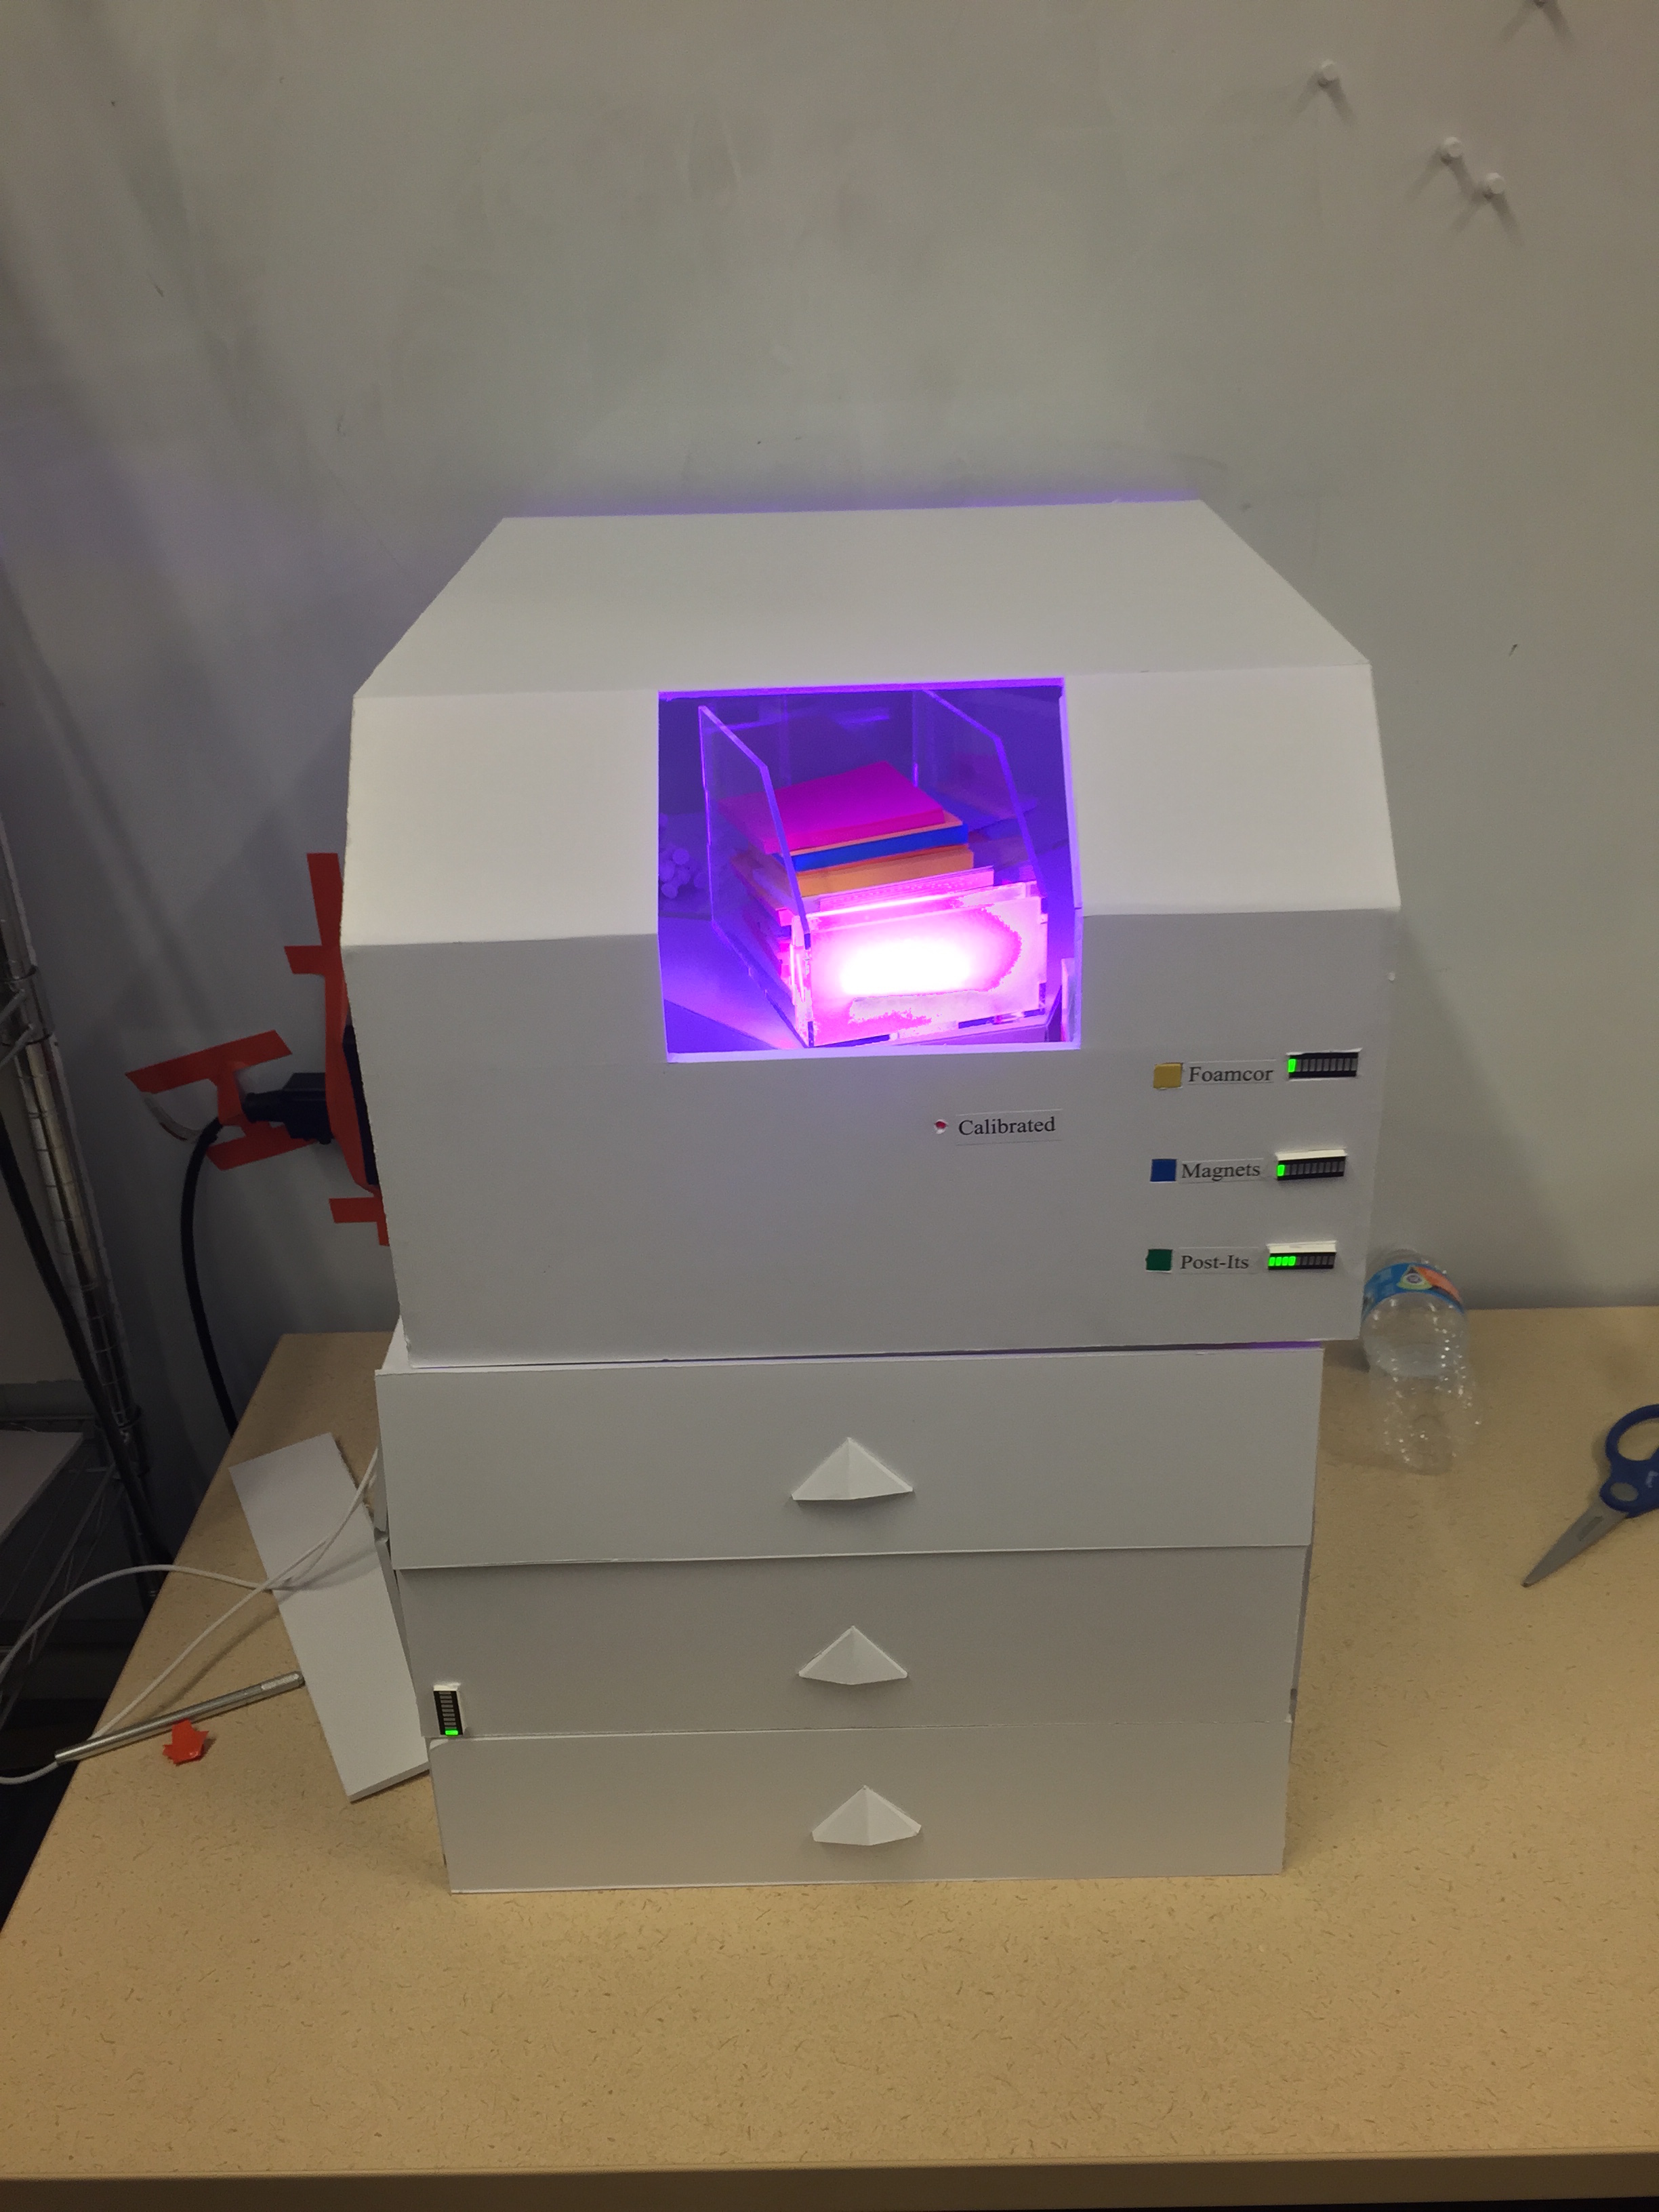
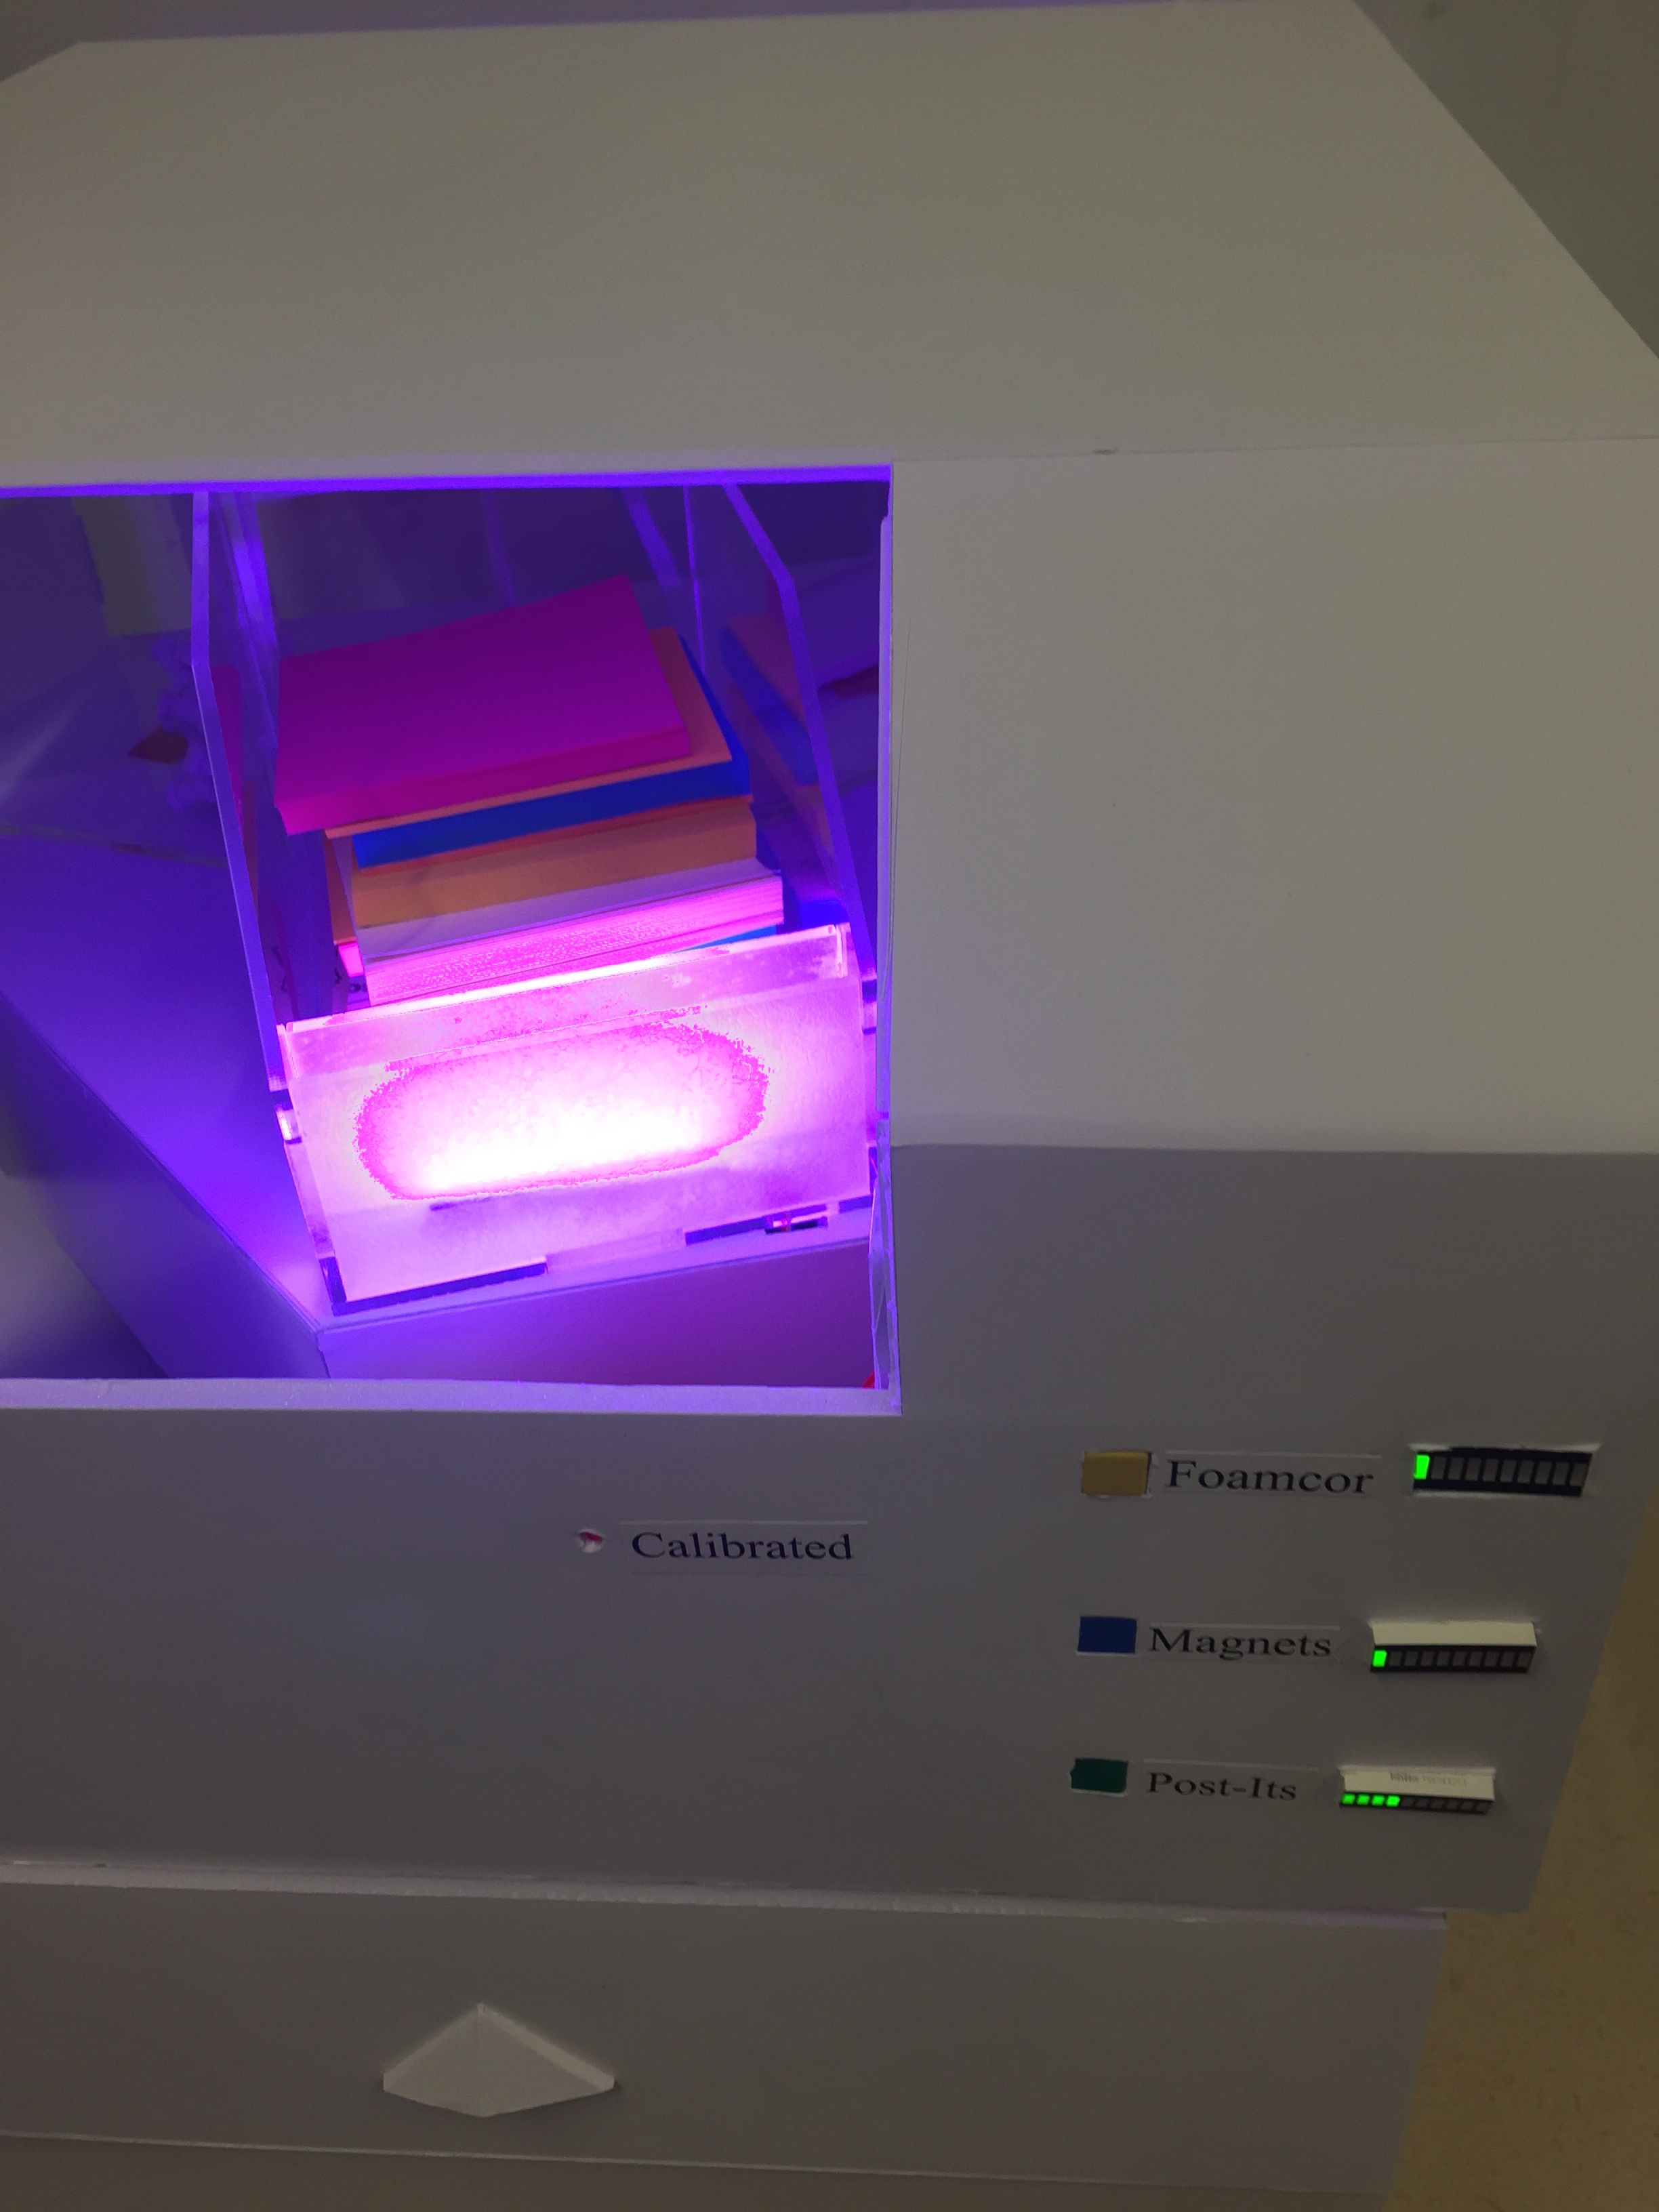
Refills
resOURce Smart Studio System - Prototype 3
Made by Melanie Swartz, Stefanie Owens, Alex Surasky-Ysasi, jhjenkin, gwilson, Christopher Holliday, Stephen Krotseng, hlgraffeo, Ethan Krokonko and Jeremy Jiang
Made by Melanie Swartz, Stefanie Owens, Alex Surasky-Ysasi, jhjenkin, gwilson, Christopher Holliday, Stephen Krotseng, hlgraffeo, Ethan Krokonko and Jeremy Jiang
Students go through lots of consumables, like paper, markers, foamcor and batteries in a studio space. Administrative staff is often not located in the same space, so they are unaware of when these items are running low. Refills solves this problem by creating a home base for these items, which monitors how much remains. As items are removed there is an active monitor and an email is sent to the administration to let know when materials reach low levels, so more can be ordered.
Created: March 2nd, 2015
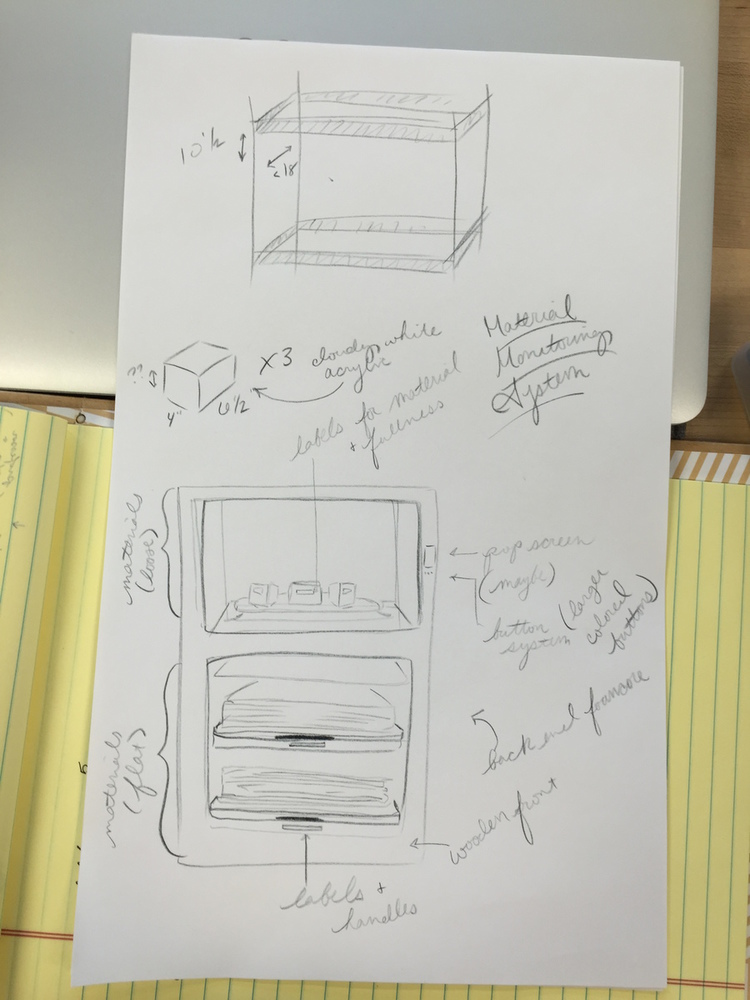
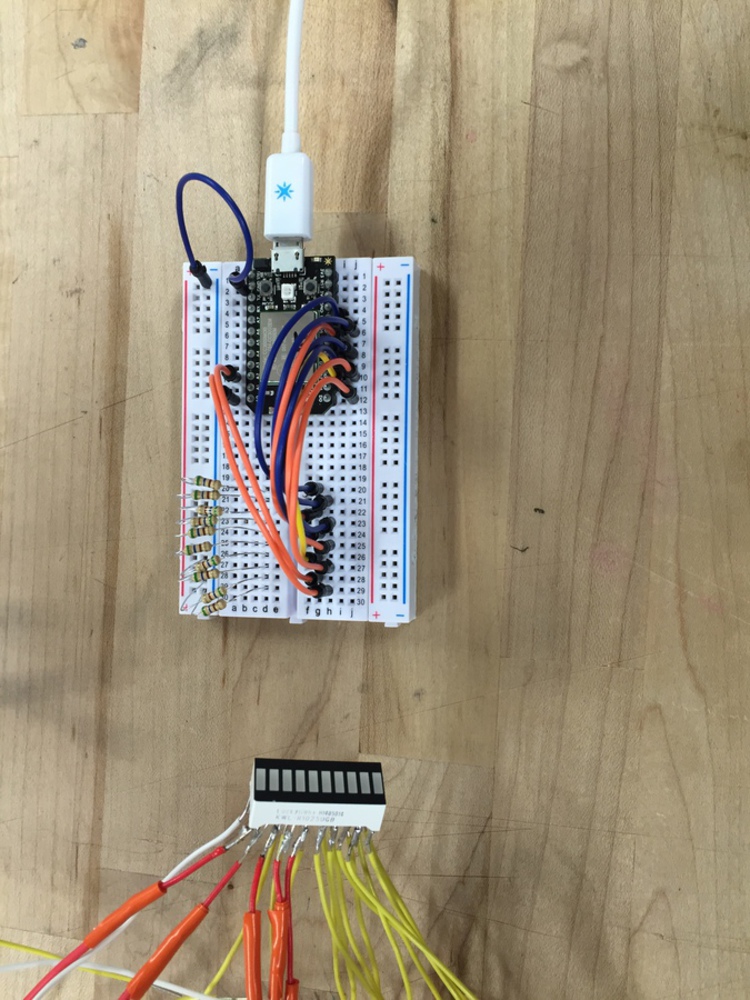
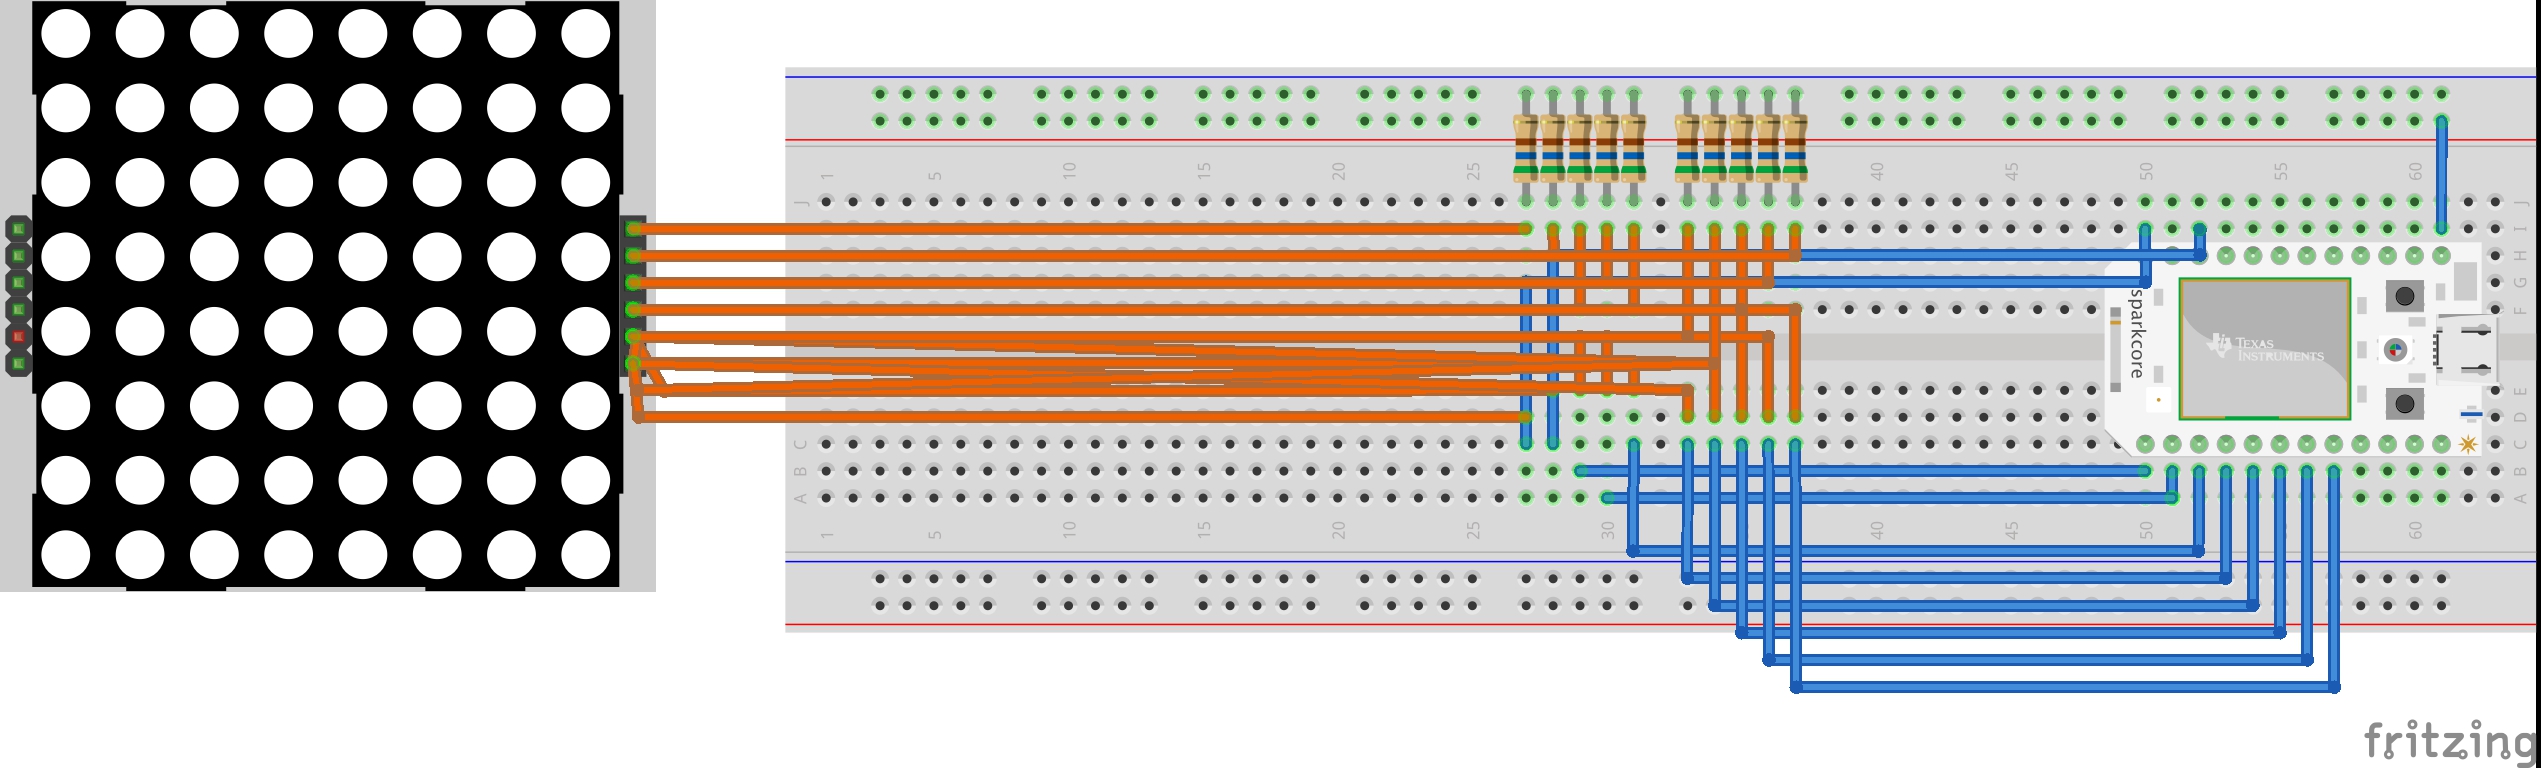
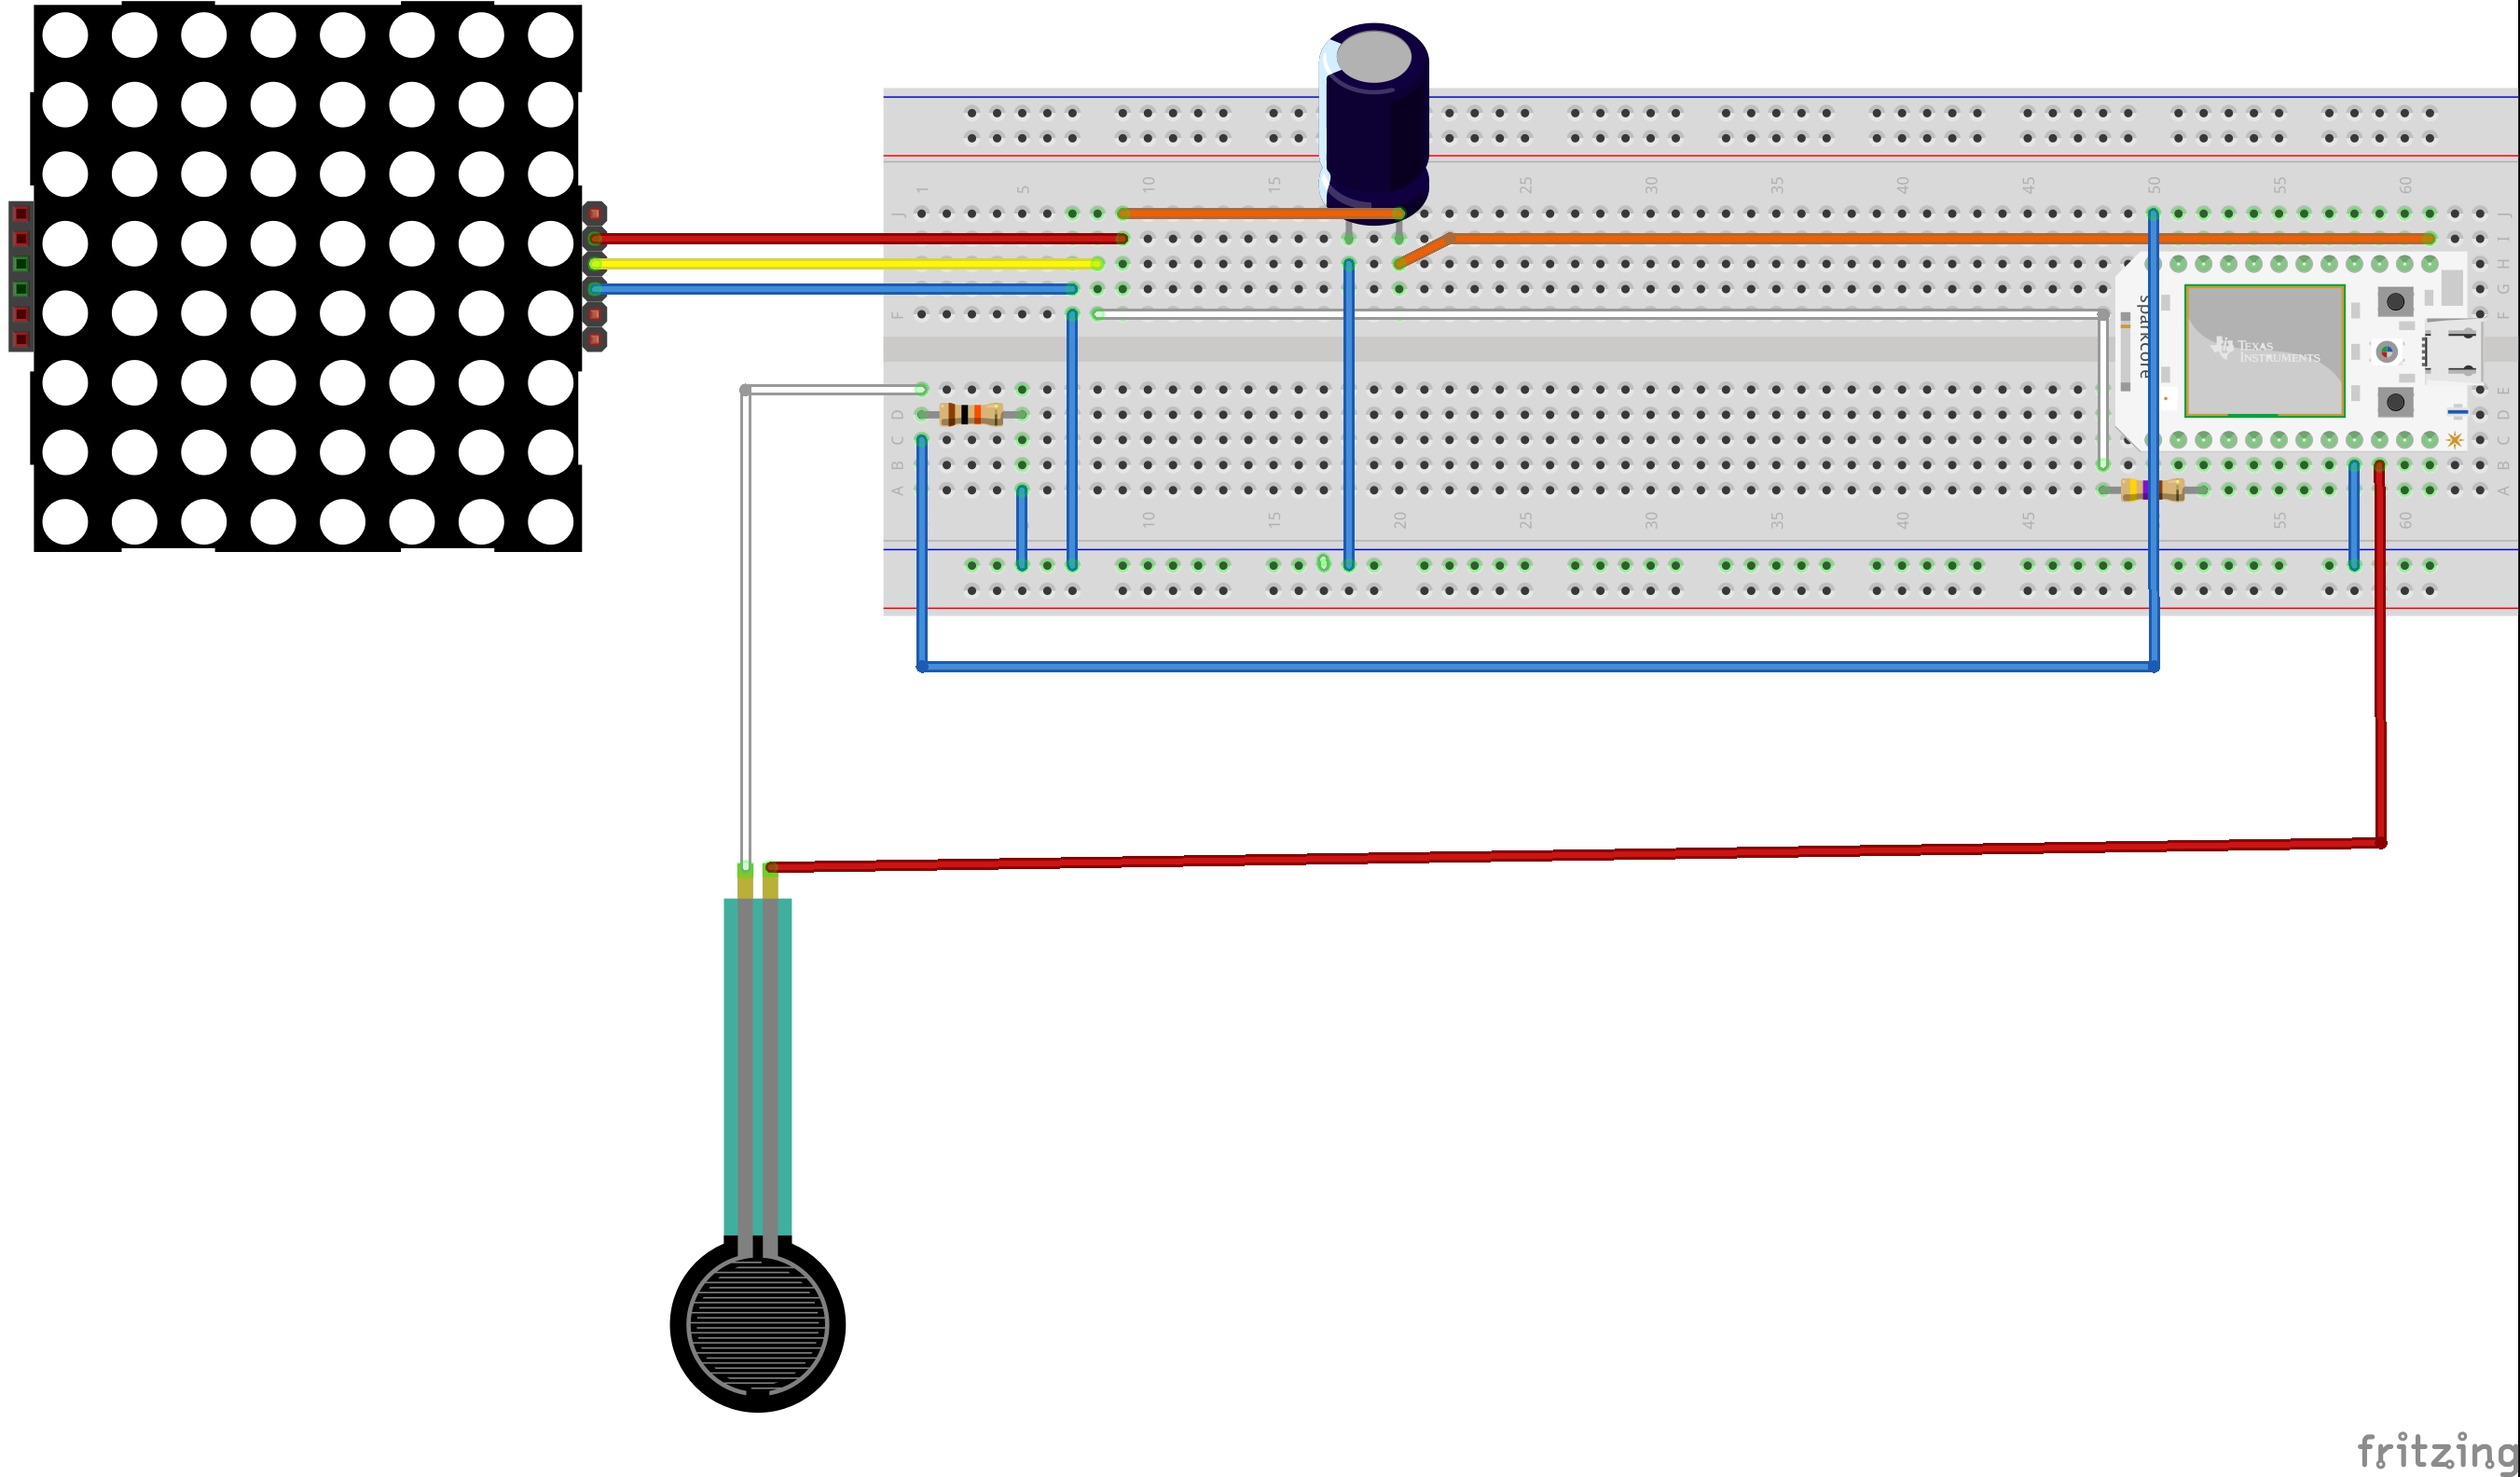
The original concept of the refills solution of our IoT system is to monitor the amount of particular materials that are located in the studio. Through weight sensing, the system will monitor the material usage and display what materials are stocked to low, medium, or high level. When a material reaches a low level, the system will also request items to be restocked through an email to Candice. Additionally, the material storage devices are lit with color changing LEDs that can change in accordance with what material is placed inside.
Our process sketches conceptualized two types of storage, both misshapen and flat storage. This allows for multiple types of materials to be monitored within the system at one time.
10 560 ohm resistors
4 1k ohm resistors
1 10k ohm resistor
1 470 ohm resistor
1 RGB LED strip
1 red LED
1 force sensitive resistor
1 capacitor
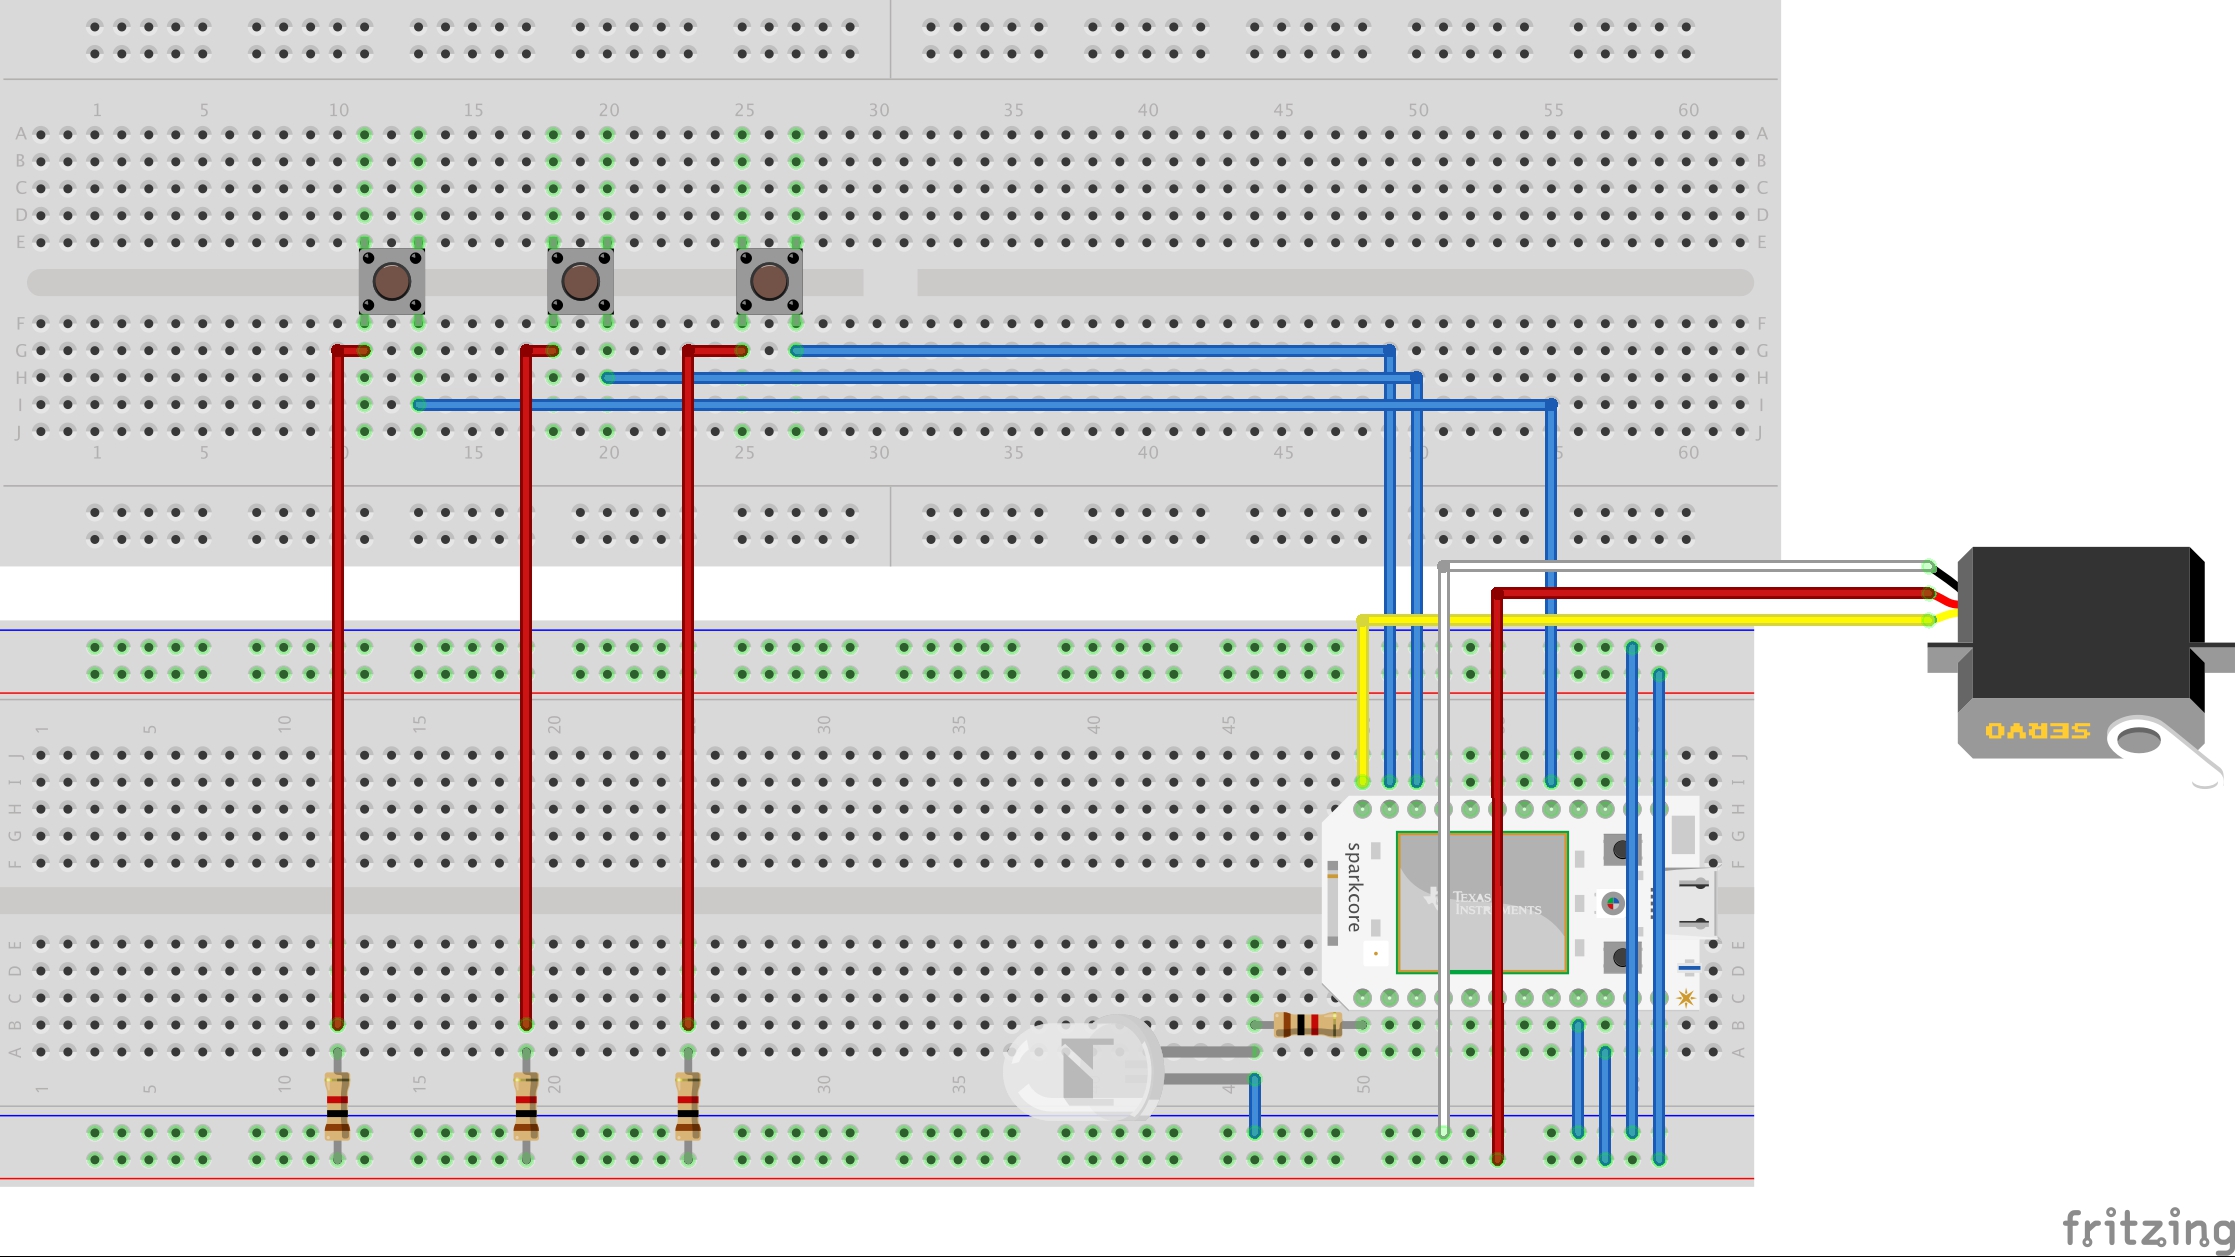
3 push buttons
1 servo
various jumper wires
// Code for button control of the servo/rotating table, as well as the calibration function.
int servoPin = A0;
int button1 = A1;
int button1State;
int button2 = A2;
int button2State;
int button3 = A7;
int button3State;
int rotPos = 1;


void setup(){
  pinMode(servoPin, OUTPUT);
  pinMode(D0, OUTPUT);
  pinMode(button1, INPUT);
  pinMode(button2, INPUT);
  pinMode(button3, INPUT);
  Spark.variable("button1", &button1State, INT);
  Spark.variable("button2", &button2State, INT);
  Spark.variable("button3", &button3State, INT);
}

void loop(){
  button1State = analogRead(button1);
  button2State = analogRead(button2);
  button3State = analogRead(button3);
  if (button1State > 3000){
    delay(500);
    button1State = analogRead(button1);
    if (button1State < 3000){
      if (rotPos == 2){
        analogWrite(servoPin, 250);
        delay(1600);
        analogWrite(servoPin, 0);
        rotPos = 1;
      }else if(rotPos == 3){
        analogWrite(servoPin, 250);
        delay(800);
        analogWrite(servoPin, 0);
        rotPos = 1;
      }else if(rotPos == 1){
        analogWrite(servoPin, 0);
      }
      else{
        analogWrite(servoPin,0);
        rotPos = 3;
      }
    }
    delay(1500);
    if (button1State > 3000){
      calibrate1();
      //function that calibrates bin
    }
  }
  else if (button2State > 3000){
    delay(500);
    button2State = analogRead(button2);
    if (button2State < 3000){
      if (rotPos == 3){
        analogWrite(servoPin, 250);
        delay(1600);
        analogWrite(servoPin, 0);
        rotPos = 2;
      }
      else if(rotPos == 1){
        analogWrite(servoPin, 250);
        delay(800);
        rotPos = 2;
        analogWrite(servoPin, 0);
      }
      else if(rotPos == 2){
        analogWrite(servoPin, 0);
      }
      else{
        analogWrite(servoPin,0);
        rotPos = 3;
      }
    }
    delay(1500);
    if (button2State > 3000){
      calibrate2();
      //function that calibrates bin
    }
  }
  else if (button3State > 3000){
    delay(500);
    button3State = analogRead(button3);
    if (button3State < 3000){
      if (rotPos == 1){
        analogWrite(servoPin, 250);
        delay(1600);
        analogWrite(servoPin, 0);
        rotPos = 3;
      }else if(rotPos == 2){
        analogWrite(servoPin, 250);
        delay(800);
        analogWrite(servoPin, 0);
        rotPos = 3;
      }else if(rotPos == 3){
        analogWrite(servoPin, 0);
      }
      else{
        analogWrite(servoPin,0);
        rotPos = 3;
      }
    }
    delay(1500);
    if (button3State > 3000){
      calibrate3();
      //function that calibrates bin
    }
  }
  else{}
}

void calibrate1(){
Spark.publish("IOTFinal15calibrate", "a");
digitalWrite(D0, HIGH);
delay(100);
digitalWrite(D0, LOW);
delay(100);
digitalWrite(D0, HIGH);
delay(100);
digitalWrite(D0, LOW);
delay(100);
digitalWrite(D0, HIGH);
delay(100);
digitalWrite(D0, LOW);
}

void calibrate2(){

}

void calibrate3(){

}

// Code for LED display for amount of material in drawer.
const int ledTotal = 10;

int ledPins[] = {D0, D1, D2, D3, D4, D5, D6, D7, A0, A1}; // an array of pin numbers to which LEDs are attached

void setup() {
  // loop over the pin array and set them all to output:
  for (int i = 0; i < ledTotal; i++) {
    pinMode(ledPins[i], OUTPUT);
  }

  // loop over the pin array and set them all to output:
  for (int i = 0; i < ledTotal; i++) {
    digitalWrite(ledPins[i], HIGH);
  }
}

void loop() {
  delay(100);
}//Code to control the color of the containers and to check the weight in each container to determine when supplies are running low
/*-------------------------------------------------------------------------
Spark Core library to control WS2811/WS2812 based RGB
LED devices such as Adafruit NeoPixel strips.
Currently handles 800 KHz and 400kHz bitstream on Spark Core,
WS2812, WS2812B and WS2811.
Also supports:
- Radio Shack Tri-Color Strip with TM1803 controller 400kHz bitstream.
- TM1829 pixels
PLEASE NOTE that the NeoPixels require 5V level inputs
and the Spark Core only has 3.3V level outputs. Level shifting is
necessary, but will require a fast device such as one of the following:
[SN74HCT125N]
http://www.digikey.com/product-detail/en/SN74HCT125N/296-8386-5-ND/376860
[SN74HCT245N]
http://www.digikey.com/product-detail/en/SN74HCT245N/296-1612-5-ND/277258
Written by Phil Burgess / Paint Your Dragon for Adafruit Industries.
Modified to work with Spark Core by Technobly.
Contributions by PJRC and other members of the open source community.
Adafruit invests time and resources providing this open source code,
please support Adafruit and open-source hardware by purchasing products
from Adafruit!
--------------------------------------------------------------------*/
/* ======================= includes ================================= */
#include "application.h"
//#include "spark_disable_wlan.h" (for faster local debugging only)
#include "neopixel.h"
/* ======================= prototypes =============================== */
void colorAll(uint32_t c, uint8_t wait);
void colorWipe(uint32_t c, uint8_t wait);
void rainbow(uint8_t wait);
void rainbowCycle(uint8_t wait);
uint32_t Wheel(byte WheelPos);
/* ======================= extra-examples.cpp ======================== */
// IMPORTANT: Set pixel COUNT, PIN and TYPE
#define PIXEL_COUNT 8
#define PIXEL_PIN D2
#define PIXEL_TYPE WS2812B
// Parameter 1 = number of pixels in strip
// Parameter 2 = pin number (most are valid)
// note: if not specified, D2 is selected for you.
// Parameter 3 = pixel type [ WS2812, WS2812B, WS2811, TM1803 ]
// note: if not specified, WS2812B is selected for you.
// note: RGB order is automatically applied to WS2811,
// WS2812/WS2812B/TM1803 is GRB order.
//
// 800 KHz bitstream 800 KHz bitstream (most NeoPixel products ...
// ... WS2812 (6-pin part)/WS2812B (4-pin part) )
//
// 400 KHz bitstream (classic 'v1' (not v2) FLORA pixels, WS2811 drivers)
// (Radio Shack Tri-Color LED Strip - TM1803 driver
// NOTE: RS Tri-Color LED's are grouped in sets of 3)
Adafruit_NeoPixel strip = Adafruit_NeoPixel(PIXEL_COUNT, PIXEL_PIN, PIXEL_TYPE);
// IMPORTANT: To reduce NeoPixel burnout risk, add 1000 uF capacitor across
// pixel power leads, add 300 - 500 Ohm resistor on first pixel's data input
// and minimize distance between Arduino and first pixel. Avoid connecting
// on a live circuit...if you must, connect GND first.
int fsrPin = A0;
int fsrRead = 0;
int baselineRead = 90; // reading when nothing on pressure sensor
int fullRead = 3000; //read when full;
void setup() {
pinMode(fsrPin, INPUT);
strip.begin();
strip.show(); // Initialize all pixels to 'off'
colorAll(strip.Color(255, 0, 255), 50); // Magenta
Spark.variable("fsrRead", &fsrRead, INT);
Spark.subscribe("IOTFinal15calibrate", calibrate);
}
void loop() {
checkCapacity();
delay(3000);
}
void calibrate(const char *event, const char *data) {
fullRead = analogRead(fsrPin);
Spark.publish("JJIoTFinal15capacity", "H", 2);
}
void checkCapacity() {
fsrRead = analogRead(fsrPin);
double capPercent = (fsrRead*1.0 - baselineRead*1.0)/(fullRead*1.0 - baselineRead*1.0)*100.0;
int temp = (int)capPercent;
if (50 <= temp) {
Spark.publish("JJIoTFinal15capacity", "H", 2);
}
else if ((15 <= temp) && (temp < 50)) {
Spark.publish("JJIoTFinal15capacity", "M", 2);
}
else if ((0 <= temp) && (temp < 15)) {
Spark.publish("JJIoTFinal15capacity", "L", 2);
}
else {
colorAll(strip.Color(255, 0, 0), 50);
}
}
// Set all pixels in the strip to a solid color, then wait (ms)
void colorAll(uint32_t c, uint8_t wait) {
uint16_t i;
for(i=0; i<strip.numPixels(); i++) {
strip.setPixelColor(i, c);
}
strip.show();
delay(wait);
}//Code to control the LED bar graphs to show how many supplies are in the containers based on weight
const int activeLeds = 10;
int activeLedPins[] = {A0, A2, D0, D1, D2, D3, D4, D5, D6, D7}; // an array of pin numbers to which LEDs are attached
int inactiveLedPin1 = A3;
int inactiveLedPin2 = A4;
int numLeds = 0;
void setup() {
// loop over the pin array and set them all to output:
for (int i = 0; i < activeLeds; i++) {
pinMode(activeLedPins[i], OUTPUT);
digitalWrite(activeLedPins[i], LOW);
}
pinMode(inactiveLedPin1, OUTPUT);
pinMode(inactiveLedPin2, OUTPUT);
digitalWrite(inactiveLedPin1, HIGH);
digitalWrite(inactiveLedPin2, HIGH);
Spark.subscribe("JJIoTFinal15capacity", adjustDisplay);
}
void loop() {
delay(1000);
}
void adjustDisplay(const char *event, const char *data) {
if (*data == 'H') {
numLeds = 10;
}
else if (*data == 'M') {
numLeds = 5;
}
else if (*data == 'L') {
numLeds = 1;
}
else {
numLeds = 0;
}
for (int i = 0; i < activeLeds; i++) {
digitalWrite(activeLedPins[i], LOW);
}
for (int i = 0; i < numLeds; i++) {
digitalWrite(activeLedPins[i], HIGH);
}
}
Students go through lots of consumables, like paper, markers, foamcor and batteries in a studio space. Administrative staff is often not located in the same space, so they are unaware of when these items are running low. Refills solves this problem by creating a home base for these items, which monitors how much remains. As items are removed there is an active monitor and an email is sent to the administration to let know when materials reach low levels, so more can be ordered.