SkillDev03-Chengzhi Zhang
Made by Chengzhi Zhang
Made by Chengzhi Zhang
Created: November 21st, 2021
#include "neopixel.h"
#include <math.h>

// IMPORTANT: Set pixel COUNT, PIN and TYPE
#define PIXEL_PIN D2
#define PIXEL_COUNT 16
#define PIXEL_TYPE WS2812

int LIGHTEST = 100;

int pixel_position = 0;

int delaytime;

Adafruit_NeoPixel strip = Adafruit_NeoPixel(PIXEL_COUNT, PIXEL_PIN, PIXEL_TYPE);

void setup(){

  Serial.begin( 9600 );

  strip.begin();
  strip.show(); // Initialize all pixels to 'off'
}

void loop(){

  for(int i=0; i< strip.numPixels(); i++) {
    uint32_t c;

    if( pixel_position >= i ){
      c = strip.Color(LIGHTEST*i/strip.numPixels(), 0, LIGHTEST*(strip.numPixels() - i)/strip.numPixels());  // WheelPos * 3, 255 - WheelPos * 3, 0
    }else{
      c = strip.Color(0, 0, 0);
    }
    strip.setPixelColor(i, c );
  }
  strip.show();


  pixel_position++;
  if( pixel_position >= strip.numPixels() )
  {
    pixel_position = 0;
  }

  delay( 100 );


}#include "neopixel.h"
#include <math.h>
// IMPORTANT: Set pixel COUNT, PIN and TYPE
#define PIXEL_PIN D2
#define PIXEL_COUNT 16
#define PIXEL_TYPE WS2812
int LIGHTEST = 100;
int pixel_position = 0;
int delaytime;
int green = LIGHTEST;
Adafruit_NeoPixel strip = Adafruit_NeoPixel(PIXEL_COUNT, PIXEL_PIN, PIXEL_TYPE);
void setup(){
Serial.begin( 9600 );
Particle.variable("Delay", &delaytime, INT);
strip.begin();
strip.show(); // Initialize all pixels to 'off'
bool success = Particle.function("funcKey", funcName);
bool success1 = Particle.function("color", changeColor);
}
int changeColor(String request) {
if (request.toInt() <= 10) {
green = 0;
}
return 1;
}
// Cloud functions must return int and take one String
int funcName(String extra) {
int de = extra.toInt();
delaytime = de;
return 0;
}
void loop(){
for(int i=0; i< strip.numPixels(); i++) {
uint32_t c;
if( pixel_position >= i ){
c = strip.Color(LIGHTEST*i/strip.numPixels(), green, LIGHTEST*(strip.numPixels() - i)/strip.numPixels()); // WheelPos * 3, 255 - WheelPos * 3, 0
}else{
c = strip.Color(0, 0, 0);
}
strip.setPixelColor(i, c );
}
strip.show();
pixel_position++;
if( pixel_position >= strip.numPixels() )
{
pixel_position = 0;
}
delay( delaytime );
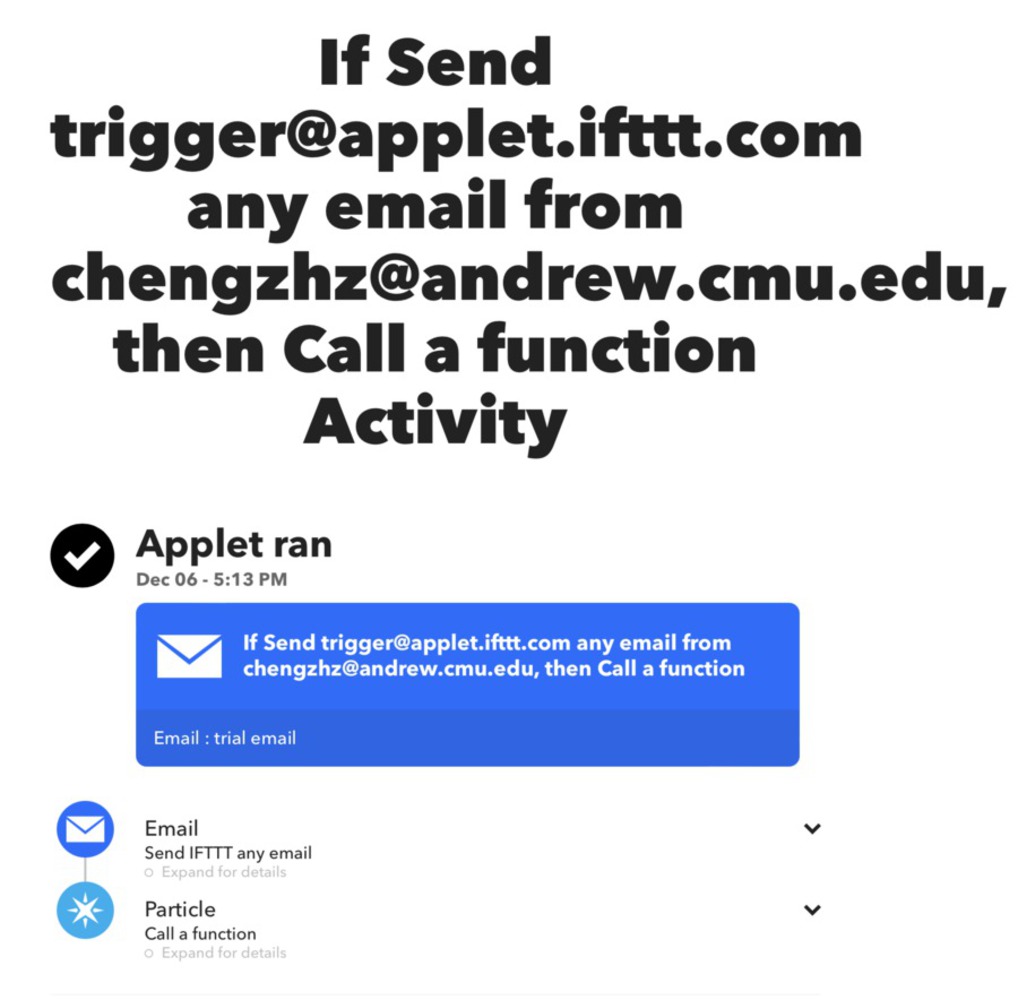
}Firstly I downloaded the codes from the IoT website that can light the pixel one by one. Then I tried to implement the function into it. I looked at the particles library for the syntax of the Particle,Function and implemented the function. I used two functions, one is to change the interval time for pixel to light up. The other function is to get rid of the green (G in RGB) in order to change the color.
1. Change the function name into more intuitive ones will be helpful in the future.
2. Adopting the existing codes from the library, and change them if it's necessary, unlike python, some parts of the code just doesn't make sense and you should just use them like rigid rules.
3. Look up the Particle library if we are lack of the syntax to adopt some new functions.