Skills Dev IV: Working with Outputs - Motors and Movement
Made by Kevin Chou
Made by Kevin Chou
Get oriented with output and feedback by working with an actuator.
Created: December 11th, 2022
// This #include statement was automatically added by the Particle IDE.
#include <neopixel.h>
//#include <Servo.h> //included in particle by default
int ledPin = D3;
int buttonPin = D4;
bool doLED = false;
int buttonVar =0;
int buttonValue;
bool LEDvar = false;
Servo flowerServo;
int servoPin = D6;
int servoValue = 0;
#define servoMin 0
#define servoMax 200
#define PIXEL_PIN D5
#define PIXEL_COUNT 1 //8 for stick, 16 for ring
#define PIXEL_TYPE WS2812B //for 4pin neopixels, WS2812/WS2813 for 6pin
Adafruit_NeoPixel flowerLED = Adafruit_NeoPixel( PIXEL_COUNT, PIXEL_PIN, PIXEL_TYPE);
#define PIXEL_PIN_POT D7
#define PIXEL_COUNT_POT 16
#define PIXEL_TYPE_POT WS2812B
Adafruit_NeoPixel potLED = Adafruit_NeoPixel(PIXEL_COUNT_POT, PIXEL_PIN_POT, PIXEL_TYPE_POT);
int redValue = 40;
int greenValue = 40;
int blueValue = 40;
bool pulseDirection = true;
int pulseDifference = 0;
int pulseMax = 28;
int test = 0;
void setup() {
// pinMode( ledPin, OUTPUT);
pinMode( buttonPin, INPUT_PULLUP);
// Particle.subscribe( "blinkLED", handleActivateLED );
// blinkLED( 3, ledPin );
// Particle.variable("Button", buttonVar);
// Particle.variable("led", LEDvar);
flowerServo.attach(servoPin);
flowerServo.write(servoMin);
Particle.function("servo", servoControl);
Particle.variable( "servoValue" , &servoValue , INT );
Particle.variable( "testValue" , &test , INT );
flowerLED.begin();
potLED.begin();
Particle.function("Red_Value", setRedValue);
Particle.function("Green_Value", setGreenValue);
Particle.function("Blue_Value", setBlueValue);
flowerLED.setPixelColor(0, redValue, greenValue, blueValue);
for(int i=0; i<potLED.numPixels();i++){
potLED.setPixelColor(i, redValue, greenValue, blueValue);
//potLED.show();
test++;
}
flowerLED.setPixelColor(0, redValue, greenValue, blueValue);
flowerLED.show();
potLED.show();
}
void loop() {
//flowerServo.write(servoMin);
//delay(1000);
//flowerServo.write(servoMax);
//flowerServo.write(180);
buttonValue = digitalRead( buttonPin );
// buttonVar = buttonValue;
if( buttonValue == LOW ){
//Particle.publish( "doPairedPublish" );
if(servoValue == servoMin){
servoValue = servoMax;
}else{
servoValue = servoMin;
}
flowerServo.write(servoValue);
}
//flowerServo.write(servoValue);
// if( doLED == true ){
// blinkLED( 6, ledPin );
// doLED = false;
// LEDvar = doLED;
// }
colorPulse(); //for flower tip single pixel, not pot ring
flowerLED.show();
for(int i=0; i<potLED.numPixels();i++){
potLED.setPixelColor(i, redValue, greenValue, blueValue);
//potLED.show();
}
potLED.show();
delay(100);
}
int setRedValue(String command)
{
// Convert
redValue = command.toInt();
flowerLED.setPixelColor(0, redValue, greenValue, blueValue);
for(int i=0; i<potLED.numPixels();i++){
potLED.setPixelColor(i, redValue, greenValue, blueValue);
//potLED.show();
}
return 1;
}
int setGreenValue(String command)
{
// Convert
greenValue = command.toInt();
flowerLED.setPixelColor(0, redValue, greenValue, blueValue);
for(int i=0; i<potLED.numPixels();i++){
potLED.setPixelColor(i, redValue, greenValue, blueValue);
potLED.show();
}
return 1;
}
int setBlueValue(String command)
{
// Convert
blueValue = command.toInt();
flowerLED.setPixelColor(0, redValue, greenValue, blueValue);
for(int i=0; i<potLED.numPixels();i++){
potLED.setPixelColor(i, redValue, greenValue, blueValue);
potLED.show();
}
return 1;
}
void colorPulse(){
flowerLED.setPixelColor(0, redValue-pulseDifference, greenValue-pulseDifference, blueValue-pulseDifference);
// for(int i=0; i<PIXEL_COUNT_POT;i++){
// potLED.setPixelColor(i, redValue, greenValue, blueValue);
// }
if(pulseDirection){
pulseDifference++;
if(pulseDifference>=pulseMax){
pulseDirection = !pulseDirection;
}
}else{
pulseDifference--;
if(pulseDifference <=0){
pulseDirection = !pulseDirection;
}
}
}
int servoControl(String command)
{
// Convert
int newPos = command.toInt();
// Make sure it is in the right range
// And set the position
servoValue = constrain( newPos, servoMin , servoMax);
// Set the servo
flowerServo.write( servoValue );
// done
return 1;
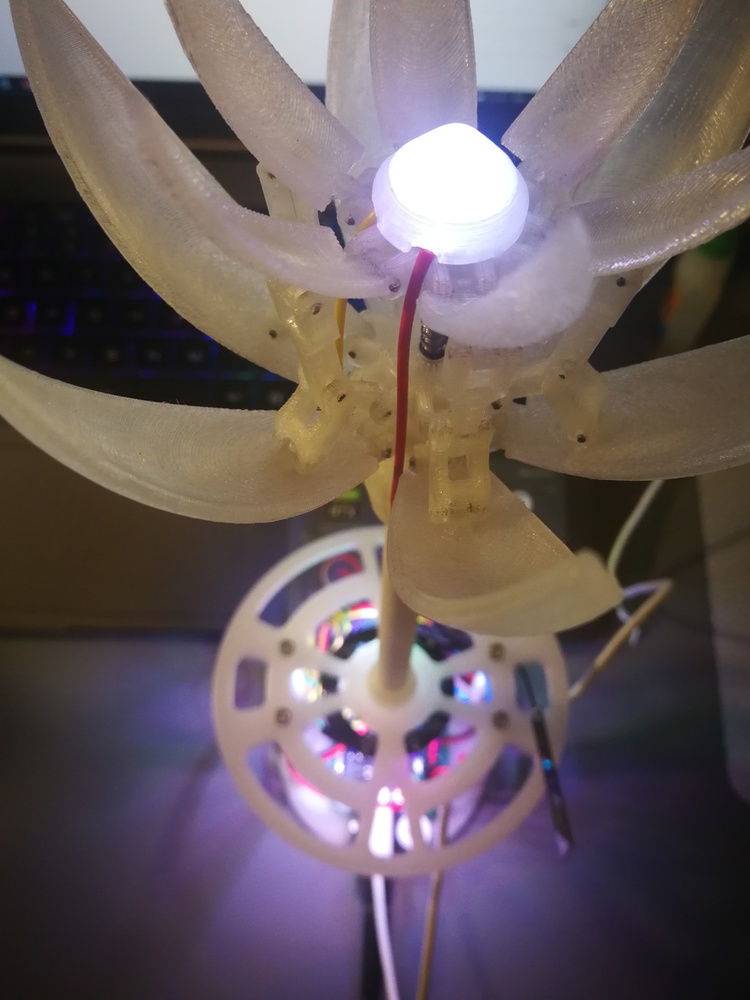
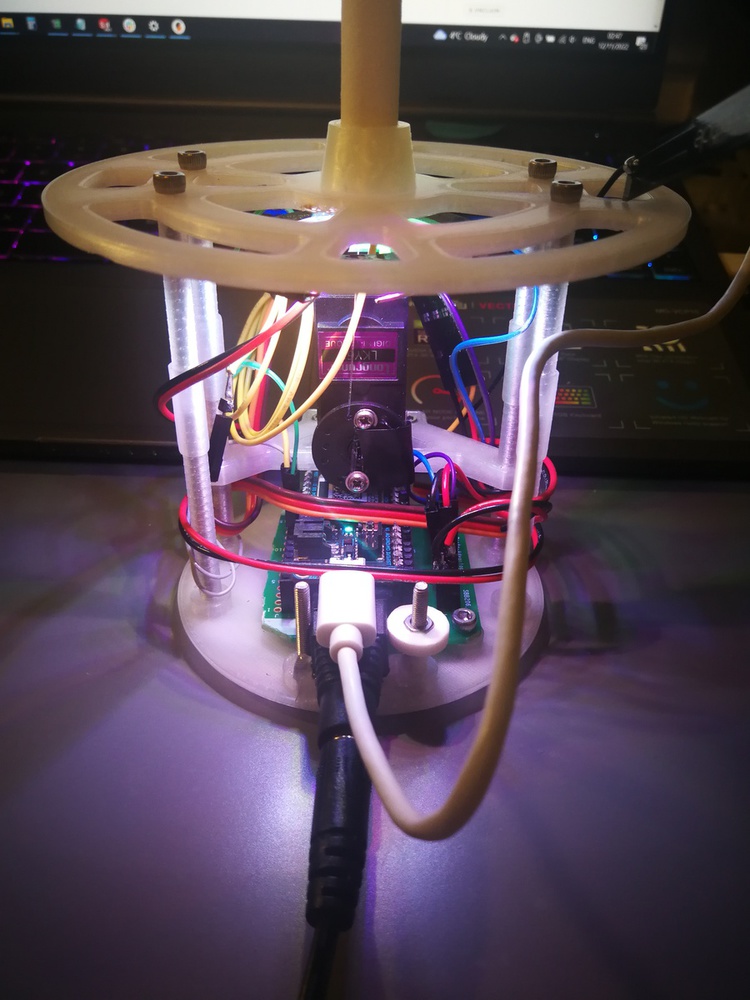
}I learned that solenoids need a ton of current to work properly, and they also get very hot. Servos and motors are very easy to control with libraries, managing all the PWM clocks and triggers in the background.
Working with my final project mechanism in particular, I learned that fishing wire was a lot more fragile than expected, as the servo I used was able to snap the wire a few times from turning too far. This unfortunately resulted in a lot of time spent repairing the mechanism.