Smart Burn
Made by Andy Knapp
Made by Andy Knapp
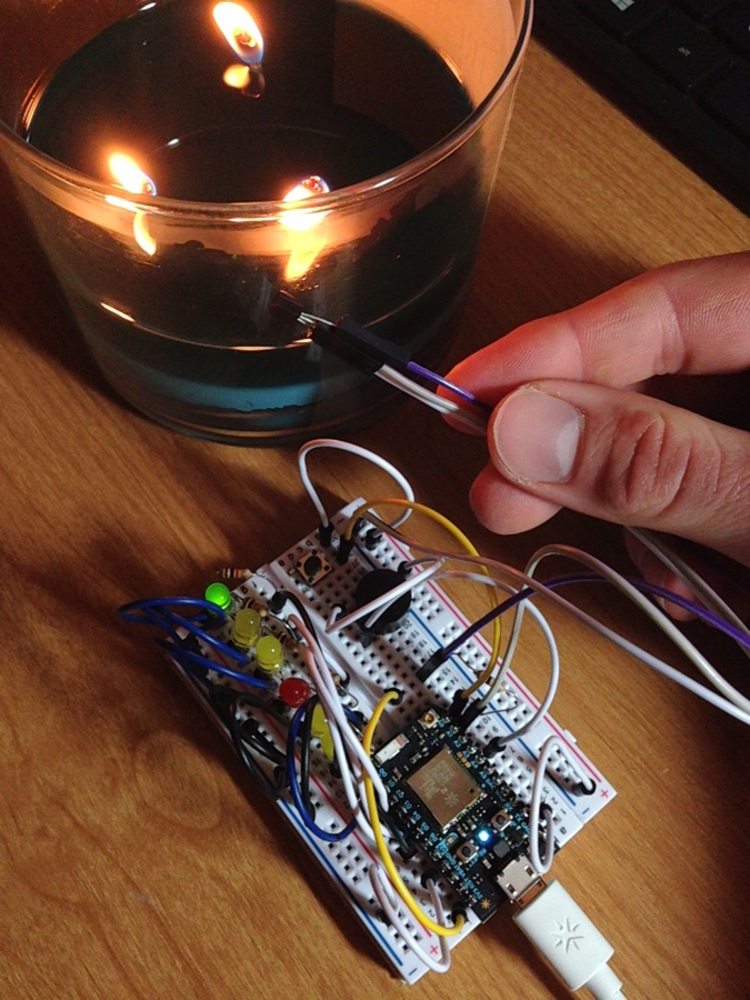
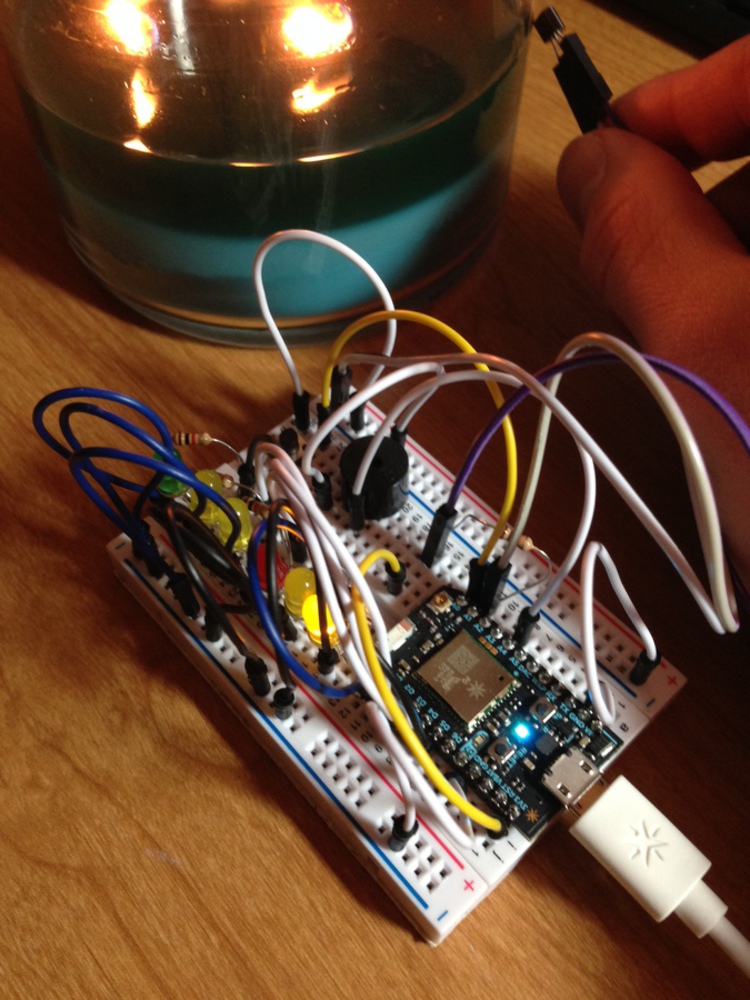
The Smart Burn prototype employs a temperature sensor and an alarm system that notifies users if candles are burning after a user specified time.
Created: January 29th, 2016
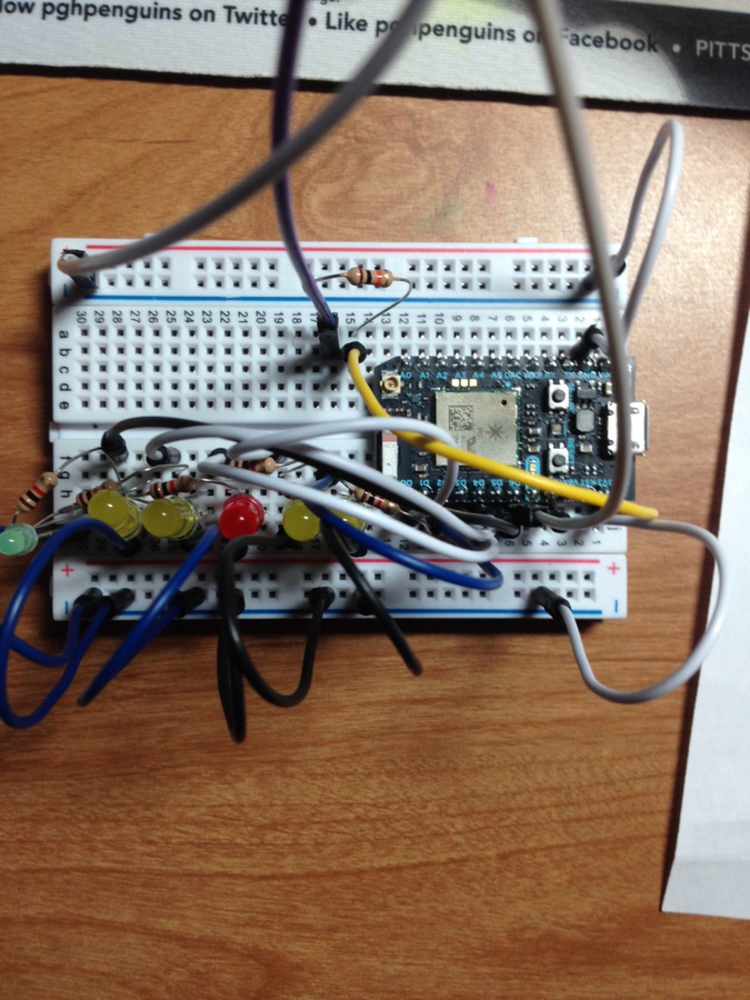
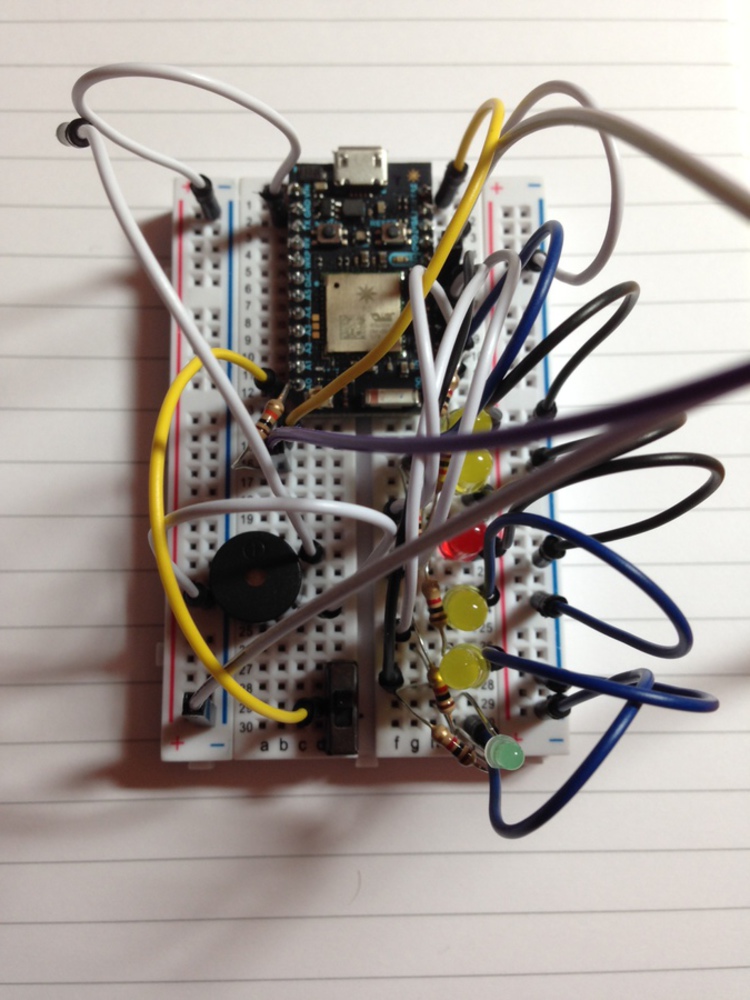
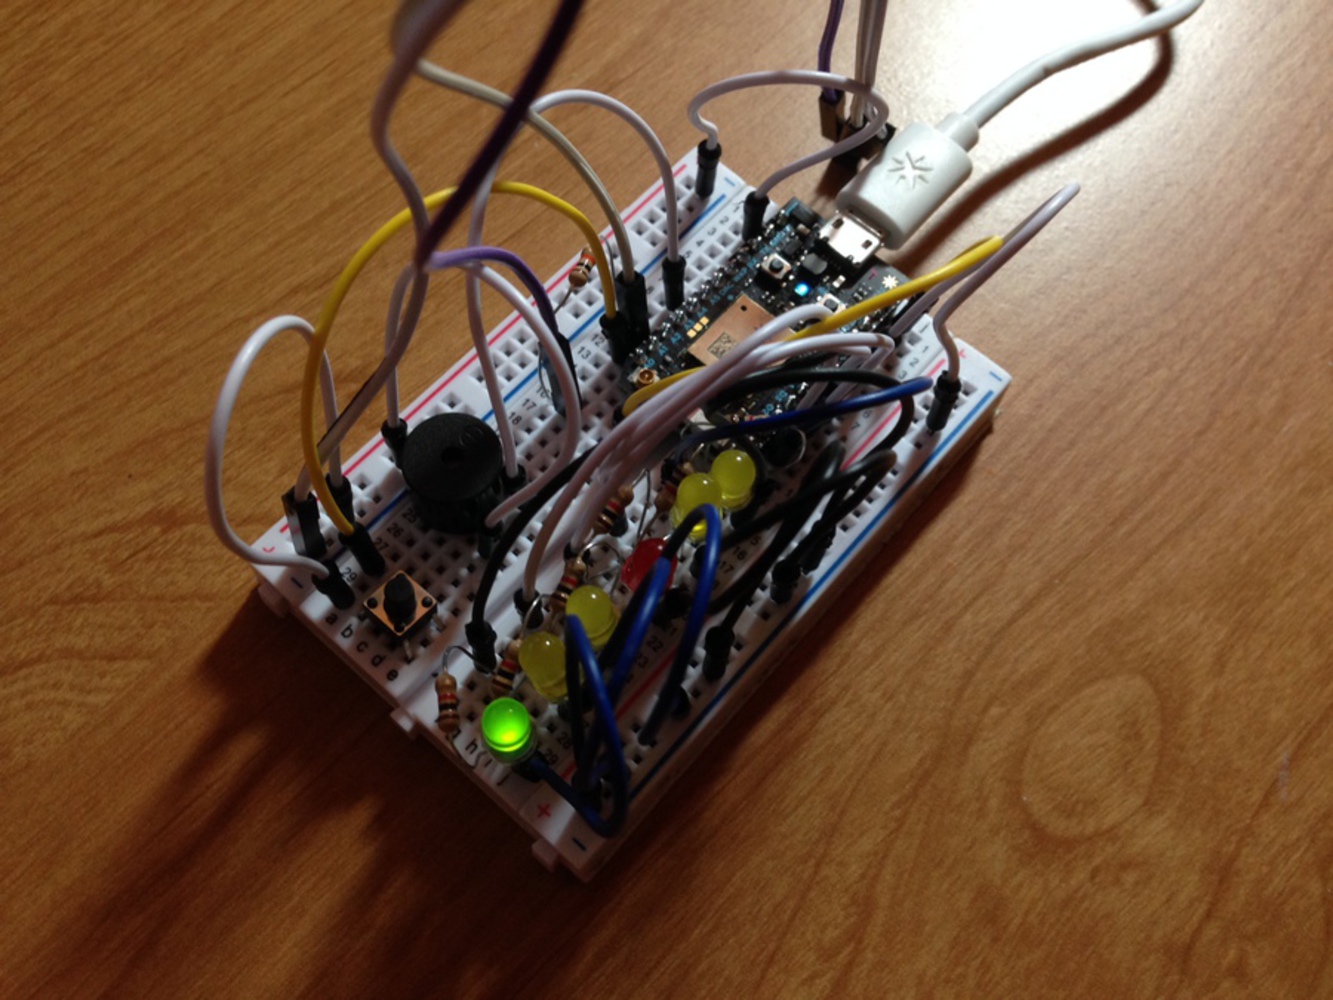
Components:
5 – Yellow LED
6 – 1K Ohm Resistor
1 – 10K Ohm Resistor
1 – DS18B20 Temperature Sensor
1 – Piezo Buzzer
1 – Push Button
1 – Red LED
1 – Green LED
Male to female jumper wires
Jumper wires
In order to efficiently develop this project, I decided to wire and test individual components as I went along. Using tutorials from class and online sources referenced below, allowed me to make certain of component’s function before adding more components. Wiring a buzzer, push button, temperature sensor, and 6 LEDs became very difficult on such a small board. After wiring the LEDs, I should have realized that I needed to transfer to a larger board. In the future, I would also like to become more efficient with board layout. After the functionality of the components was verified, numerous resources were used to develop code that allowed all candle burning event criteria to be met.
#include<math.h>
////////////////////////////TEMP SENSOR/////////////////////////////////////
#include "OneWire.h"
#include "spark-dallas-temperature.h"
// Setup a oneWire instance to communicate with any OneWire devices (not just Maxim/Dallas temperature ICs)
OneWire oneWire(A1 );
// Pass our oneWire reference to Dallas Temperature.
DallasTemperature dallas(&oneWire);
// Create a variable that will store the temperature value
double temperature = 0.0;
double temperatureF = 0.0;

////////////////////////////LED LIGHTS//////////////////////////////////////
int timer = 100;           // The higher the number, the slower the timing.
int ledg = D5;

///////////////////////////BUZZER///////////////////////////////////////////
const int speakerPin = A4;
const int songLength = 18;
char notes[] = "cdfda ag cdfdg gf ";
int beats[] = {1,1,1,1,1,1,4,4,2,1,1,1,1,1,1,4,4,2};
int tempo = 150;

////////////////////////////BUTTON//////////////////////////////////////////
int pushButton = A0;
int pushButtonState = 0;
int numPins = 5;
int ledPins[6]={D0,D1,D2,D3,D4,D5};

/////////////////////////////TIME//////////////////////////////////////////
int hour = 17;

int buttonPressed = false;

////////////////////////////SETUP///////////////////////////////////////////
void setup() {

  ////////////////////////////TIME////////////////////////////////////////////

  ////////////////////////////BUTTON//////////////////////////////////////////

  pinMode(pushButton, INPUT_PULLUP);
  for(int i=0;i<numPins;i++){
    pinMode(ledPins[ i ], OUTPUT);
  }

  ////////////////////////////BUZZER//////////////////////////////////////////
  pinMode(speakerPin, OUTPUT);

  //playMelody();
//////////////////////////////////////////////////////////////////////////////
  // Register a Particle Core variable here
  Particle.variable("temperature", &temperature, DOUBLE);
  Particle.variable("temperatureF", &temperatureF, DOUBLE);

  // setup the library
  dallas.begin();

  Serial.begin(9600);

  // set timezone to EST
  Time.zone(-5);

  // use a for loop to initialize each pin as an output:
  //for (int thisPin =0; thisPin < 5; thisPin++) {
  //  pinMode(thisPin, OUTPUT);
  //}
  pinMode(ledg, OUTPUT);

}

void loop() {

  updateTemperature();
  Serial.println( Time.hour() );
  Serial.println( Time.minute() );

  if( temperature < 0 )
  {
      delay( 100);
      return;
  }

  pushButtonState = digitalRead(pushButton);
  if(pushButtonState == LOW){ // If we push down on the push button
    buttonPressed = true;
  }

  if( Time.hour() == hour && temperatureF >= 75 && buttonPressed == false)
  {
    digitalWrite(ledg, LOW);
    doChasingLEDs();
    playMelody();
    doChasingLEDs();
  }else if( Time.hour() == hour && buttonPressed == true){
    //buttonPressed = false;
    digitalWrite(ledg, HIGH);
    setAllLEDsTo(false);
   }else if( Time.hour() == hour && temperatureF <= 75 ){
    Serial.println( "19:00 and below 70");
    digitalWrite(ledg, HIGH);
    setAllLEDsTo(false);
  }else if( Time.hour() != hour ){
    buttonPressed = false;

    setAllLEDsTo(false);
    digitalWrite(ledg, HIGH);

  }

  delay(50);
}

//////////////////////////////BUZZER/////////////////////////////////////////
int frequency(char note)
{
  // This function takes a note character (a-g), and returns the
  // corresponding frequency in Hz for the tone() function.

  int i;
  const int numNotes = 8;  // number of notes we're storing

  // The following arrays hold the note characters and their
  // corresponding frequencies. The last "C" note is uppercase
  // to separate it from the first lowercase "c". If you want to
  // add more notes, you'll need to use unique characters.

  // For the "char" (character) type, we put single characters
  // in single quotes.

  char names[] = { 'c', 'd', 'e', 'f', 'g', 'a', 'b', 'C' };
  int frequencies[] = {262, 294, 330, 349, 392, 440, 494, 523};

  // Now we'll search through the letters in the array, and if
  // we find it, we'll return the frequency for that note.

  for (i = 0; i < numNotes; i++)  // Step through the notes
  {
    if (names[i] == note)         // Is this the one?
    {
      return(frequencies[i]);     // Yes! Return the frequency
    }
  }
  return(0);  // We looked through everything and didn't find it,
              // but we still need to return a value, so return 0.
}


void playMelody(){
  // We only want to play the song once, so we'll put it in the setup loop
  int i, duration;

  for (i = 0; i < songLength; i++) // step through the song arrays
  {
    duration = beats[i] * tempo;  // length of note/rest in ms

    if (notes[i] == ' ')          // is this a rest?
    {
      delay(duration);            // then pause for a moment
    }
    else                          // otherwise, play the note
    {
      tone(speakerPin, frequency(notes[i]), duration);
      delay(duration);            // wait for tone to finish
    }
    delay(tempo/10);              // brief pause between notes
  }

}

void updateTemperature()
{
  //////////////////////////////TEMP SENSOR//////////////////////////////////
  // Request temperature conversion (traditional)
  dallas.requestTemperatures();

  // get the temperature in Celcius
  float tempC = dallas.getTempCByIndex(0);
  // convert to double
  temperature = (double)tempC;

  // convert to Fahrenheit
  float tempF = DallasTemperature::toFahrenheit( tempC );
  // convert to double
  temperatureF = (double)tempF;

  // Print out
  Serial.print( "Temp in C = ");
  Serial.print( tempC );
  Serial.print( "\t\t F = ");
  Serial.println( tempF );
}

void doChasingLEDs(){
  //////////////////////////CHASING YELLOW LEDS/////////////////////////////
    // loop from the lowest pin to the highest:
    for (int thisPin =0; thisPin < 5; thisPin++) {
      // turn the pin on:
      digitalWrite(thisPin, HIGH);
      delay(timer);
      // turn the pin off:
      digitalWrite(thisPin, LOW);
    }

    // loop from the highest pin to the lowest:
    for (int thisPin = 4; thisPin >= 0; thisPin--) {
      // turn the pin on:
      digitalWrite(thisPin, HIGH);
      delay(timer);
      // turn the pin off:
      digitalWrite(thisPin, LOW);
    }
}


void setAllLEDsTo( boolean on ){
  //////////////////////////CHASING YELLOW LEDS/////////////////////////////
    // loop from the lowest pin to the highest:
    for (int i =0; i < 5; i++) {
      // turn the pin on:
      if( on == true ){
        digitalWrite(ledPins[ i ], HIGH);
        //digitalWrite(thisPin, HIGH);
      }else{
        digitalWrite(ledPins[ i ], LOW);
      }
    }

}The product works like this:
1. Attach the temperature sensor to side of candle
2. Set the hour in which the candle should not burn
3. Program checks the scenario criteria:
a. Glass temperature above room temperature and not “alarm hour” = SAFE STATE (green LED)
b. Glass temperature above room temperature and “alarm hour” = ALARM STATE (chasing yellow and red LEDs and buzzer)
c. Glass temperature below room temperature and not “alarm hour” = SAFE STATE (green LED)
4. If scenario B occurs, the push button is engaged to deactivate the alarm and reset the system to safe state.
I am satisfied with the performance of this project. However, there are multiple functions that I would like to add if I were to continue to develop this idea. First, the addition of another temperature sensor would allow the program to read and input the ambient room temperature. Currently, I have to manually change the temperature value in the code. Second, the user should be able to control all of the functions from a mobile device. This includes setting the alarm time (currently manual) and also turning on the ringer and camera flash of the same mobile device. Finally, this product could also offer the user the ability extinguish the candle from their device. The candle lid could be retrofitted with a small servo that would rotate 90 deg to close.
References:
http://daraghbyrne.github.io/diotlabs/
https://www.arduino.cc/en/Tutorial/ForLoopIteration
https://docs.particle.io/reference/firmware/core/#timestr-
This course charts the emergence of the now "connected world" to explore the possibilities for future products and connected spaces.
The Smart Burn prototype employs a temperature sensor and an alarm system that notifies users if candles are burning after a user specified time.