Skills Dev III - Lulin Shan
Made by Lulin Shan
Made by Lulin Shan
To create an ambient calendar alert using a neopixel strip
Created: November 27th, 2021
In this project, I finally made a device connected to my Google Calendar which will give me an ambient notification before new events. I first went through the Neopixels tutorial on the lab site to get myself familiar with it.
// This #include statement was automatically added by the Particle IDE.
#include <neopixel.h>

// IMPORTANT: Set pixel COUNT, PIN and TYPE
#define PIXEL_PIN D2
#define PIXEL_COUNT 16
#define PIXEL_TYPE WS2812

Adafruit_NeoPixel strip = Adafruit_NeoPixel(PIXEL_COUNT, PIXEL_PIN, PIXEL_TYPE);

void setup() {

  strip.begin();
  strip.show(); // Initialize all pixels to 'off'

}

void loop() {

  uint16_t i;
  uint32_t c = strip.Color(0, 0, 100); // blue

  for(i=0; i< strip.numPixels(); i++) {
    strip.setPixelColor(i, c );
		strip.show();
		delay( 100 );
  }

	delay( 100 );

}// This #include statement was automatically added by the Particle IDE.
#include <neopixel.h>
// IMPORTANT: Set pixel COUNT, PIN and TYPE
#define PIXEL_PIN D2
#define PIXEL_COUNT 16
#define PIXEL_TYPE WS2812
Adafruit_NeoPixel strip = Adafruit_NeoPixel(PIXEL_COUNT, PIXEL_PIN, PIXEL_TYPE);
int numPixels = strip.numPixels();
void setup() {
strip.begin();
strip.show(); // Initialize all pixels to 'off'
}
void loop() {
uint16_t i;
uint32_t c = strip.Color(0, 255, 255);
for(i=0; i< strip.numPixels(); i++) {
strip.setPixelColor(i, c );
strip.show(); // tells Neopixels to push the updates to each individual pixel
delay( 200 );
}
delay( 500 );
for(int i= numPixels; i>=0 ; i--) {
strip.setPixelColor(i, 0, 0, 0 );
strip.show();
delay(200);
}
delay( 500 );
}// This #include statement was automatically added by the Particle IDE.
#include <neopixel.h>
// IMPORTANT: Set pixel COUNT, PIN and TYPE
#define PIXEL_PIN D2
#define PIXEL_COUNT 16
#define PIXEL_TYPE WS2812
Adafruit_NeoPixel strip = Adafruit_NeoPixel(PIXEL_COUNT, PIXEL_PIN, PIXEL_TYPE);
void setup() {
strip.begin();
strip.show(); // Initialize all pixels to 'off'
}
// Modify the code to light up blue, then red, then green then white in sequence
void loop() {
uint16_t i;
for(i=0; i< strip.numPixels(); i++) {
strip.setPixelColor(i, 0,0,255 ); // blue
}
strip.show(); // set updates to the strip
delay( 1000 );
for(i=0; i< strip.numPixels(); i++) {
strip.setPixelColor(i, 255,0,0 ); // red
}
strip.show(); // set updates to the strip
delay( 1000 );
for(i=0; i< strip.numPixels(); i++) {
strip.setPixelColor(i, 0,255,0 ); // green
}
strip.show(); // set updates to the strip
delay( 1000 );
for(i=0; i< strip.numPixels(); i++) {
strip.setPixelColor(i, 255,255,255 ); // white
}
strip.show(); // set updates to the strip
delay( 1000 );
}// This #include statement was automatically added by the Particle IDE.
#include <neopixel.h>
// IMPORTANT: Set pixel COUNT, PIN and TYPE
#define PIXEL_PIN D2
#define PIXEL_COUNT 16
#define PIXEL_TYPE WS2812
Adafruit_NeoPixel strip = Adafruit_NeoPixel(PIXEL_COUNT, PIXEL_PIN, PIXEL_TYPE);
void setup() {
strip.begin();
strip.show(); // Initialize all pixels to 'off'
}
void loop() {
uint16_t i;
for(i=0; i< strip.numPixels(); i++) {
strip.setPixelColor(i, 0,255,0 ); // green
strip.show(); // Update each pixel one by one, and wait 1000 ms in between each update.
delay( 1000 );
strip.setPixelColor(i, 0, 0, 0 );
}
}// This #include statement was automatically added by the Particle IDE.
#include <neopixel.h>
// IMPORTANT: Set pixel COUNT, PIN and TYPE
#define PIXEL_PIN D2
#define PIXEL_COUNT 16
#define PIXEL_TYPE WS2812
Adafruit_NeoPixel strip = Adafruit_NeoPixel(PIXEL_COUNT, PIXEL_PIN, PIXEL_TYPE);
int red = 0;
int green = 0;
int blue = 0;
void setup() {
strip.begin();
strip.show(); // Initialize all pixels to 'off'
Particle.function("red", setRed);
Particle.function("green", setGreen);
Particle.function("blue", setBlue);
}
void loop() {
uint16_t i;
uint32_t c = strip.Color(red, green, blue); //set the color
for(i=0; i < strip.numPixels(); i++) {
strip.setPixelColor(i, c);
}
strip.show();
delay( 100 );
}
int setRed(String command){
int redInput = command.toInt(); // convert string to number
if( redInput >= 0 and redInput <= 255 ){
red = redInput;
}else{
return -1;
}
return 1;
}
int setGreen(String command){
int greenInput = command.toInt(); // convert string to number
if( greenInput >= 0 and greenInput <= 255 ){
green = greenInput;
}else{
return -1;
}
return 1;
}
int setBlue(String command){
int blueInput = command.toInt(); // convert string to number
if( blueInput >= 0 and blueInput <= 255 ){
blue = blueInput;
}else{
return -1;
}
return 1;
}
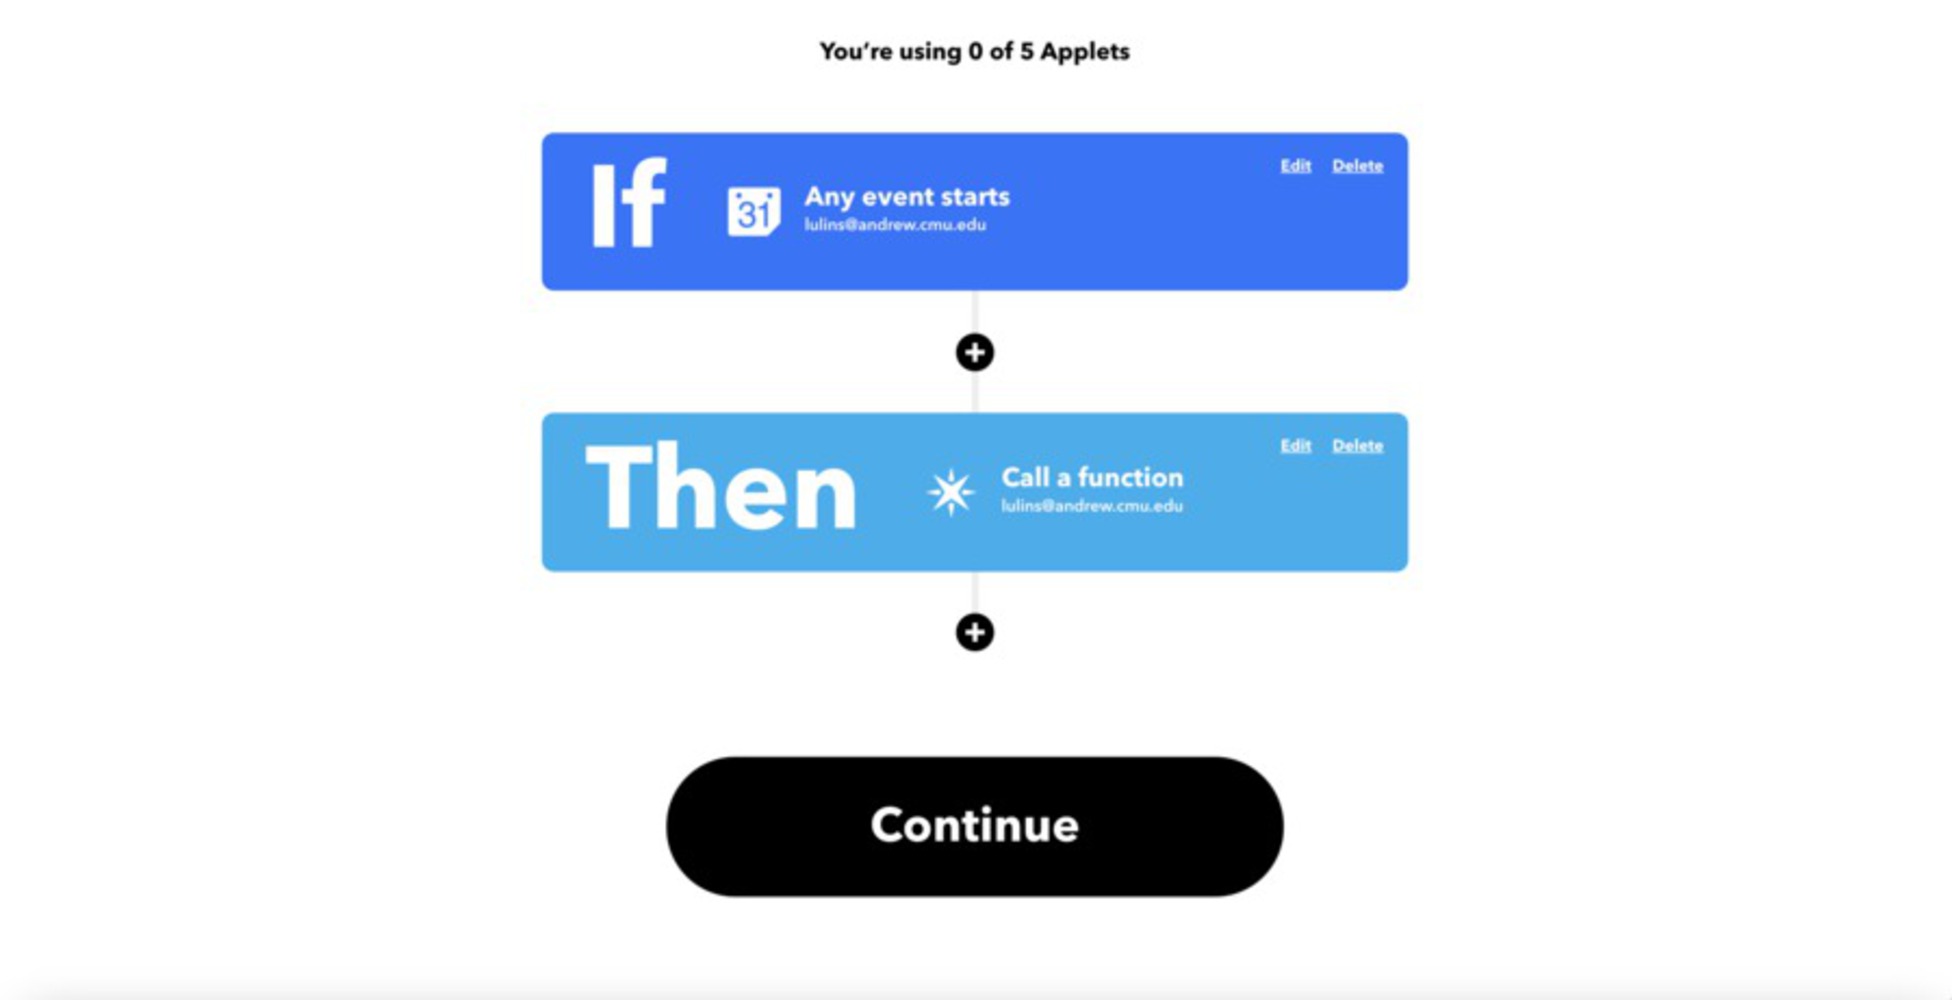
This exercise asks us to create an ambient calendar alert using a neopixel strip. It is connected to Google Calendar through IFTTT and is able to send an alert to a device 15 minutes before an appointment. The neopixels will respond by fading to red slowly to signal the meeting approaches. After the meeting has begun, it starts fading back to white.
Program your Neopixel Ring to display a cool white by default.
// This #include statement was automatically added by the Particle IDE.
#include <neopixel.h>

// IMPORTANT: Set pixel COUNT, PIN and TYPE
#define PIXEL_PIN D2
#define PIXEL_COUNT 16
#define PIXEL_TYPE WS2812

Adafruit_NeoPixel strip = Adafruit_NeoPixel(PIXEL_COUNT, PIXEL_PIN, PIXEL_TYPE);

void setup() {

  strip.begin();
  strip.show(); // Initialize all pixels to 'off'

}

void loop() {

      uint16_t i;
      uint32_t c = strip.Color( 255, 255, 255 ); // white

      for( int i = 0; i < strip.numPixels(); i++ ){
          strip.setPixelColor(i, c); // set a color
      }
      strip.show();
      delay( 100 );
}// This #include statement was automatically added by the Particle IDE.
#include <neopixel.h>
// IMPORTANT: Set pixel COUNT, PIN and TYPE
#define PIXEL_PIN D2
#define PIXEL_COUNT 16
#define PIXEL_TYPE WS2812
Adafruit_NeoPixel strip = Adafruit_NeoPixel(PIXEL_COUNT, PIXEL_PIN, PIXEL_TYPE);
bool meetingStatus = false;
void setup() {
strip.begin();
strip.show(); // Initialize all pixels to 'off'
Particle.function("meetingsoon", meetingSoon);
}
int meetingSoon(String command){
if ( command == "yes" ){
meetingStatus = true;
} else if ( command == "no" ){
meetingStatus = false;
}
return 0;
}
void loop() {
uint32_t white = strip.Color(255,255,255); // white
uint32_t red = strip.Color( 255,0, 0 ); // red
if ( meetingStatus == true ){
for( int i = 0; i < strip.numPixels(); i++ ){
strip.setPixelColor(i, red);
strip.setBrightness(50);
}
strip.show();
delay( 100 );
} else {
for( int i = 0; i < strip.numPixels(); i++ ){
strip.setPixelColor(i, white);
strip.setBrightness(50);
}
strip.show();
delay( 100 );
}
}// This #include statement was automatically added by the Particle IDE.
#include <neopixel.h>
// IMPORTANT: Set pixel COUNT, PIN and TYPE
#define PIXEL_PIN D2
#define PIXEL_COUNT 16
#define PIXEL_TYPE WS2812
Adafruit_NeoPixel strip = Adafruit_NeoPixel(PIXEL_COUNT, PIXEL_PIN, PIXEL_TYPE);
bool meetingStatus = false;
unsigned long startTime = 0;
unsigned long fadeTime = 60000; //one minute
float redVal = 255.0;
float greenVal = 255.0;
float blueVal = 255.0;
void setup() {
strip.begin();
strip.show(); // Initialize all pixels to 'off'
Particle.function("meeting_soon", meetingSoon);
}
int meetingSoon(String command){
startTime = millis();
if (command == "yes"){
meetingStatus = true;
} else if (command == "no") {
meetingStatus = false;
}
return 0;
}
void loop() {
uint32_t white = strip.Color(255, 255, 255); // White
uint32_t red = strip.Color(255, 0, 0); // red
uint32_t currentColor;
if (meetingStatus == true) {
unsigned long now = millis();
while (now - startTime <= fadeTime){
now = millis();
greenVal -= (255/60);
blueVal -= (255/60);
currentColor = strip.Color(255, greenVal, blueVal);
for( int i=0; i< strip.numPixels(); i++) {
strip.setPixelColor(i, currentColor);
strip.setBrightness(50);
}
strip.show();
delay(1000);
}
} else {
for( int i=0; i< strip.numPixels(); i++) {
strip.setPixelColor(i, white);
strip.setBrightness(50);
}
strip.show();
delay( 100 );
}
}// This #include statement was automatically added by the Particle IDE.
#include <neopixel.h>
// IMPORTANT: Set pixel COUNT, PIN and TYPE
#define PIXEL_PIN D2
#define PIXEL_COUNT 16
#define PIXEL_TYPE WS2812
Adafruit_NeoPixel strip = Adafruit_NeoPixel(PIXEL_COUNT, PIXEL_PIN, PIXEL_TYPE);
bool meetingStatus = false;
bool redOn = false;
unsigned long startTime = 0;
unsigned long fadeTime = 60000; //one minute
float redVal = 255.0;
float greenVal = 255.0;
float blueVal = 255.0;
void setup() {
strip.begin();
strip.show(); // Initialize all pixels to 'off'
Particle.function("meeting_soon", meetingSoon);
}
int meetingSoon(String command){
startTime = millis();
if (command == "yes"){
meetingStatus = true;
} else if (command == "no") {
meetingStatus = false;
}
return 0;
}
void loop() {
uint32_t white = strip.Color(255, 255, 255); // White
uint32_t red = strip.Color(255, 0, 0); // red
uint32_t currentColor;
if (meetingStatus == true) {
unsigned long now = millis();
while (now - startTime <= fadeTime){
now = millis();
greenVal -= (255/60);
blueVal -= (255/60);
currentColor = strip.Color(255, greenVal, blueVal);
for( int i=0; i< strip.numPixels(); i++) {
strip.setPixelColor(i, currentColor);
strip.setBrightness(50);
}
strip.show();
delay(1000);
}
redOn = true;
}else if (meetingStatus == false && redOn == true){
greenVal = 0.0;
blueVal = 0.0;
unsigned long now = millis();
while (now - startTime <= fadeTime){
now = millis();
greenVal += (255/60);
blueVal += (255/60);
currentColor = strip.Color(255, greenVal, blueVal);
for( int i=0; i< strip.numPixels(); i++) {
strip.setPixelColor(i, currentColor);
strip.setBrightness(50);
}
strip.show();
delay(1000);
}
redOn = false;
} else {
for( int i=0; i< strip.numPixels(); i++) {
strip.setPixelColor(i, white);
strip.setBrightness(50);
}
strip.show();
delay( 100 );
redOn = false;
}
}// This #include statement was automatically added by the Particle IDE.
#include <neopixel.h>
// IMPORTANT: Set pixel COUNT, PIN and TYPE
#define PIXEL_PIN D2
#define PIXEL_COUNT 16
#define PIXEL_TYPE WS2812
Adafruit_NeoPixel strip = Adafruit_NeoPixel(PIXEL_COUNT, PIXEL_PIN, PIXEL_TYPE);
bool meetingStatus = false;
bool redOn = false;
unsigned long startTime = 0;
unsigned long fadeTime = 900000; //15 minute
float redVal = 255.0;
float greenVal = 255.0;
float blueVal = 255.0;
void setup() {
strip.begin();
strip.show(); // Initialize all pixels to 'off'
Particle.function("meeting_soon", meetingSoon);
}
int meetingSoon(String command){
startTime = millis();
if (command == "yes"){
meetingStatus = true;
} else if (command == "no") {
meetingStatus = false;
}
return 0;
}
void loop() {
uint32_t white = strip.Color(255, 255, 255); // White
uint32_t red = strip.Color(255, 0, 0); // red
uint32_t currentColor;
if (meetingStatus == true) {
unsigned long now = millis();
while (now - startTime <= fadeTime){
now = millis();
greenVal -= (255/60);
blueVal -= (255/60);
currentColor = strip.Color(255, greenVal, blueVal);
for( int i=0; i< strip.numPixels(); i++) {
strip.setPixelColor(i, currentColor);
strip.setBrightness(50);
}
strip.show();
delay(1000);
}
redOn = true;
}else if (meetingStatus == false && redOn == true){
greenVal = 0.0;
blueVal = 0.0;
unsigned long now = millis();
while (now - startTime <= fadeTime){
now = millis();
greenVal += (255/60);
blueVal += (255/60);
currentColor = strip.Color(255, greenVal, blueVal);
for( int i=0; i< strip.numPixels(); i++) {
strip.setPixelColor(i, currentColor);
strip.setBrightness(50);
}
strip.show();
delay(1000);
}
redOn = false;
} else {
for( int i=0; i< strip.numPixels(); i++) {
strip.setPixelColor(i, white);
strip.setBrightness(50);
}
strip.show();
delay( 100 );
redOn = false;
}
}
From this project, I learned how to use Neopixels to create multiple signals. I think it's quite useful when I want to represent different event statuses. Besides, IFTTT is a very useful platform to combine Particle with other applications.
It was extremely helpful to follow the Lab site's suggestion of breaking the practice exercise down into small steps, rather than trying to program it all at once. This is a method I will definitely implement with future projects.