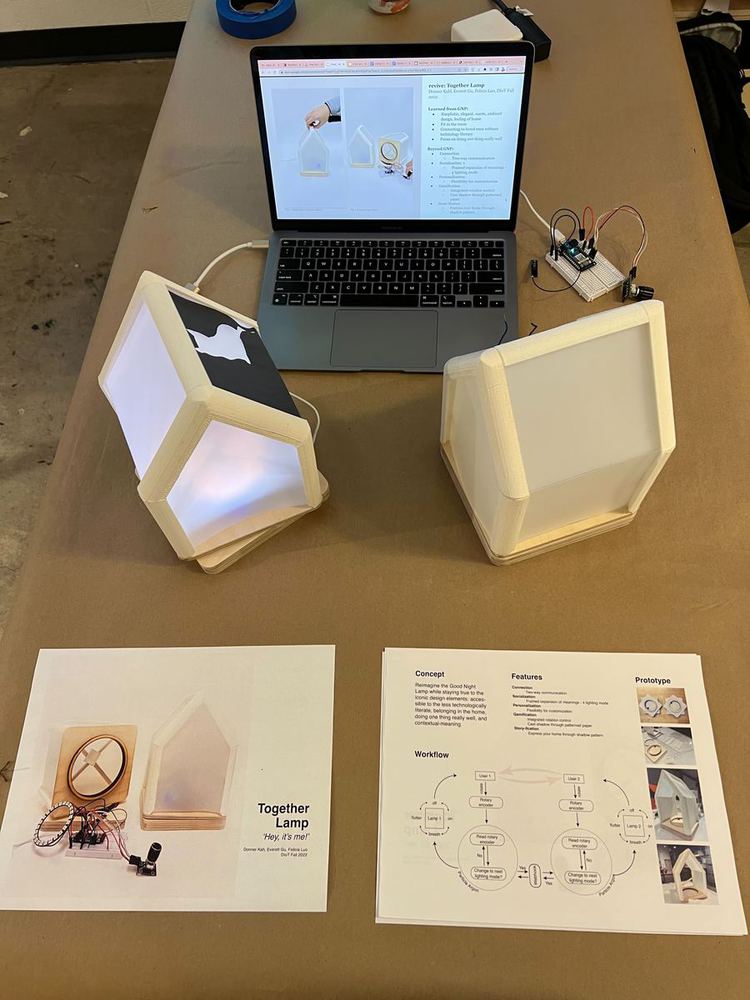
Together Lamp: Revisiting the Good Night Lamp
Made by Donner Kahl, Felicia Luo and Everett Jiaxi Gu
Made by Donner Kahl, Felicia Luo and Everett Jiaxi Gu
Reimagine the Good Night Lamp while staying true to the iconic design elements: accessible to the less technologically literate, belonging in the home, doing one thing really well, and contextual-meaning.
Created: December 2nd, 2022
Reimagine the iconic Good Night Lamp while staying true to the design concepts designated to be most important: accessible to the less technologically literate, belonging in the home, doing one thing really well, and contextual-meaning.
First announced in 2013, the Good Night Lamp's goal was to bring the connectivity of technology to people with low technology literacy. The creator, Alexandra Deschamps-Sonsino, chose to have limited functionality (with a few easter eggs provided on Github) and "just nail it."
The primary “home”-owner would purchase a home and accompanying little home(s). The little home(s) would be distributed to friends and or family. The “home”-owner would then press a button on top of the primary large lamp to light it up, along with the accompanying lamps.
The single action of lighting up the main lamp, with the smaller lamps following, provided little meaning but allowed a plethora of added meaning - just left work, available to talk, off to bed, etc.
Alex made the device very easy to use, you plugged in the devices and through GSM (an early cellular technology, the large house was found and connected with the nearby houses. The simplicity is made more admirable considering the difficulty of connecting devices with no interface even in 2022.
Alex sought to bring function to the home, not just create a device. This inspired the use of wood and plastic as warmer home products - "think Ikea rather than Apple."
The Good Night Lamp lived 6 years as a consumer product, eventually being discontinued (partially due to the dependence on GSM, which lost its role with the proliferation of 4G). However, the Good Night Lamp's design contribution lives on and the lamp itself can still be found in design museums.
What is known?
Mature products similar to the lamp
Archived documents and case studies
Multiple DIY resources
What is unknown / to be discovered?
Connectivity: how were additional lamps added? Was it truly just a text message or did it use a cloud?
Technology related to additional features we may add
We understood that reimagining the Good Night Lamp would require a level of intention that speaks to the immense intention that went into the lamp design. We began by identifying the primary design features of the lamp, which we defined as follows:
Accessible to the less technologically literate
Doing one thing really well
Belonging in the home
Contextual-meaning
Then with the features identified, we ranked them in terms of importance. This would provide us a vision for our reimagination. The iterative process followed asking ourselves the question: if could stay true to one feature, what would it be? Then, eliminating the winning feature, we asked it again. With our features prioritized, we considered how they would influence our reimagining process.
Accessible to the less technologically literate means a simple interface. We avoided screens or complex actions. Doing one thing really well guided us away from adding multiple features, and we eventually decided to adapt the lamp with one feature simply and really well. Belonging in the home we understood to mean warm, welcoming, and unobtrusive. Finally, contextual-meaning guided us away from choosing a feature that had meaning in of itself. We wanted to adapt without losing the user’s ability to add meaning, in fact.
We then set out in the design process to consider how we want the user to interact with the lamp, how the lamp will interact with the physical environment, and how the lamps will interact with each other. We considered the following questions to guide our consideration for the purpose and meaning of our reimagining:
What was the Good Night Lamp lacking?
Portability - the Good Night Lamp was quite large and did not allow connection without being with the lamp
Two way communication - the Good Night Lamp only allowed for the large lamp to light up the smaller lamps; two way communication was only possible if users each purchased a large lamp and exchanged small ones
The house is very traditional - the house shape may not appeal to everyone
It lacks expression - the lamp is singular and abstract, there is no personalization or expression
What did it do well?
Meaning came completely from context
Very warm and ambient design - use of wood and white plastic
Easy to use - starting up just required plugging it in and a mere button press was its only function
Shape of the home - gable roof shape - it is common in many cultures and is easily recognizable as safe and welcoming
Anonymity, target customer with different ethnographic backgrounds - it’s lack of specificity allowed many people and cultures to connect with it
“Homey” feel of single light and “warm” materials
With these considerations, we decided to impact one functional feature and one design feature. This guided us to our core questions: what purpose do we want the added feature to serve and would the new feature be design or functional? How does the added feature impact the context - limiting or expanding? We did not want to select a feature then fit it to the lamp, we wanted to consider the effect we wanted and identify a feature to match it.
We considered mobility, creating a network of lamps, allowing a form of expression, providing additional and potentially more specific messages, or adding shadows. We decided that we wanted to focus on two-way communication for our functional feature and enabling a form of personalization for the design component.
We elected to not deviate away from a single light as our feature, but sought to add a two way communication through different light patterns. We wanted patterns that continued to be ambient and decided to use off, on, breathe, and flutter. On and off were natural selections and breathing is common in other ambient lights. Flutter was selected as an evolution from blinking; however, blinking felt too obtrusive. Therefore, we explored patterns and decided flutter offers a happy medium between flash and ambient.
For the design component, we wanted to give users the ability to define home for them. Initially we thought this meant deviating from the gable shape, but we wanted to pay homage to the Good Night Lamp and recognize the safe and comfort the recognizable symbol provided. Thus, we elected to give users the ability to personalize what they considered home by allowing for cutouts or stencils to be added to the frame.
Finally, we had to consider how the user would interact with the device. We wanted to go beyond the simplicity of a button, we wanted a design that made the home feel uninterrupted. Rotating the shell provided that feeling.
In conclusion, our process left us with a gable home with rivets on the outside that allowed for stencils to be added, which rotated to activate 4 different light patterns (including off). This stayed true to the Good Night Lamp. We avoided an interface and focused on physical interaction by the user to stay true to accessibility. We wanted to continue to use a single color lamp really well. We selected a shape that would fit well in the home. Finally, we expanded the contextual meaning without imposing our own.
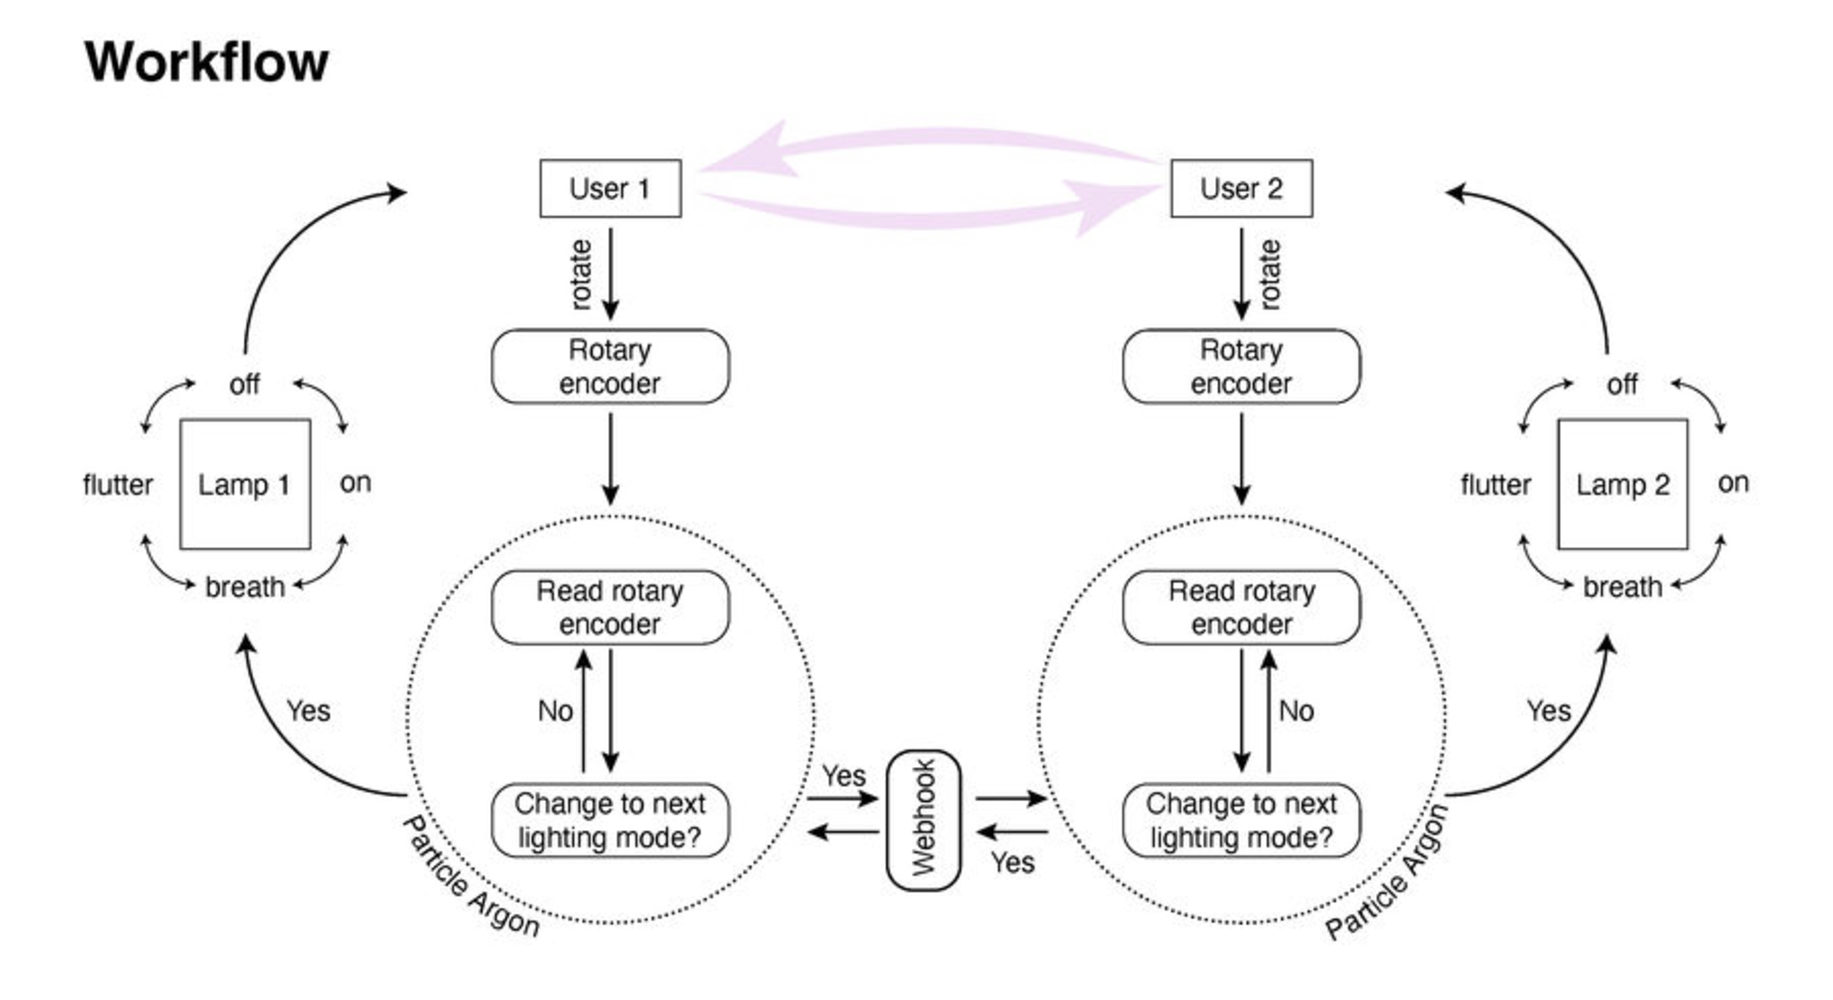
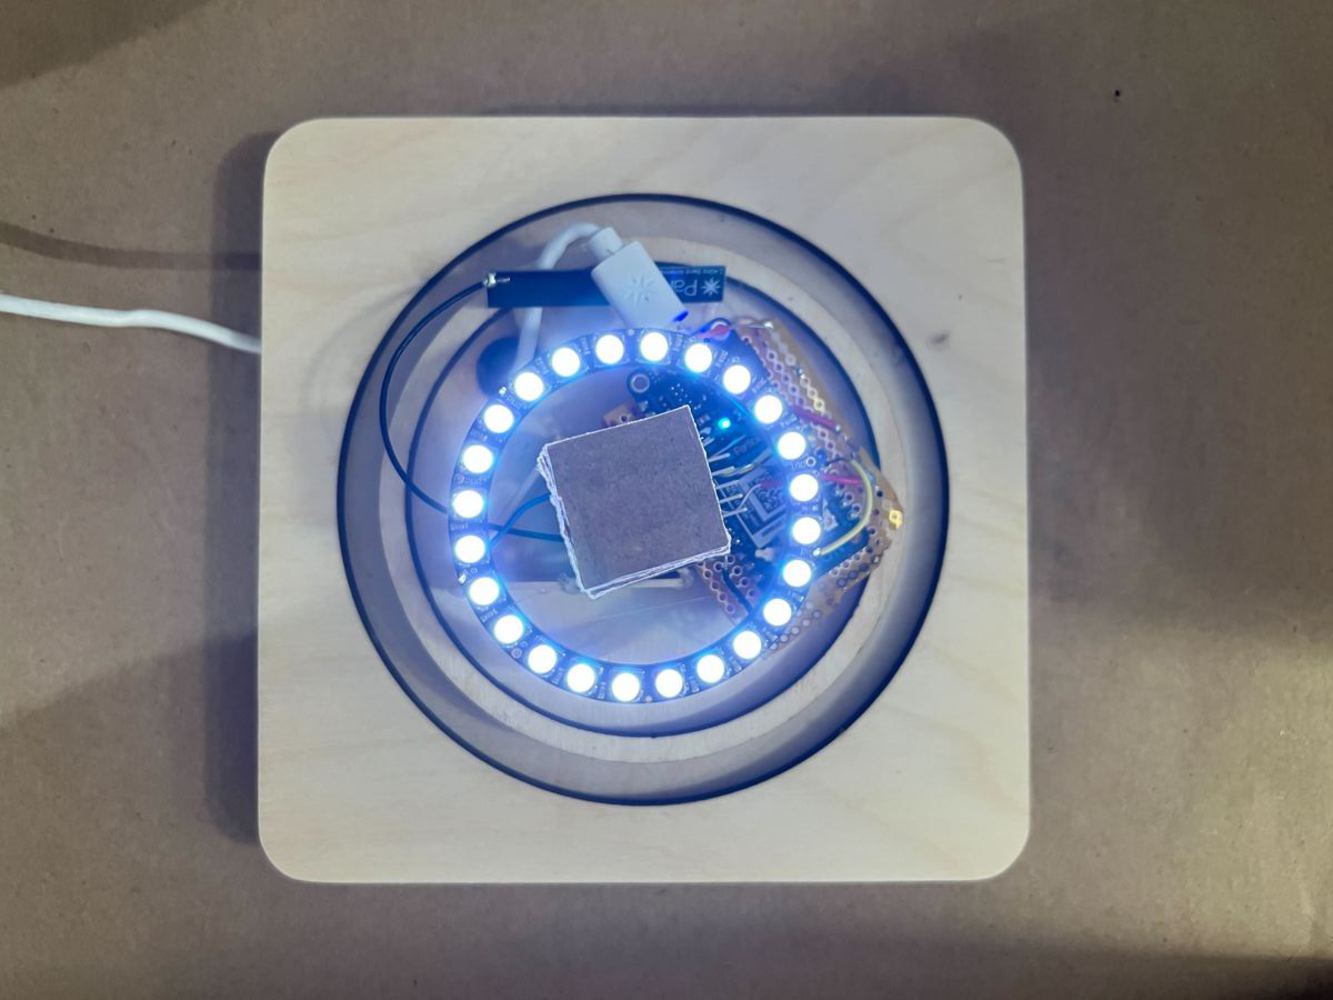
For two-way communication, we designed a workflow synchronizing the two lamps. Whenever either lamp rotates 90 degree, a microcontroller (Particle Argon) reads the rotary encoder position changes 5, it would not only control its wired neopixel to change to the next or previous lighting mode, but also publish an event to the cloud platform, and the other microcontroller that has subscribed to the event would control their wired neopixel to change to the same. See the following workflow diagram and script for more.
// This #include statement was automatically added by the Particle IDE.
#include <libfixmath.h>
// This #include statement was automatically added by the Particle IDE.
#include <neopixel.h>
// This #include statement was automatically added by the Particle IDE.
#include <math.h>
#include <neopixel.h>
#include <Particle.h>
//Set the neopixel to pin 5
#define PIXEL_PIN D5
//Set the pixel count
#define PIXEL_COUNT 32
//Set the neopixel type
#define PIXEL_TYPE WS2812
//Set the rotary encoder pins
#define encoder0PinA D2 // CLK
#define encoder0PinB D3 // DT
#define encoderPushPin D4 // SW
// Rotary Encoder Setup
int encoder0Pos = 0;
int encoder0PinALast = LOW;
int n = LOW;
int modeChange = 0;
// Neopixel Setup
int num_options = 4;
int steps = 5;
int indices = 0;
int prev_idx = 0;
//Create the neopixel strip function
Adafruit_NeoPixel strip = Adafruit_NeoPixel(PIXEL_COUNT, PIXEL_PIN, PIXEL_TYPE);
unsigned long lastButtonPress = 0;
long last_on = 0;
long last_low = 0;
//This determines the minimum brightness
int pwr_min = 10;
//This determines the starting brightness but will change
int pwr = 20;
//This determines highest brightness
int pwr_max = 50;
//Neopixel color set up
uint32_t off = strip.Color(0,0,0);
uint32_t color = strip.Color(pwr*r,pwr*g,pwr*b);
uint32_t test = strip.Color(pwr*r,0,0);
uint32_t low_light = strip.Color(pwr_min*r,pwr_min*g,pwr_min*b);
void setup() {
Serial.begin(9600);
pinMode (encoder0PinA, INPUT);
pinMode (encoder0PinB, INPUT);
pinMode (encoderPushPin, INPUT_PULLUP);
//This determines the color, using the brightness indicator
uint32_t color = strip.Color(pwr, pwr, pwr);
strip.begin();
strip.show();
//Neopixel lights up when connected
for(int j=0; j < strip.numPixels(); j++)
{
strip.setPixelColor(j,color);
strip.show();
}
delay(1000);
for(int j=0; j< strip.numPixels(); j++)
{
strip.setPixelColor(j, off );
strip.show();
}
// subscribe to Donner
Particle.subscribe( "D2F_CW", handleCW );
Particle.subscribe( "D2F_CCW", handleCCW );
Particle.subscribe( "D2F_BTN", handleBTN );
}
void loop() {
// Get index of lighting mode
rotary();
// add mode change (1 or -1 or 0) to current indices
indices = indices + modeChange;
// make sure indices can only be 0,1,2,3
if (indices > 3) {
indices = 0;
}
if (indices < 0) {
indices = 3;
}
// Read Rotary Button
int btnState = digitalRead(encoderPushPin);
if (btnState == LOW) {
// reset when button is pushed
indices = 0;
encoder0Pos = 0;
Particle.publish( "F2D_BTN" ); // sync the other lamp
}
// Light up Neopixel
if (prev_idx != indices) {
Serial.printf("indices: %d\n", indices);
Serial.printf("prev_idx: %d\n", prev_idx);
// 0 - off
if( indices == 0 ){
for(int j=0; j< strip.numPixels(); j++){
strip.setPixelColor(j, off );
strip.show();
}
}
// 1 - on
else if( indices == 1 ){
for(int j=0; j< strip.numPixels(); j++) {
strip.setPixelColor(j, color );
strip.show();
}
}
}
// 2 - breath
if( indices == 2 ) {
breathe( 1 );
}
// 3 - flutter
else if( indices == 3 ) {
flutter(1);
}
prev_idx = indices;
}
// Calc the sin wave for the breathing white led
void breathe( uint8_t wait ){
// CITATION: reference code from Daragh
float val = (exp(sin(millis()/2000.0*M_PI)) - 0.36787944)*108.0;
Serial.println( val );
uint16_t i;
uint32_t c = strip.Color(val/2, val/2, val/2);
for(i=0; i< strip.numPixels(); i++) {
strip.setPixelColor(i, c);
}
strip.show();
delay(wait);
}
void flutter( uint8_t wait ){
long now = millis();
if(now - last_on > 1000) // low light for 1s
{
for(int j=0; j < strip.numPixels(); j++)
{
strip.setPixelColor(j,low_light);
strip.show();
}
last_on = now;
}
delay(wait);
if(last_on - last_low >500) // on for 0.5s
{
for(int j=0; j < strip.numPixels(); j++)
{
strip.setPixelColor(j,color);
strip.show();
}
last_low = millis();
}
delay(wait);
}
// check mode index change
// output 1 (rotate CW) or -1 (rotate CCW) or 0 (no change)
void rotary() {
// read encoder pin A and pin B change to determine if encoder position has changed,
// and count the change as encoder0Pos
n = digitalRead(encoder0PinA);
if ((encoder0PinALast == LOW) && (n == HIGH))
{
if (digitalRead(encoder0PinB) == LOW) {
encoder0Pos++;
}
else {
encoder0Pos--;
}
}
encoder0PinALast = n;
// mode change to next or previous every 5 steps
if (encoder0Pos > 4) {
modeChange = 1; // mode change to next
Particle.publish( "F2D_CW" ); // sync the other lamp if mode change
encoder0Pos = 0; // reset encoder step count
}
else if (encoder0Pos < -4) {
modeChange = -1; // mode change to previous
Particle.publish( "F2D_CCW" ); // sync the other lamp if mode change
encoder0Pos = 0; // reset encoder step count
}
else {
modeChange = 0; // no mode change
}
}
// handle event from Donner
// rotate clockwise
void handleCW (const char *event, const char *data) {
indices = indices + 1;
}
// rotate counter-clockwise
void handleCCW (const char *event, const char *data) {
indices = indices - 1;
}
// button pushed - reset
void handleBTN (const char *event, const char *data){
indices = 0;
encoder0Pos = 0;
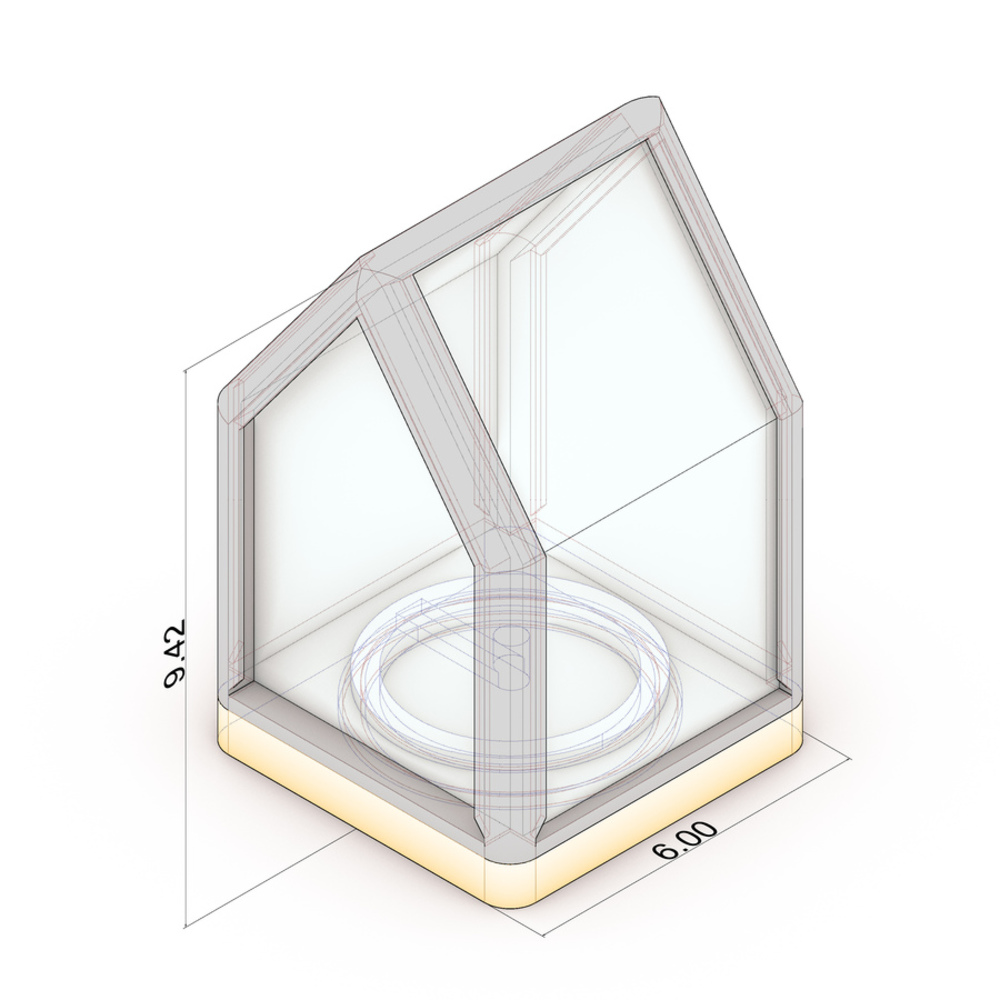
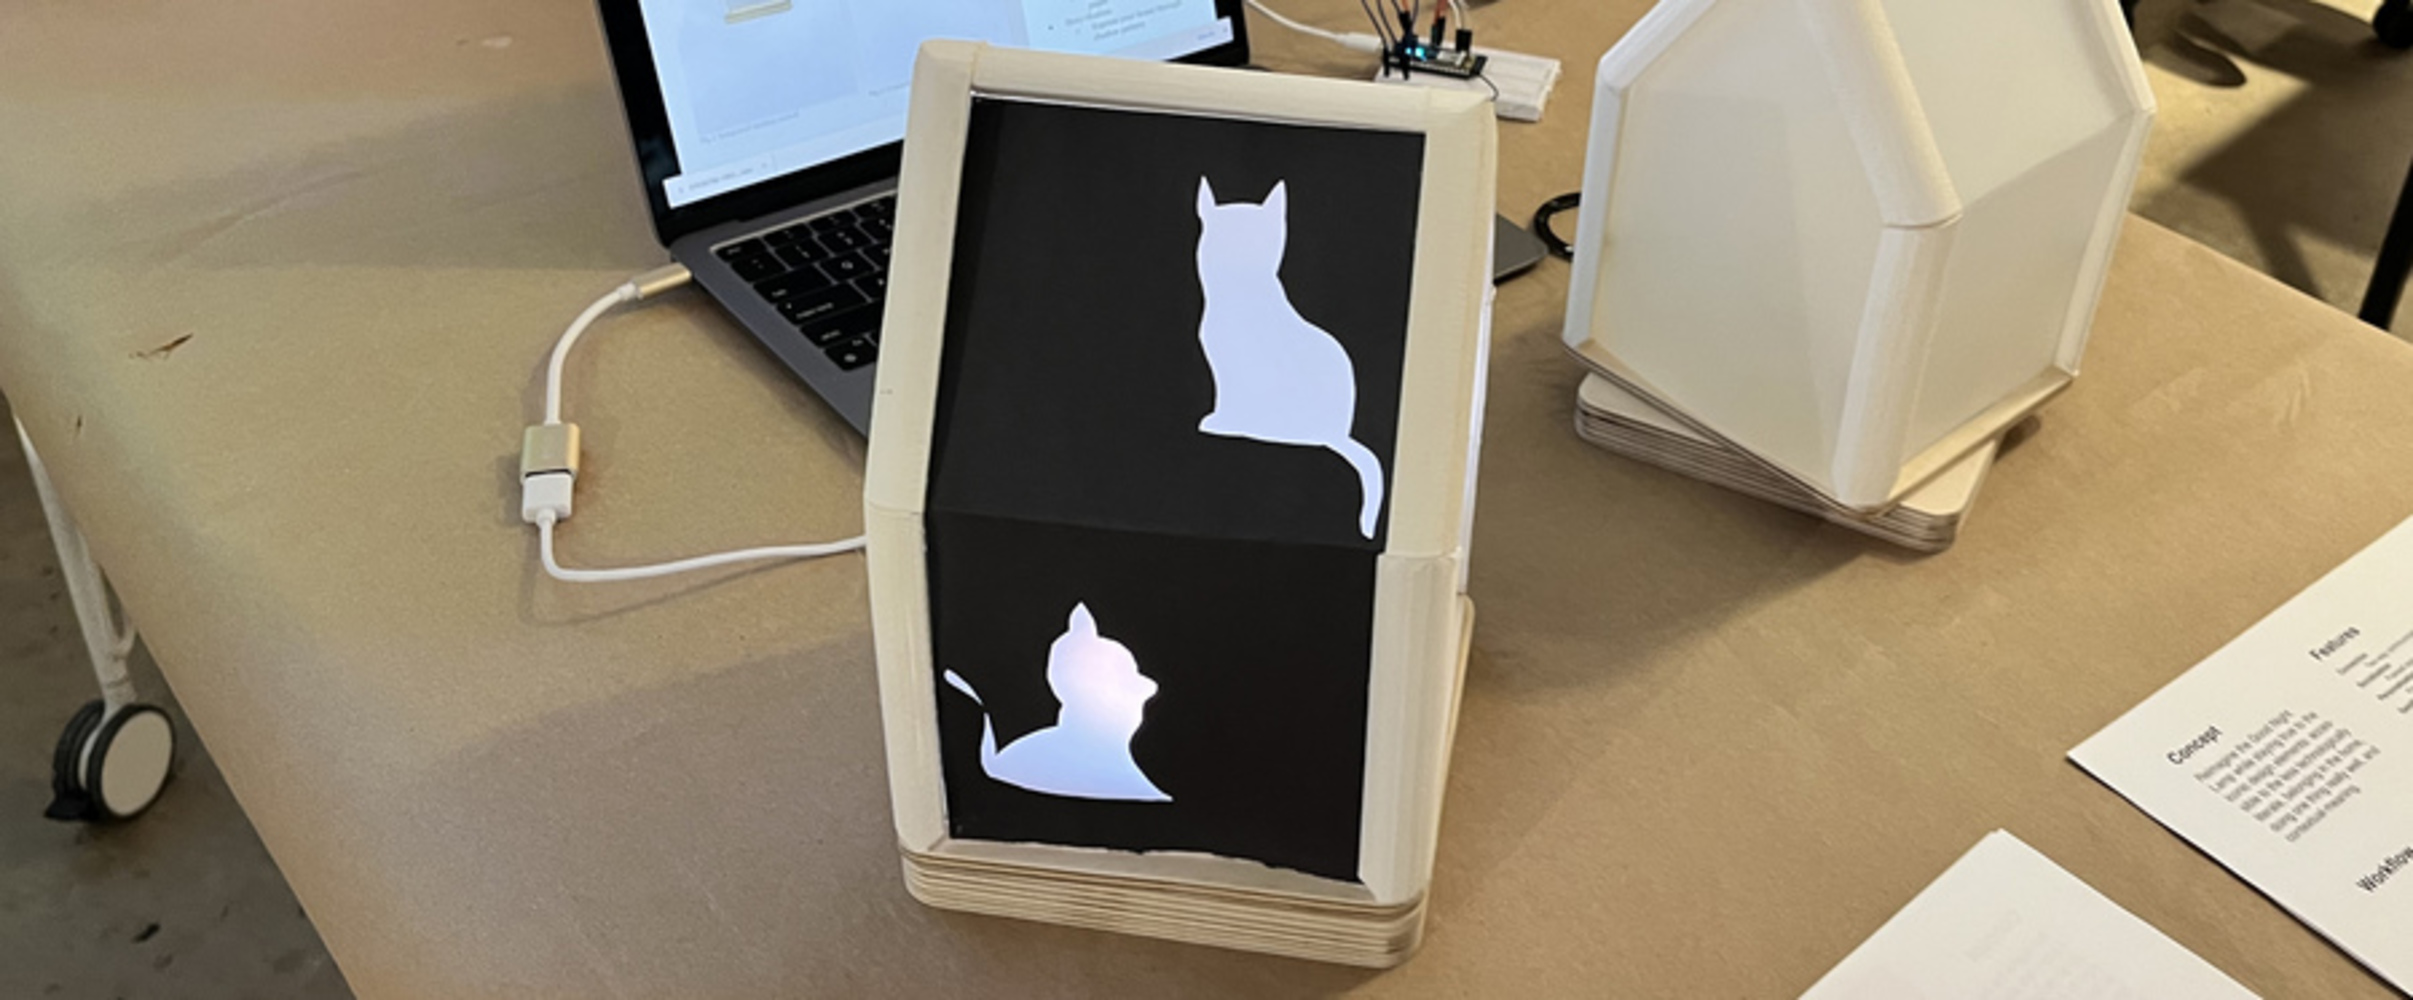
}In our initial discussions, we compared the purely square form and the house with a sloping roof, discussing which would be better for the user to use the lamp as he or she understood it. In the end, we decided to use a more abstract small house form to suggest a home application scenario. At the same time, several sides of the house will be set up with rails so that users can attach personalized stickers or textured cards to the shade, giving the lamp a personalized connotation that fits different people's understanding of the concept of home and companionship.
Several iterations of the model were carried out in Rhino, and the size was designed to be slightly larger so that the decorative paper cutouts that could be attached to the shade would be large enough to express different patterns. The three materials are used in this prototype: 3D printed frame, frosted acrylic sheet and wooden base with a rotation track. The bonding surfaces where the parts meet and the junction of the rotation track were designed with a tolerance to ensure the smooth rotation of the lampshade on the base and the ability to freely fix paper cutouts with individual patterns to the external frame at a later stage.
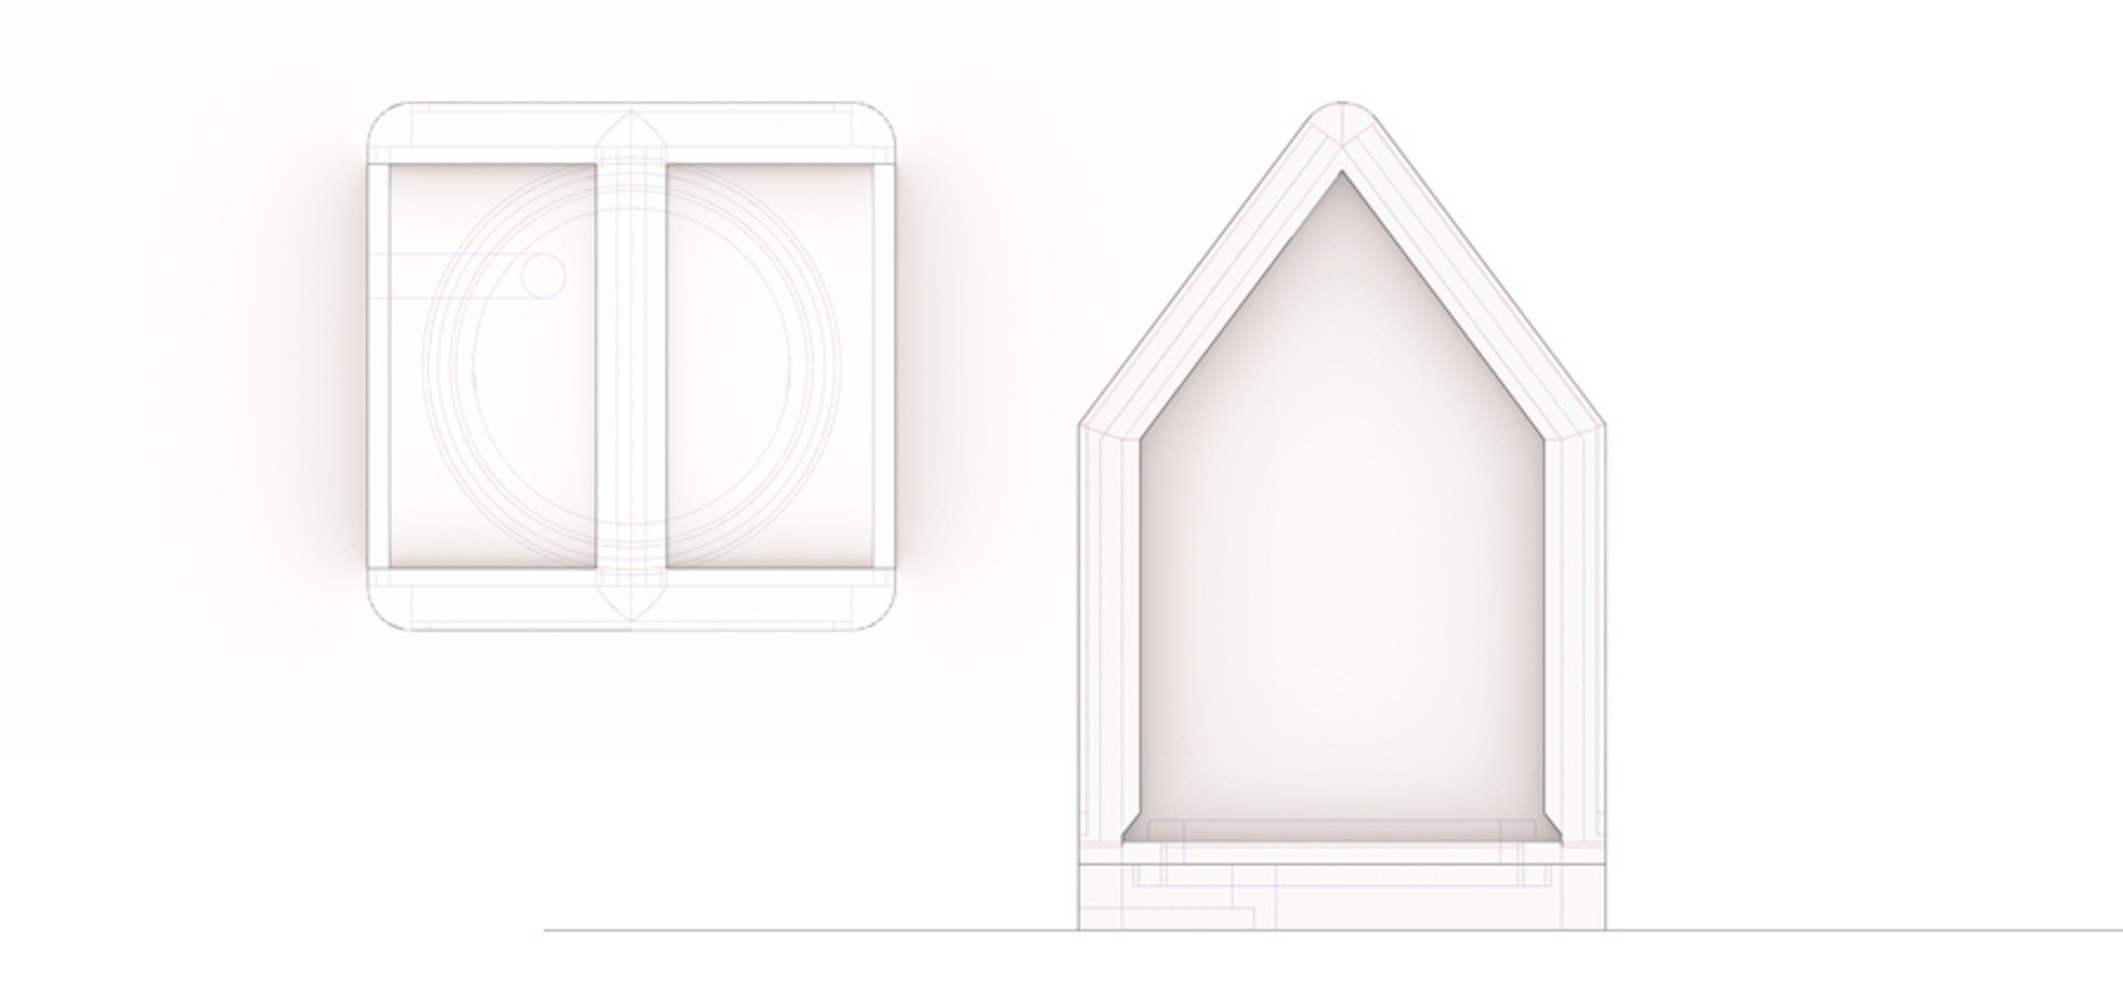
We used a combination of digital fabrication and manual assembling. In the diagram below, the gray part is the 3D-printed lampshade frame, the light blue is the manually assembled frosted acrylic sheet, and the light yellow is the wooden base consisting of 3 layers of laser-cut 1/4" basswood boards.
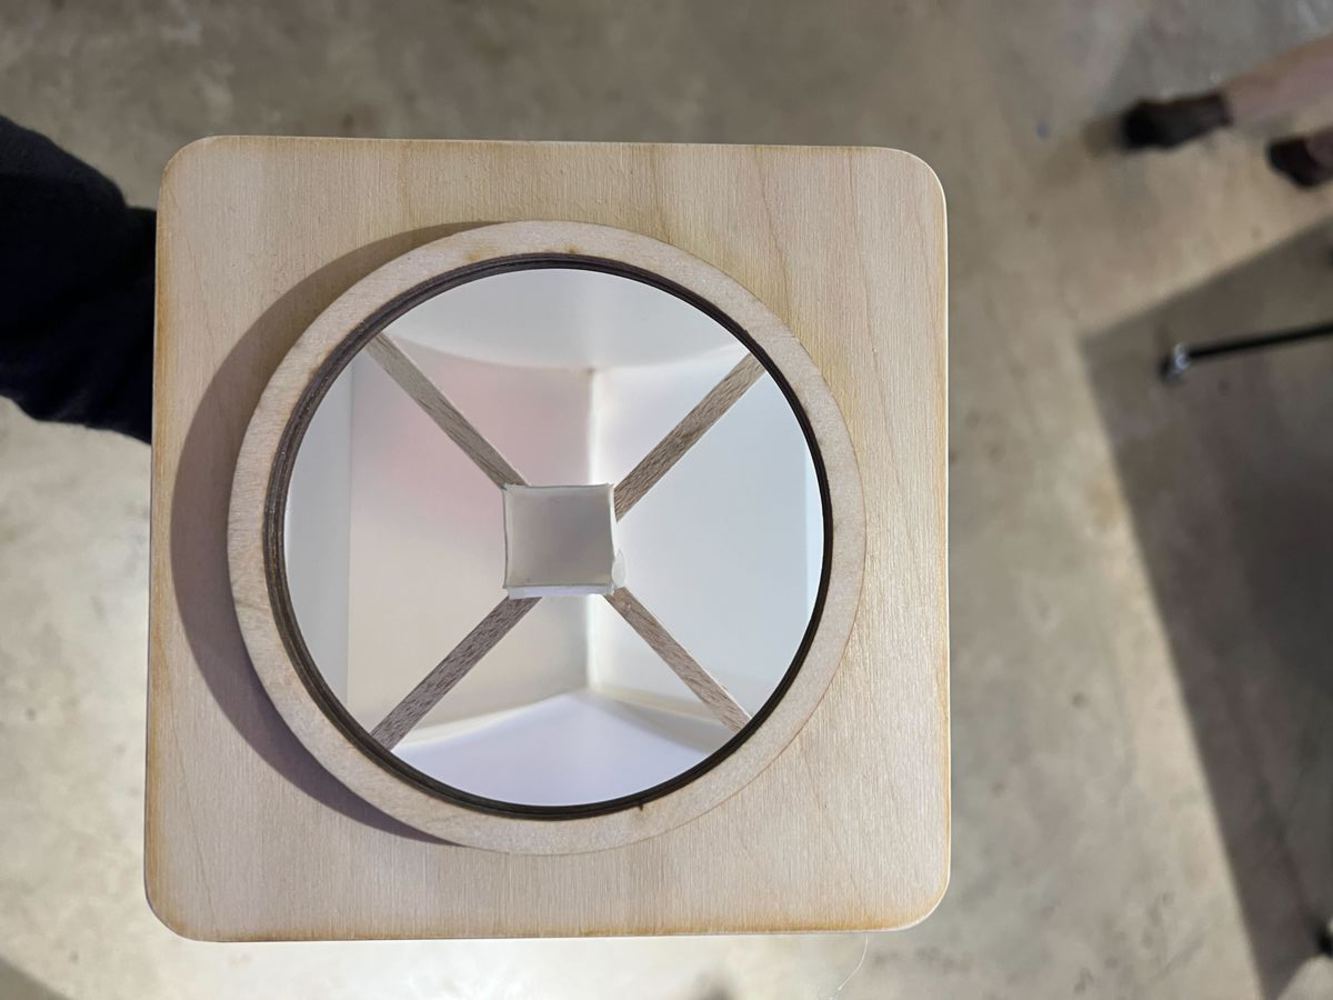
As our intention was to integrate the control of the light in the house itself and decided that rotating the house would change the light, we specifically designed a hat-head mechanism, so that we can detach the lampshade from the base for set up and troubleshoot the electronics, but at the same time allow lampshade rotation to drive the rotary encoder fixed to the base. The head is a solid cube glued to the rotary encoder. And the hat is a cubical shell with open bottom glued to a cross spanning the light shell. Whenever the lampshade-cross-hat whole rotates, the hat would bring the head to rotate since they fit perfectly. Therefore the rotary encoder rotates. We also carefully place the hat-head higher than all the other electronics, so that the wires and parts will not interfere with the rotation movement.
The following video shows the different modes of a single light and the way the two lights interact with each other. To make the demonstration more intuitive, we removed the shade of one lamp to show how the internal circuitry works. In general, the shade can be easily rotated to switch to a different mode by holding the frame at the top of the shade, and the mode switch will also affect the other lamp at the same time to achieve our preconceived interactive scenario.
If we had more time, we believe it would be very interesting to explore the following areas of functional adaptation.
1. more ways to change the lighting with multiplayer interaction modes, but still maintain the simplicity of the functionality as originally envisioned, keeping the ambient device positioned to differentiate it from the mobile newsletter. This includes both the details of debugging, such as the frequency of light and dark changes in fluttering mode needs to be adjusted; also includes the need to introduce subtle changes in light color to expand the richness of the message.
2. Optimized physical prototype assembly method. The current version of rotary encoder is not convenient to press the control. We tried to add cotton and wooden spacers between the shade and the base so that the shade could be rotated and pressed down for additional functionality, but time constraints did not allow for the simplicity of the "button" look. The next iteration of the process will no doubt require some simple mechanical design to work with the circuitry.
What could/will go wrong
Electronic parts could cast shadow
How to troubleshoot without tearing apart the lamp
Inappropriate flashing due to inaccurate sensors
Solutions
Remember the inspiration: do one thing really well
Fail gracefully - what becomes of the item if it fails?
Ambient notification of failure
Summarizing the various feedback received during the final presentation, the simplicity we reached in the interaction mode and appearance design was a success. We need to reflect on the need for more research and understanding of social interaction patterns, as well as the need for more simplicity in the design and assembly of physical prototypes to make precision easier to achieve.
In terms of understanding social interaction, firstly in terms of design, more time should be set aside after the lights are built to test how people create their own unique ways of communicating, especially when the two lights are in two separate spaces. Such testing will help us to summarize how unexpected situations will arise during the interaction. And on this basis, we will further test how the lamp can be used as an ambient device in a complex home environment to meet people's living habits. The technical aspects can also be improved based on a deeper understanding of social interaction patterns, such as the possibility of interaction between multiple etc., so that the lamp can be used in large families with many members without confusing the messaging. In order to achieve more complex functionality, can other parameters introduced, such as the change of light color, make the light still simple and easy to use?
There is also considerable detail in the assembly of the physical prototype that could be optimized. Because the first time we assembled the lamp we divided the individual parts into numerous pieces, the gluing process resulted in many errors, and we needed to pre-design the assembly pattern between the parts in detail and then work on it.
Blumberg, P. O. (2021, January 8). Friendship Lamps Are Officially The Cutest Way To Stay Connected To Your BFF. Women’s Health. https://www.womenshealthmag.com/relationships/g35142065/long-distance-friendship-lamps/
Expert, A. (2020, September 21). Network-Connected Lamps (IoT for Beginners). ATMega32 AVR. https://atmega32-avr.com/network-connected-lamps-iot-for-beginners/
Family Board using AWS IOT. (n.d.-a). Hackster.Io. Retrieved December 17, 2022, from https://www.spark.hackster.io/rseltrecht/family-board-using-aws-iot-c75838
Family Board using AWS IOT. (n.d.-b). Hackster.Io. Retrieved December 17, 2022, from https://www.spark.hackster.io/rseltrecht/family-board-using-aws-iot-c75838
Good Night Lamp – designswarm. (n.d.). Retrieved December 17, 2022, from https://www.designswarm.com/good-night-lamp/
Jürgen. (2022). DIY Remote Friendship Lamp [C++]. https://github.com/juekr/remote-friendship-lamp (Original work published 2020)
Lamps, F. (n.d.). About Friendship Lamps. Friendship Lamps. Retrieved December 17, 2022, from https://www.friendlamps.com/pages/about-us
LeWeb (Director). (2013, June 6). Good Night Lamp—Start-Up Competition—LeWeb London 2013. https://www.youtube.com/watch?v=sdp-fXRZLkU
(No title). (n.d.). Retrieved December 17, 2022, from https://web.archive.org/web/20170729053057/http://goodnightlamp.com/
Sleigh, A. (1 C.E., November 30). Alexandra Deschamps-Sonsino: Making the Good Night Lamp - Make: Make: DIY Projects and Ideas for Makers. https://makezine.com/article/home/furniture/alexandra-deschamps-sonsino-making-the-good-night-lamp/
Top 11 Long Distance Friendship Lamps You’ll Love: Best Of 2022. (2021, July 29). Lasting The Distance. https://lastingthedistance.com/long-distance-friendship-lamps/