Solid Message
Made by Chengzhi Zhang, Tian Li, Tianqi Chu and Xinye Wang
Made by Chengzhi Zhang, Tian Li, Tianqi Chu and Xinye Wang
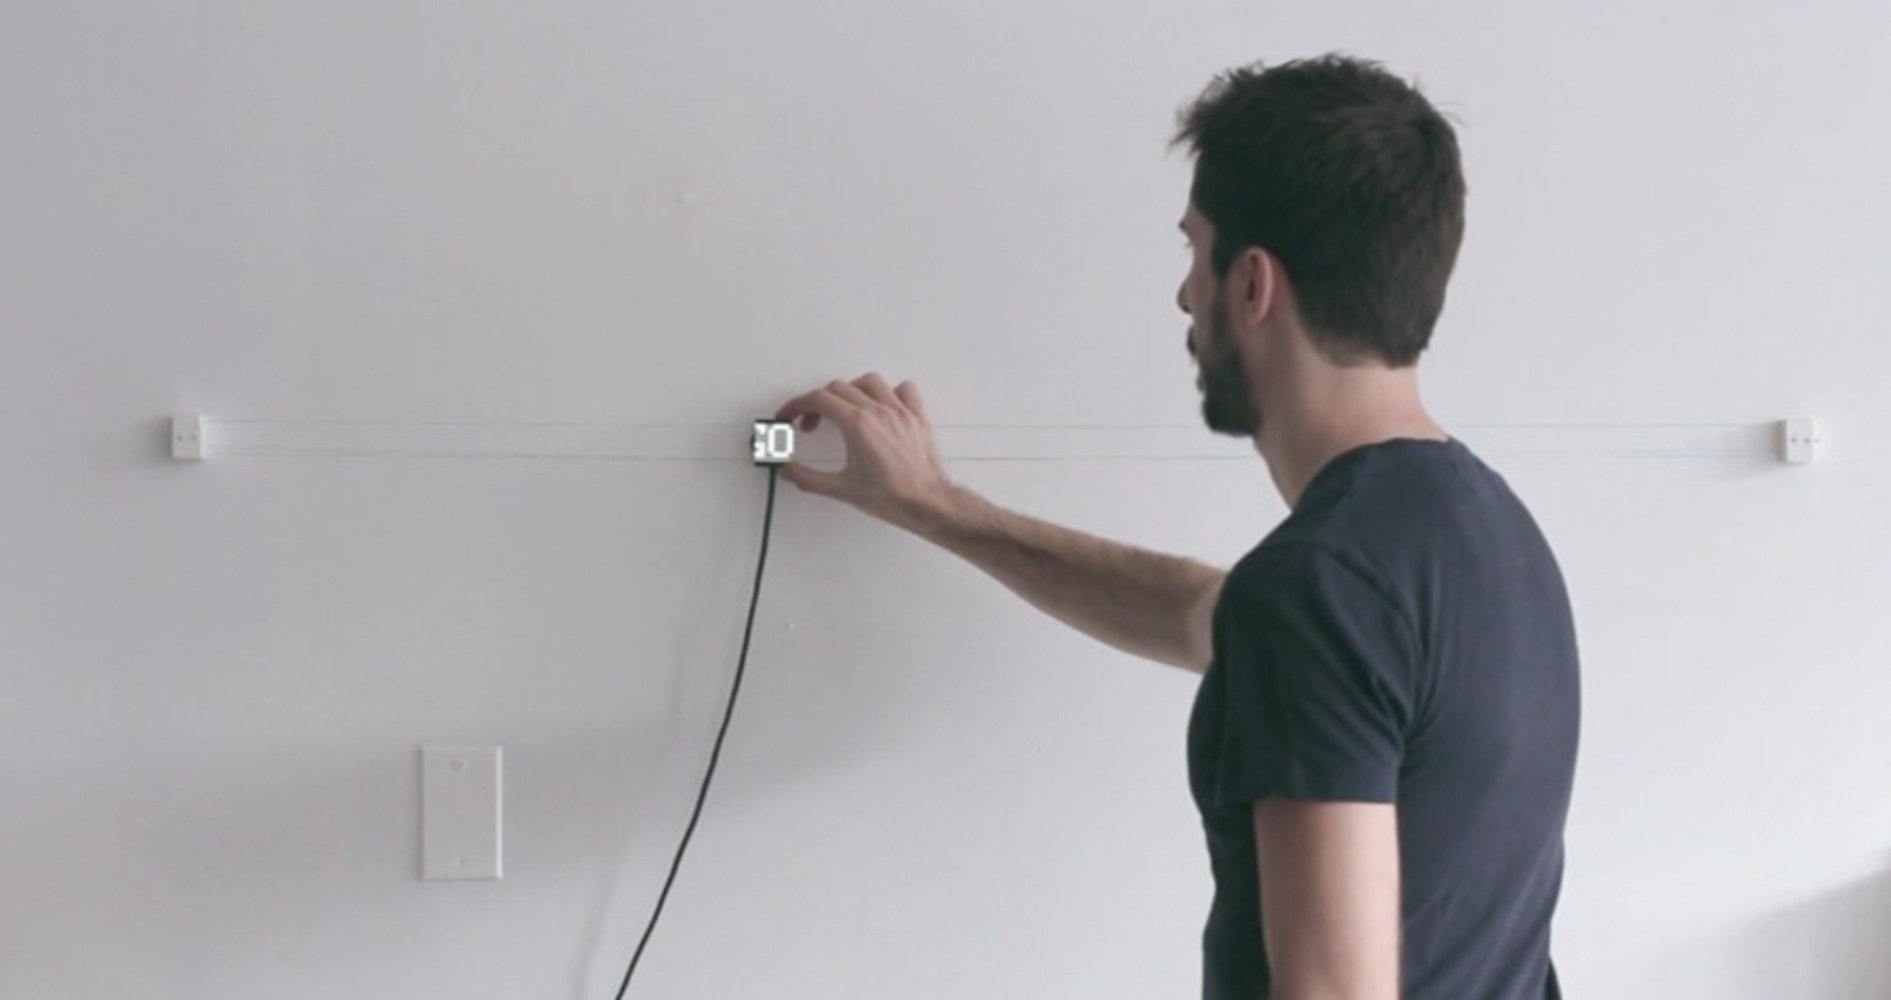
Solid message reflects on how we receive and send messages, retrieves the old-fashioned way of sending messages and finds alternatives for the fast-paced message sending and receiving in social media. By allowing the end user to send only one message a day and physically prints the message out, we seek more deliberate, mindful ways of communicating.
Created: May 5th, 2022
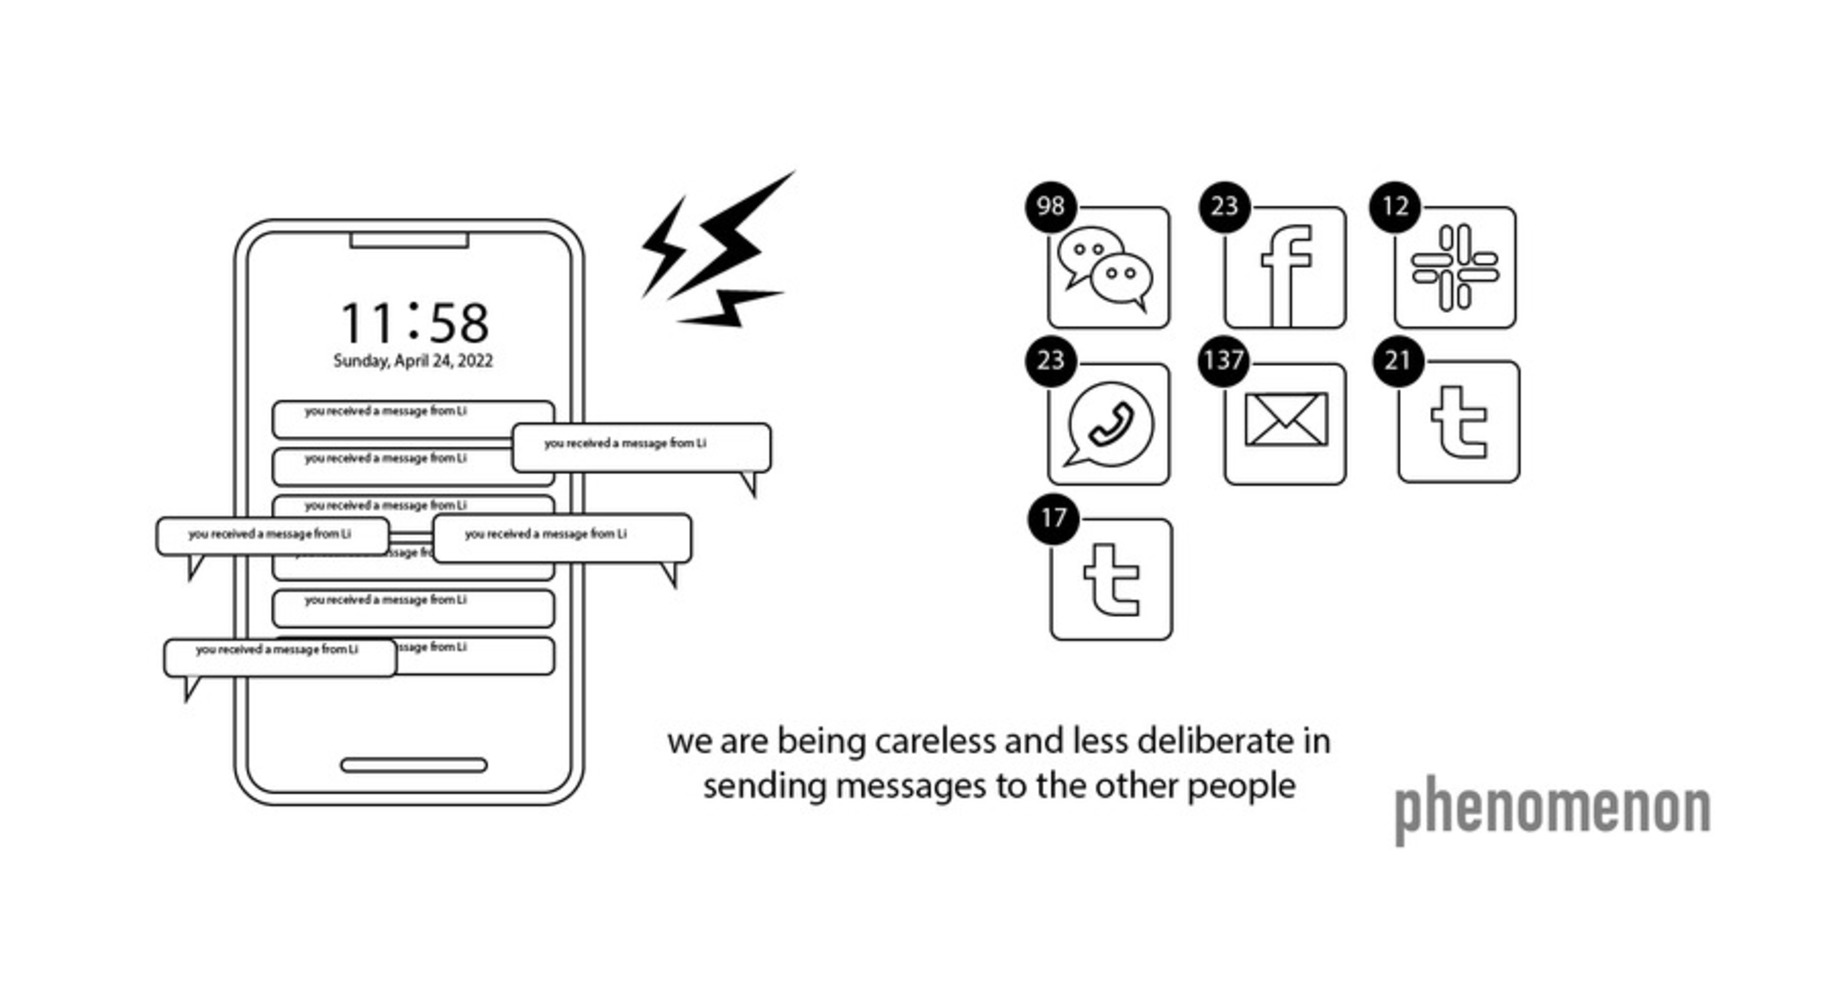
Time has witnessed the increasing ease of sending a message to the one we care about. At the same time, it has witnessed individuals become more careless in sending messages and expressing themselves. We had a hard time expressing our feeling to the person we love afar face to face, while we are also having much more ease in expressing ourselves in cyberspace with the boom of instant message apps. With WhatsApp, and Wechat, we can send dozens of messages to our loved ones far away, we are also losing the purposefulness and attention in wording and phrasing our messages. We type messages fast and hit the “send” button in a rush because we know we can retrieve the message using the latest “recall” feature. This could not happen when we are using a typewriter or writing mail with pen and paper. Before, we think twice before typing a letter or writing a character because we know what it takes physically in getting the message conveyed, and thus we take it seriously. At the moment, people no longer take expressing themselves seriously as we did before, getting rid of all the romance and redundancy simultaneously.
Technology is shaping how we express ourselves, negatively. The boom of meditation as a lifestyle is combatting this tendency, helping us to retrieve a more mindful, present living experience. So are many devices artists and designers create. For example, the manual reader by Ishac Bertran reflects on the issue of information overload, adding physical edges to digital information to increase people’s perception(Bertran, 2014). The slow game takes one move a day and discusses the consequent fast pace technology instills in us(Bertran, 2014).
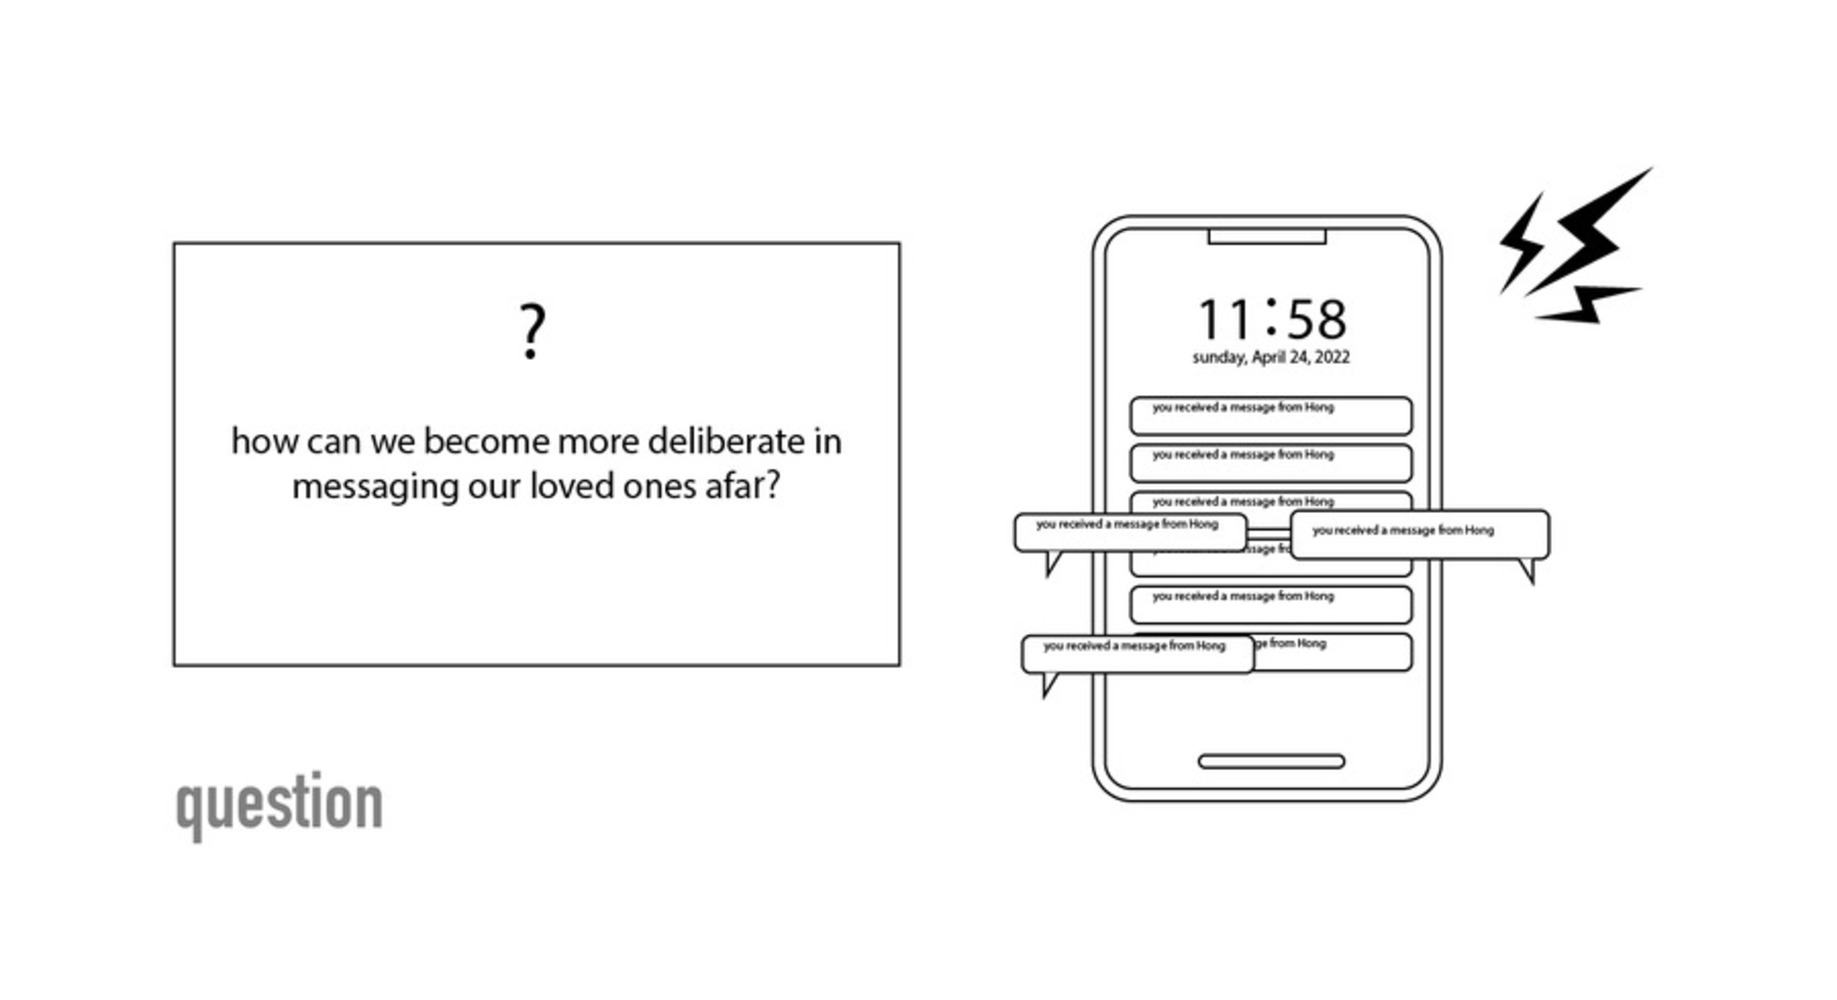
So, can we be more mindful and present if we go back to the days before, grabbing our pen and notebook again? Or, using the typewriter to type and fax machine to send the message to our cared one afar? Will we be more mindful in expressing our love if there’s no more “recall” button, or if we are only allowed to send one message in WeChat a day? If convenience is undermining the experience we have, then what’s the purpose of this sort of convenience? Or a more general question cited by Frauenberger in his paper:“are we becoming the human we wish to become?”(Frauenberger, 2019, P18) (Introna, 2009) Do we have a say in this wave of the times? Are we becoming the guinea pigs of those tech giants, who release the features like recall and metaverse only because they think they can gain more economic benefits from it? Do they think twice before launching a feature, like “recall”? It left us endless questions we should ask ourselves, whether we have answers or not.
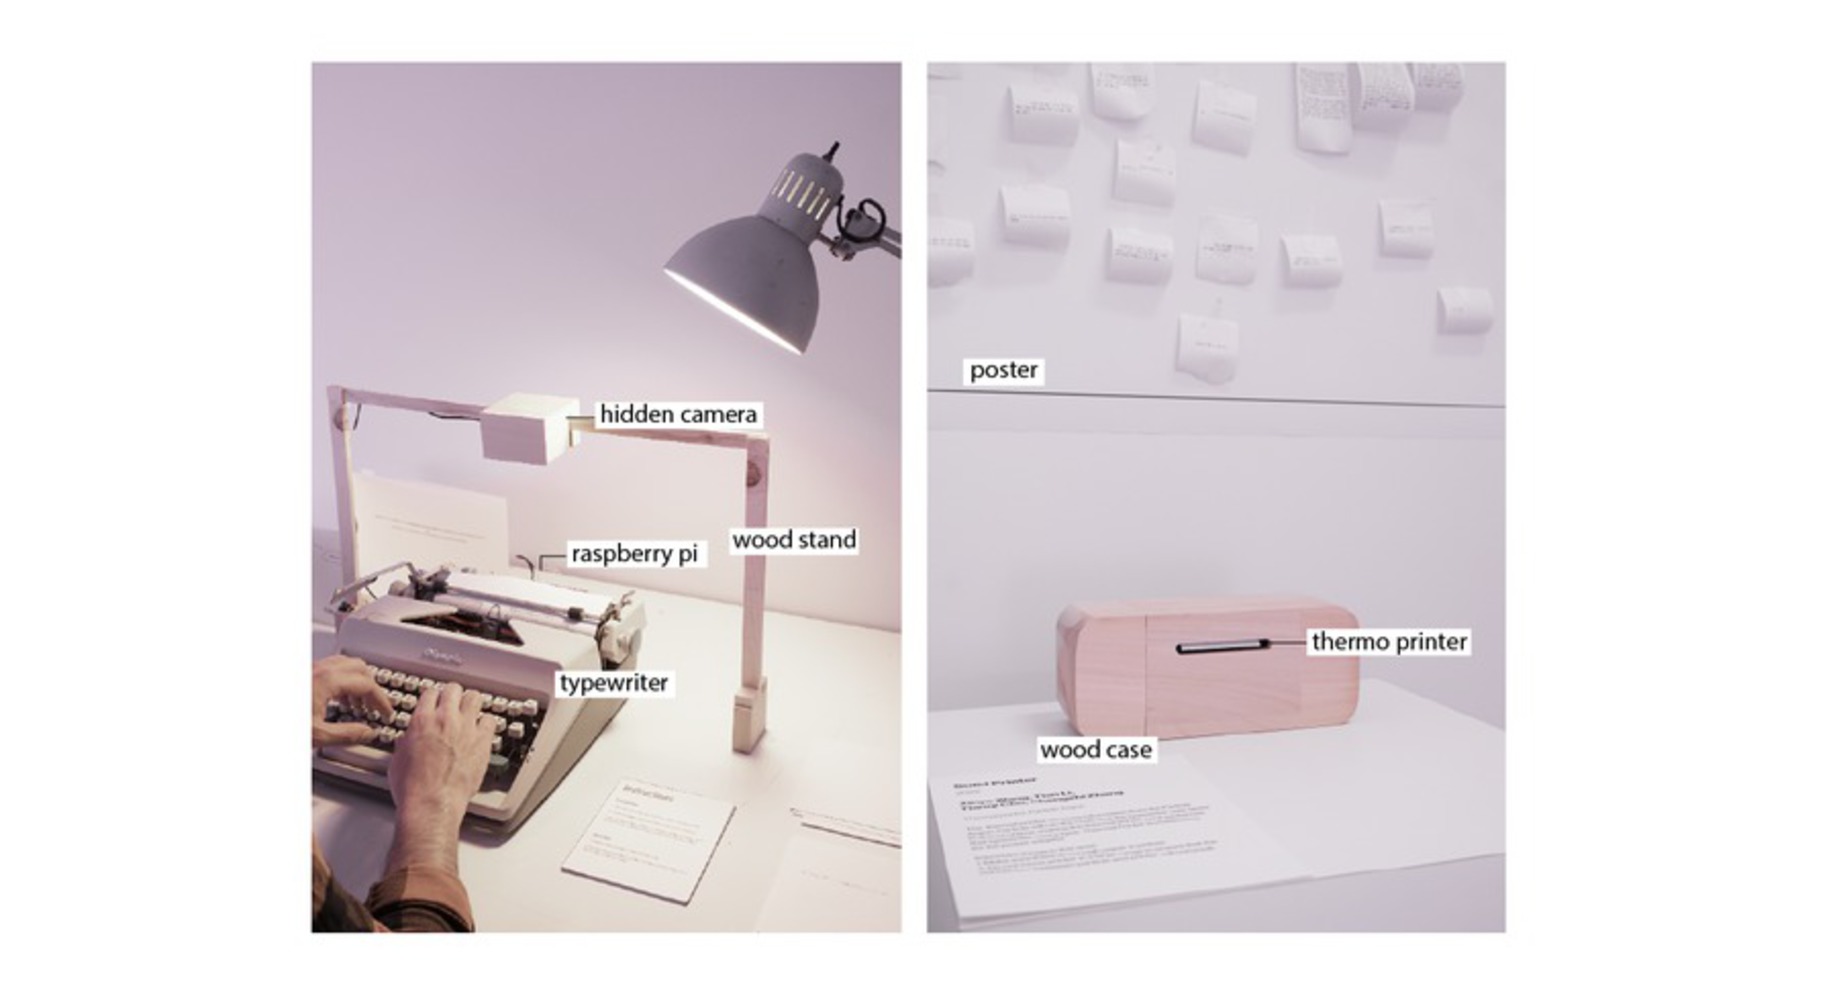
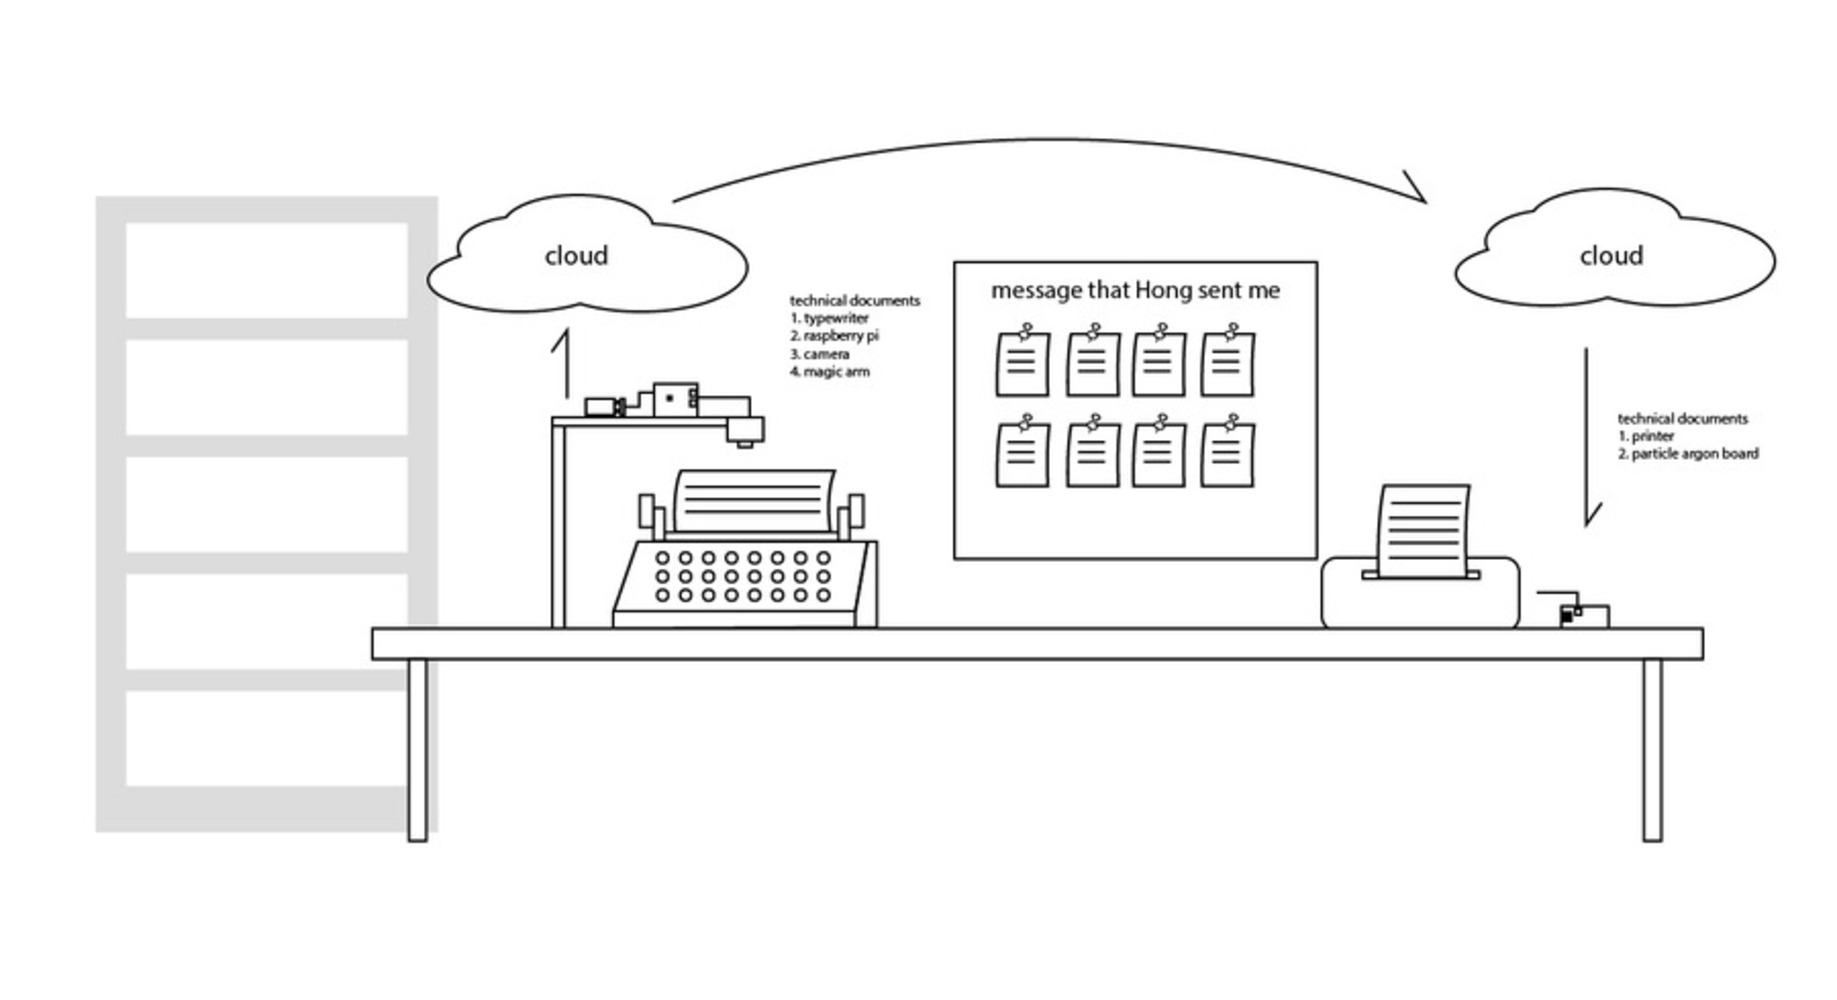
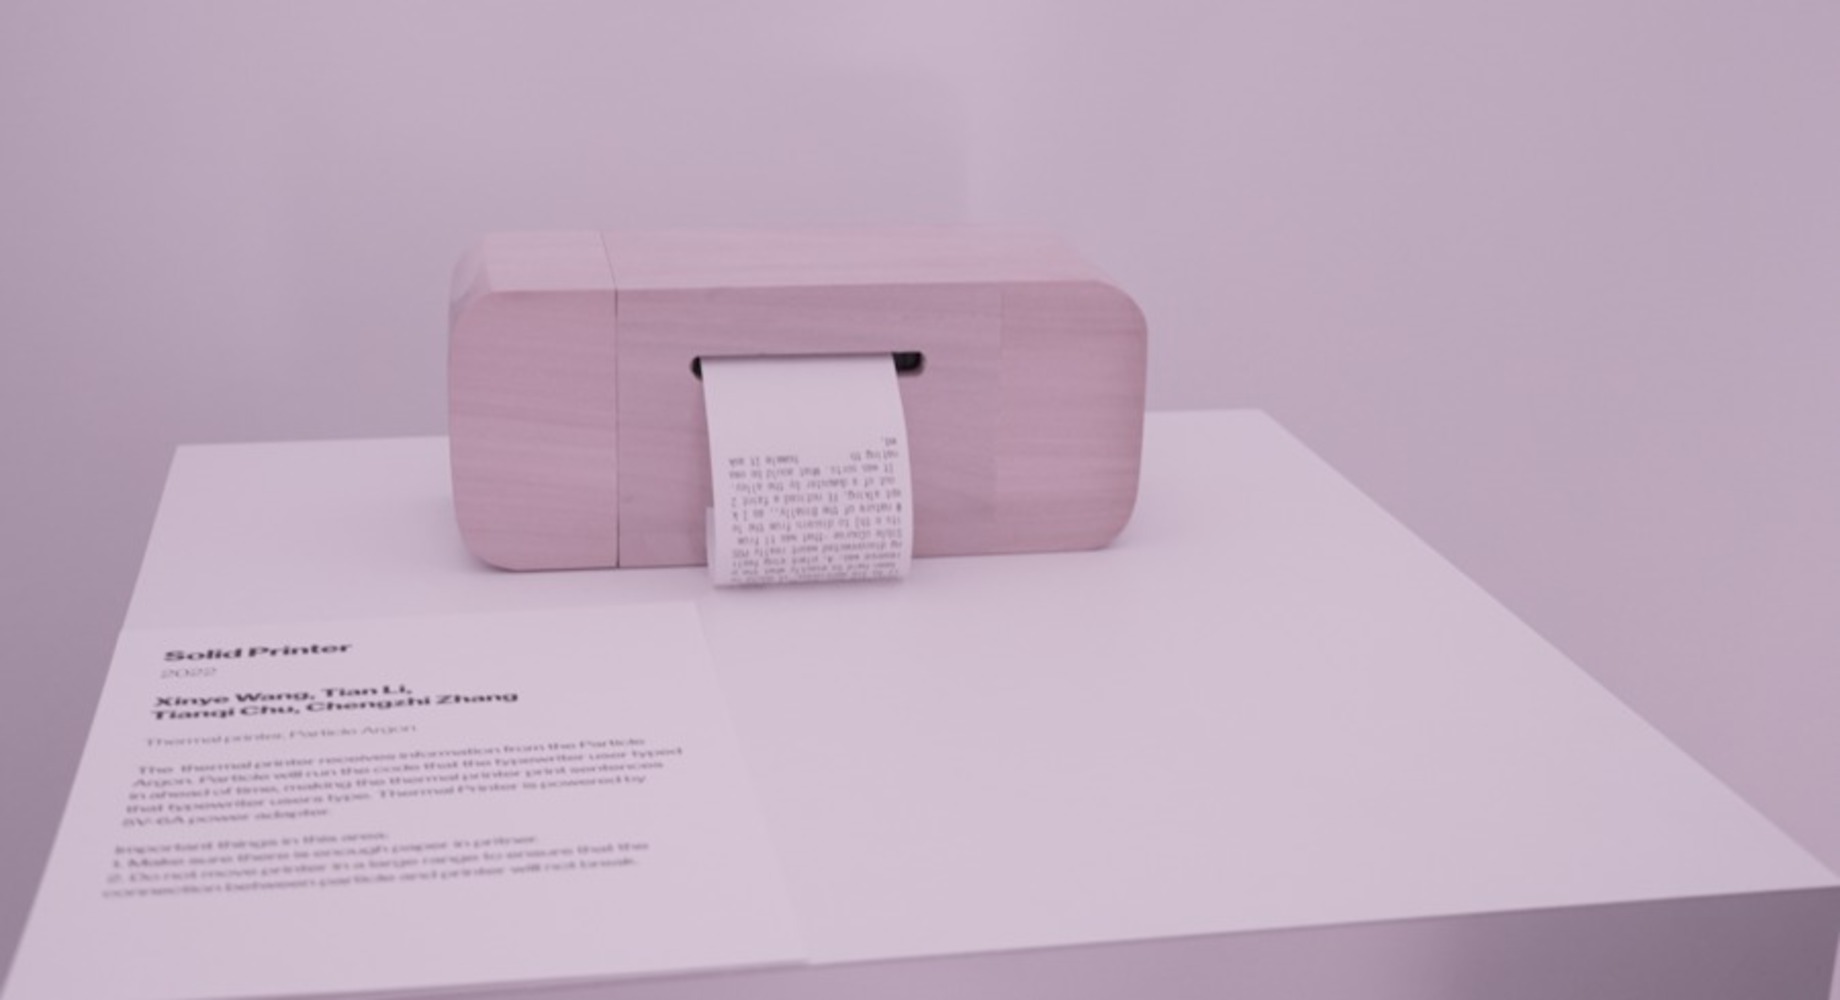
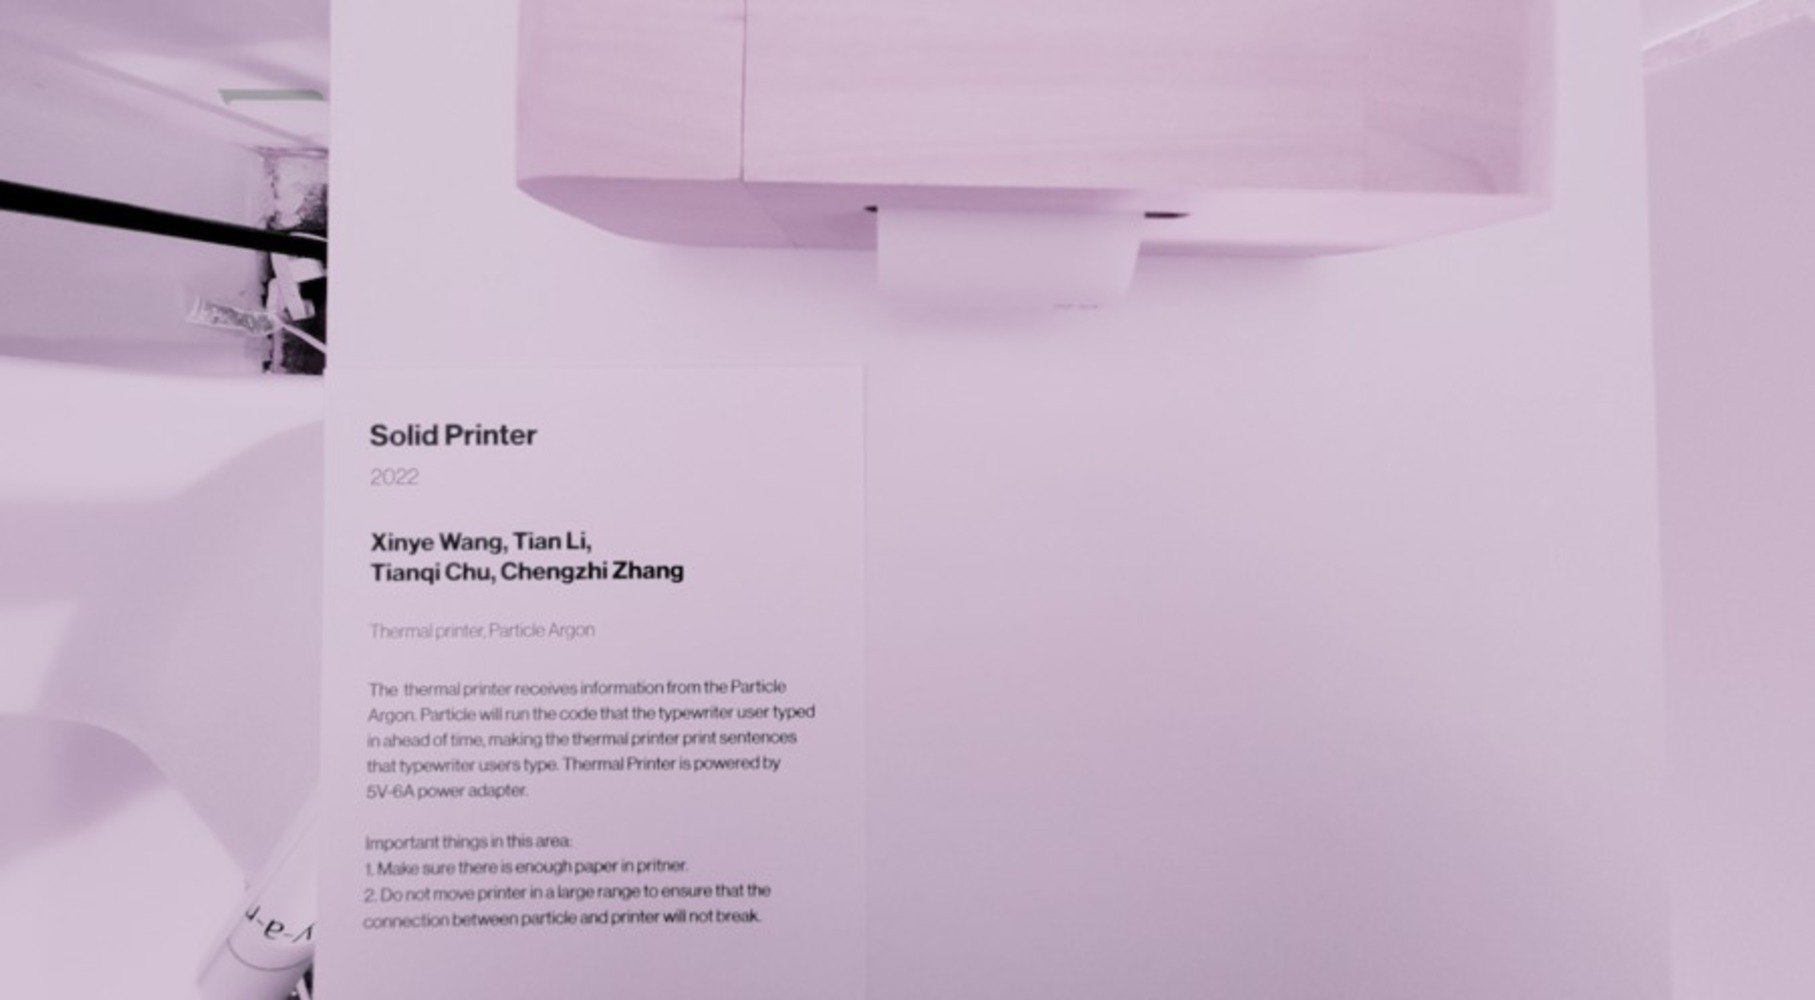
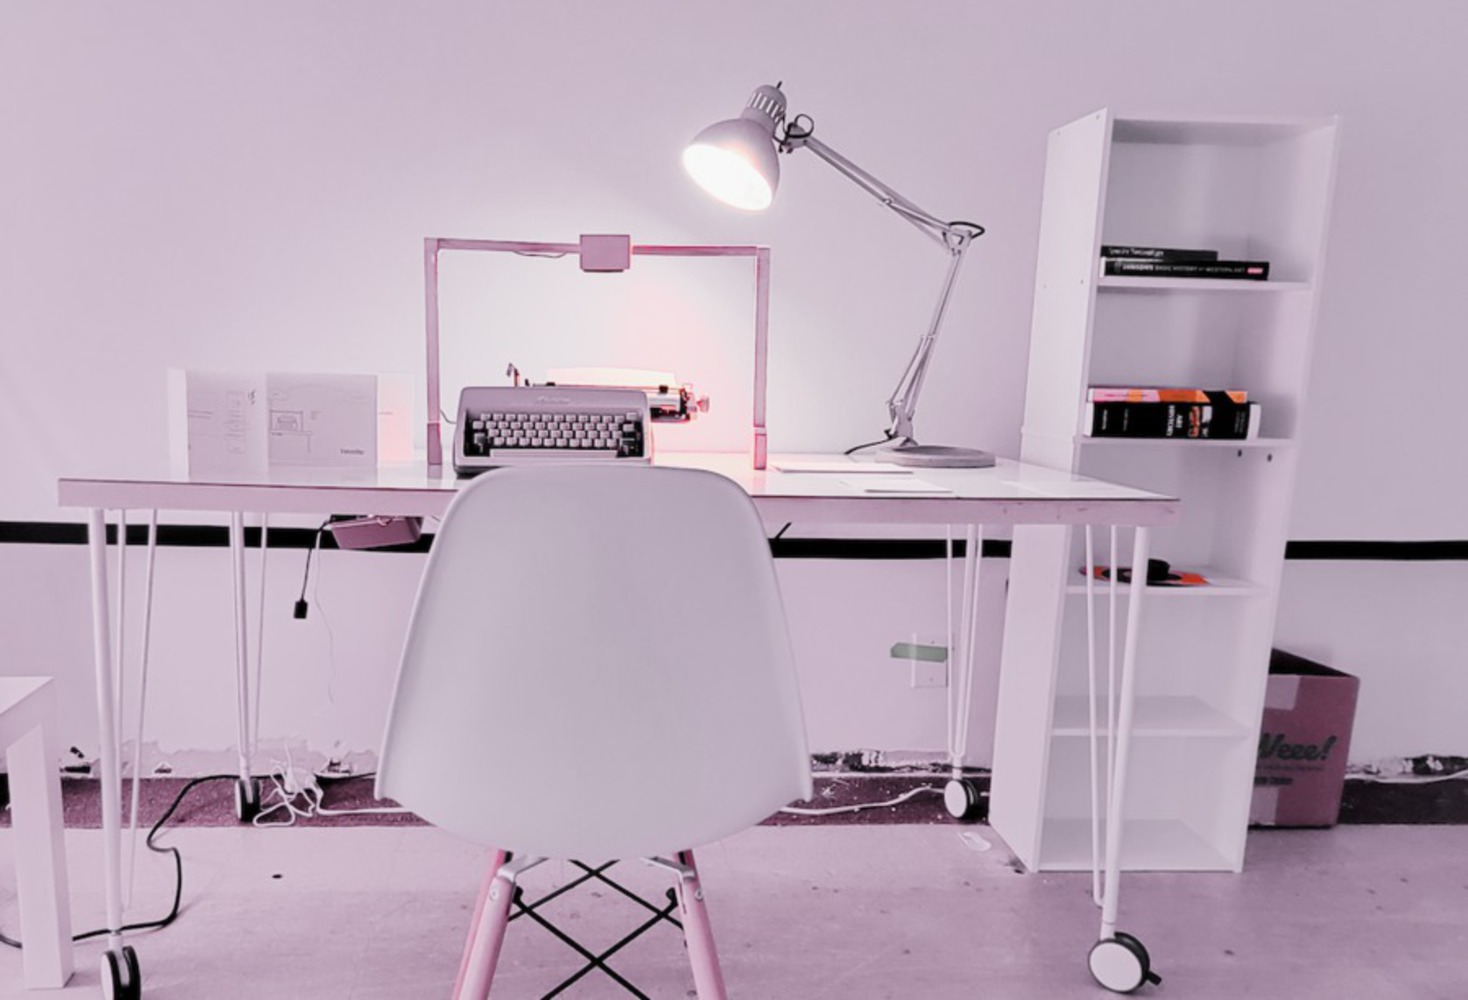
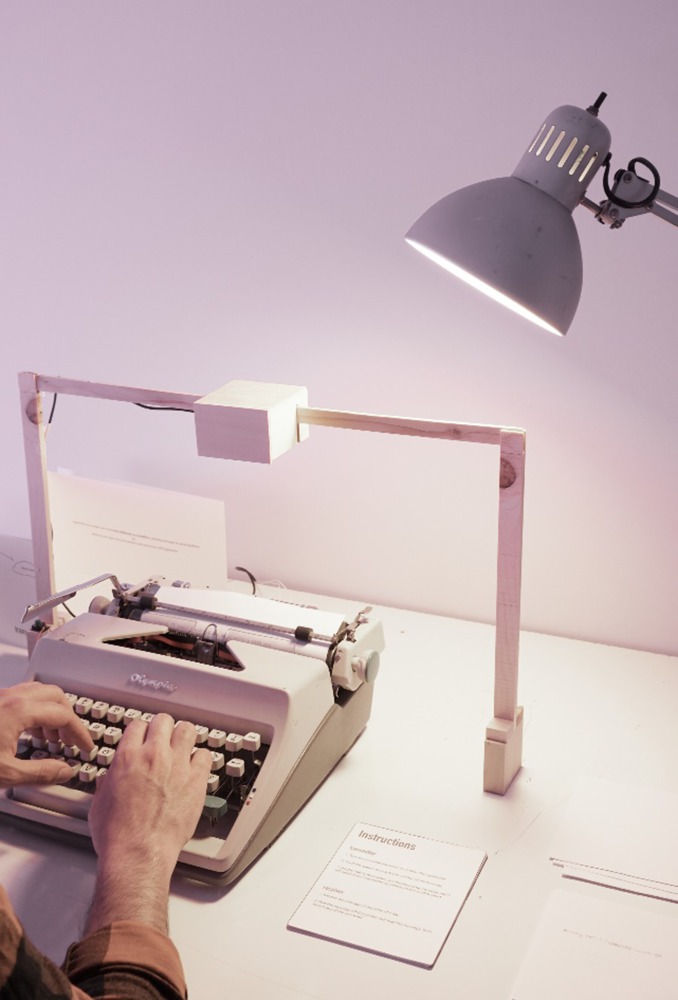
James Pierce in his PhD dissertation paper writes: “Resistance is offered as a technique to be developed and refined, extended into other domains and concerns, and realized in the form of new design works(Pierce, 2015, P11).” And he put forward different products that represents the idea “working by not quite working” and slow technology(Odom, 2012, P1), like Camera Obscura 1C(Pierce, 2015). Reflecting on how we send messages today, our group intends to retrieve people’s mindful experience of sending messages to the person afar by creating two linked devices. On one end there is a old-fashioned typewriter and on the other end the printer. With the typewriter, the sender can only type one sentence and hit send button once. For the receiver end, it will print this message out with the printer. It calls the user to think mindfully before sending a message, inserting more space for imagination, and increases expectation and surprise.
Ending this message with a quote by Charles Dickens in his book A Tale of Two Cities:
“It was the best of times, it was the worst of times,
it was the age of wisdom, it was the age of foolishness,
it was the epoch of belief, it was the epoch of incredulity,
it was the season of light, it was the season of darkness,
it was the spring of hope, it was the winter of despair.”
1. Bertran, I. (n.d.). Manual Reader. ishback. Retrieved April 12, 2022, from http://www.ishback.com/reader/index.html
2. Bertran, I. (n.d.). slow game. ishback. Retrieved April 12, 2022, from http://www.ishback.com/slowgames/index.html
3. Frauenberger, Christopher. "Entanglement HCI the next wave?." ACM Transactions on Computer-Human Interaction (TOCHI) 27.1 (2019): 1-27.
4. Pierce, J., & Paulos, E. (2015, April). Making multiple uses of the obscura 1C digital camera: reflecting on the design, production, packaging and distribution of a counterfunctional device. In Proceedings of the 33rd Annual ACM Conference on Human Factors in Computing Systems (pp. 2103-2112).
5. Odom, W., Banks, R., Durrant, A., Kirk, D., & Pierce, J. (2012, June). Slow technology: critical reflection and future directions. In Proceedings of the Designing Interactive Systems Conference (pp. 816-817).
6. Introna, L. D. (2009). Ethics and the speaking of things. Theory, Culture & Society, 26(4), 25-46.
Solid Message
Solid message reflects on how we receive and send messages, retrieves the old-fashioned way of sending messages and finds alternatives for the fast-paced message sending and receiving in social media. By allowing the end user to send only one message a day and physically prints the message out, we seek more deliberate, mindful ways of communicating.
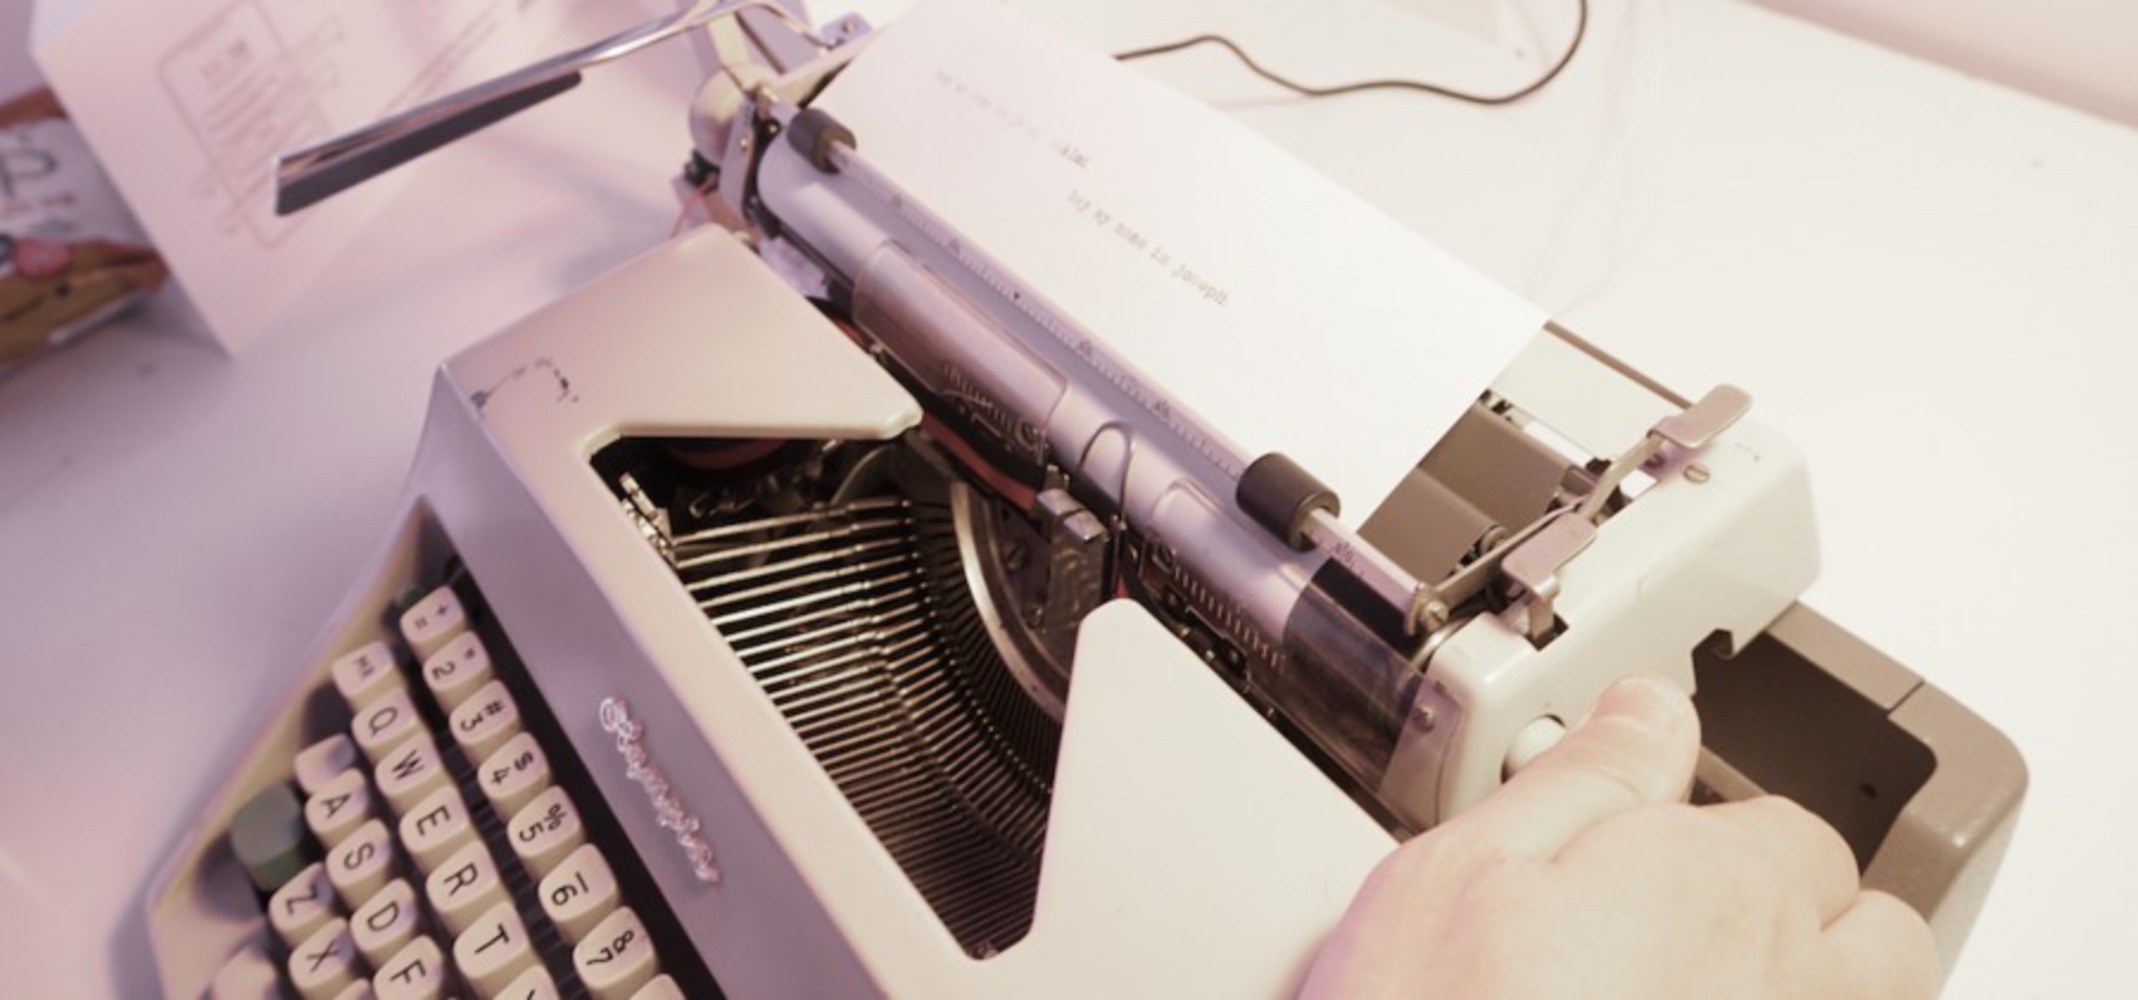
The topic of opposition and unity of new and old has always been discussed. With the rapid development of the Internet of Things (IoT) technology, people are constantly chasing new things and trying to make products more and more intelligent, which makes the product industry boost rapidly. More and more people pay attention on the new smart products, while those classic products may be outdated gradually and fade out of people's minds. How to make the classic products of the past still infuse the soul of intelligence to give off a unique brilliance? A good example of the design with old outdated devices is the project "The Typewriter Symphony" by Chris Gregg. In the project, the designers reused an outdated typewriter and implemented new smart technology into it. With the aims of modern technology, the typewriter can work normally as a modern printer to print out documents!
A typewriter was introduced in 1874 and it is a mechanical or electromechanical machine for typing characters. After it has been invented, the efficiency of typing was quickly enhanced. The typewriter was a useful machine for people to make self publications, writings, and even mails. However, after 1970s, typewriters began to reach their end of the line, because of the new electroclinic memory typewriters and computers coming up.
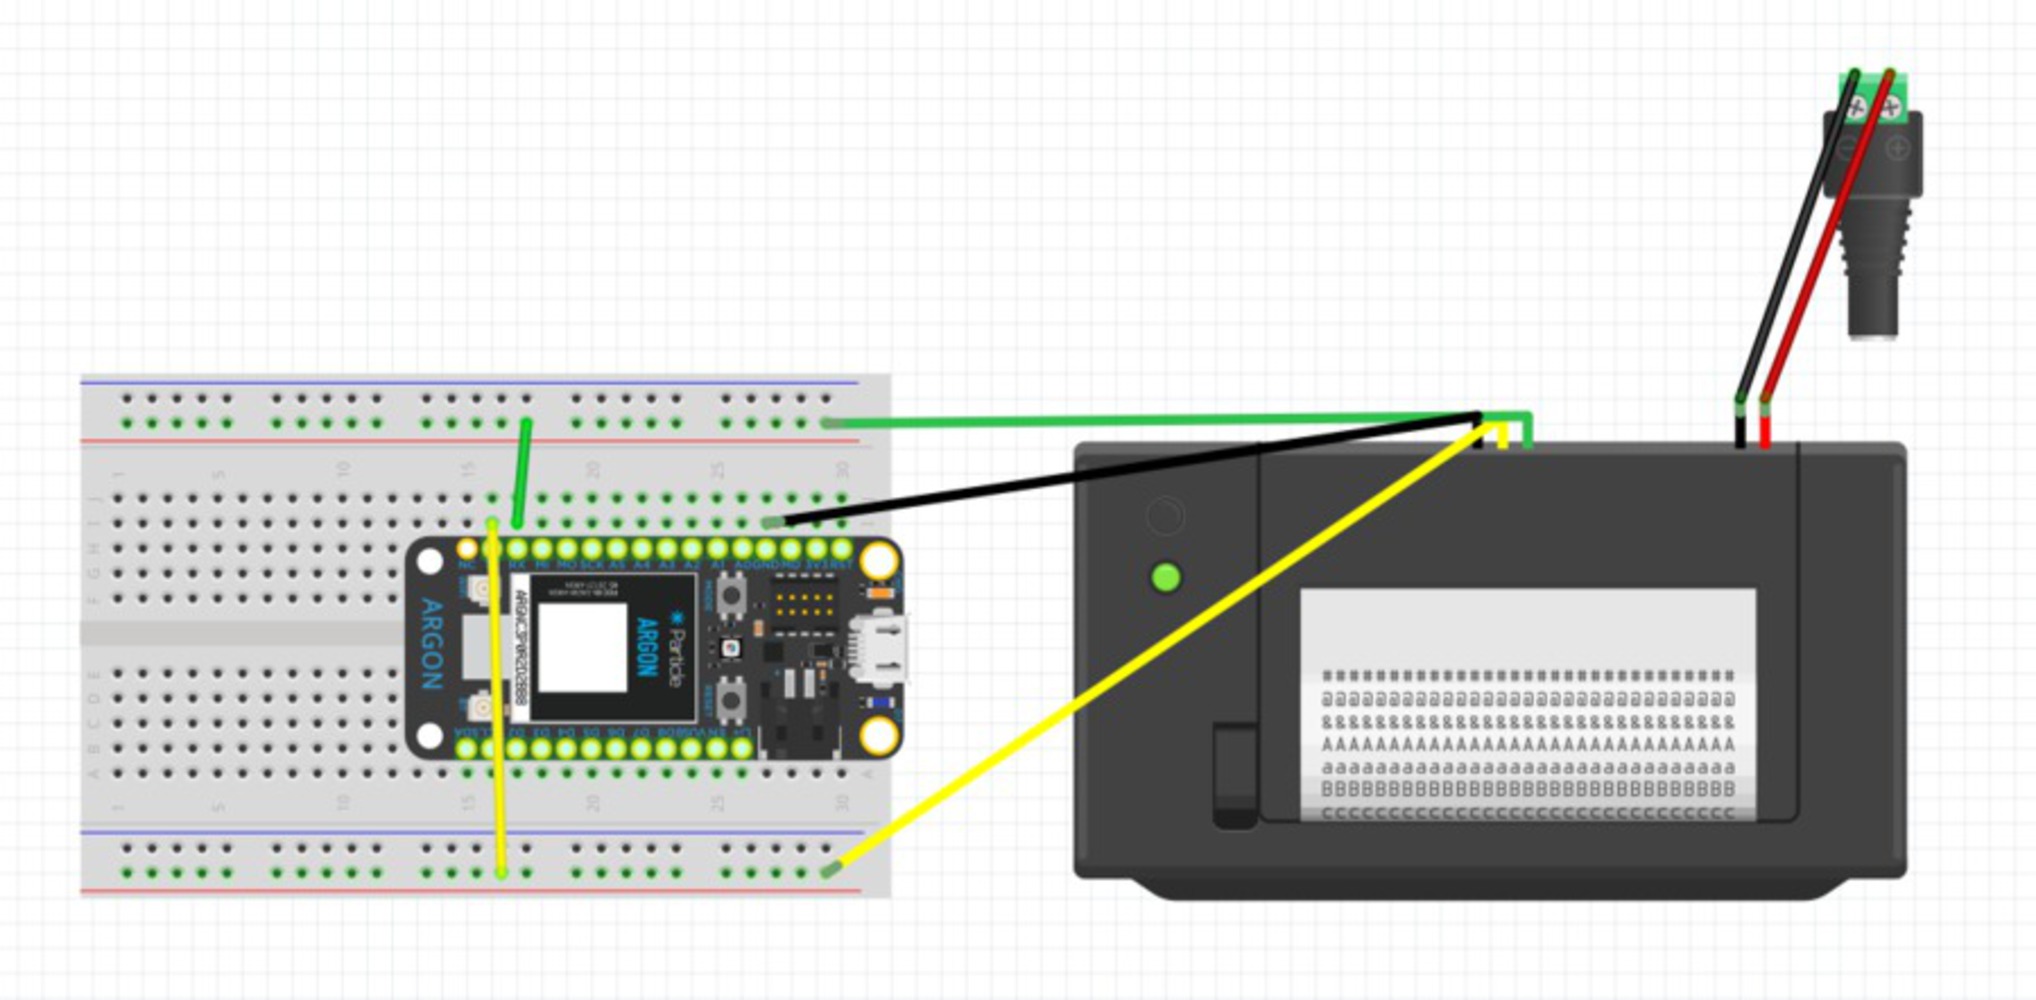
Our project attempts to use the typewriter as one of the mediums through which people convey love and care. The project is composed of two terminals, one is located on one side (sender) and the other is located on the other location (receiver). For the sender side, we reused and redesigned the typewriter with the Raspberry PI as a executor, and for the receiver side, we set a thermal printer with the Particle to receive and process data that sends out from the sender side. Unlike modern popular communication devices, this device is used to complement communication with silent "soft communication" and share our physical and emotional information together. The redesign can not only re-inject traditional equipment with a fresh intelligent soul, but also effectively avoid the stress caused by sound and image communication with others. This is a harbor where we can feel love and tranquility in the hustle and bustle of the city. After getting off work, people just sit in front of the "Smart Typewriter" with a cup of tea, and sending a loving note to their loved ones would be a wonderful thing to enjoy. Then, the receiver would immediately receive the loving note from the thermal printer. This delicate soft communication can create a tacit interaction between senders and receivers.
Besides, we continued to explore making the typewriter a way to interact with people. For example, how the device responds when people take different actions, like sending multiple notes. How the device can have reactions when it finishes one line and needs to shift a new line. Also, we considered technical connections between the device and the terminals.
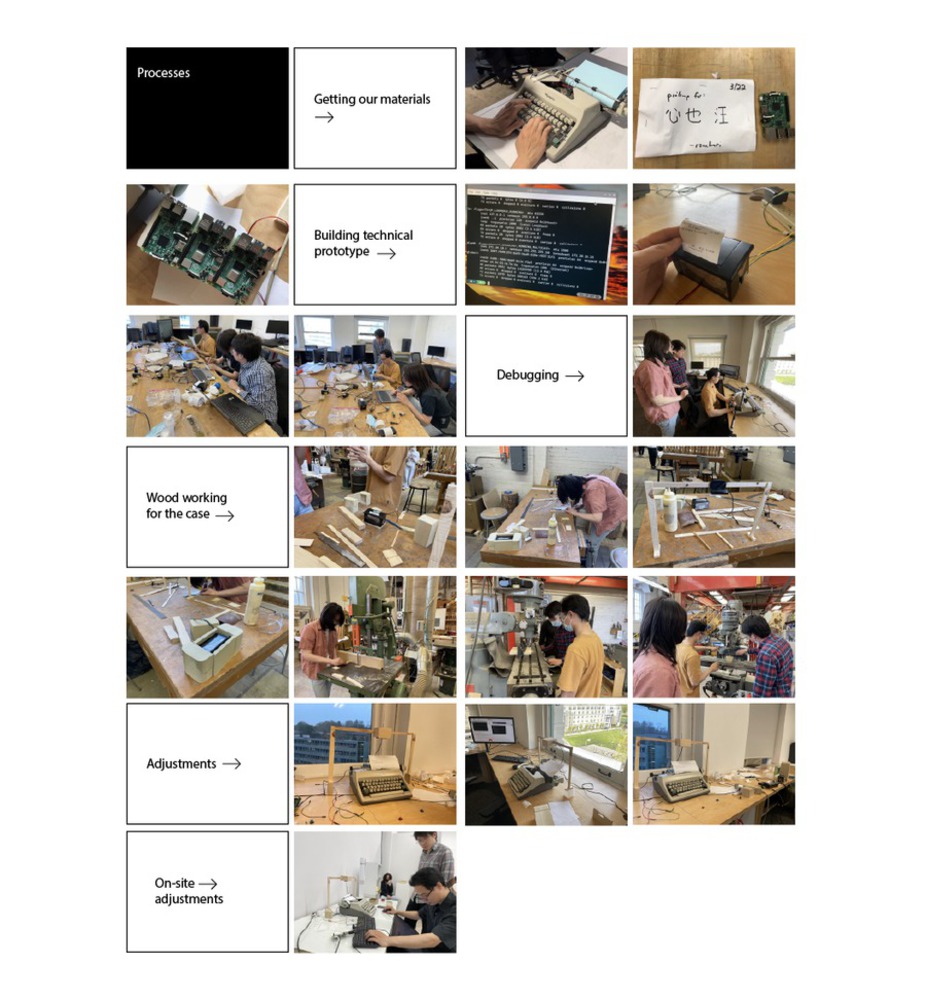
Processes
April 12th
The manager of the physical computing lab, Zach sent me the raspberry Pi 3b for building our project. The first iteration of our work is using Teachable Machine and Open AI to build an interactive device that can help people that cannot be physically together to form a more casual and subtle way of “soft communication”.
April 13th
We set up the new raspberry pi and installed the latest version of raspberry os on our Pi, and tried to attach the newly bought camera to the pi. But strange things happened. We found that the correctly plugged camera can be detected and loaded, but it cannot capture images after debugging according to various tutorials on the Internet. In this case, we have to use a USB webcam instead, which requires us to install OpenCV and OpenCV-python to make it function normally. Due to unknown reasons, maybe the poor performance of the device or version of the software, we failed to install the OpenCV library.
April 15th
After rounds of discussion, we found that the previous propositions of the project were too general and had to be narrowed down to deliver our core thoughts of us. Finally, we decide to integrate an old typewriter to produce a sense of ritual and nostalgia in terms of communication. Then we together explored some online shopping platforms and placed an order for an old typewriter. We also started to reach out to find if there were any raspberry pi 4b available for us to use in this final project.
April 18th
We got a raspberry pi 4b from one of our friends. This performance of raspberry pi 4b is really impressive and the OpenCV library was correctly installed, though it took 5 hours in total to achieve this. But the problem with the camera still existed, we assumed that the problem is related to the camera instead of the raspberry pi 3b. After plugging in the webcam, we wrote some python code to test the functionality of OpenCV to see whether the library worked correctly and it worked.
April 22nd
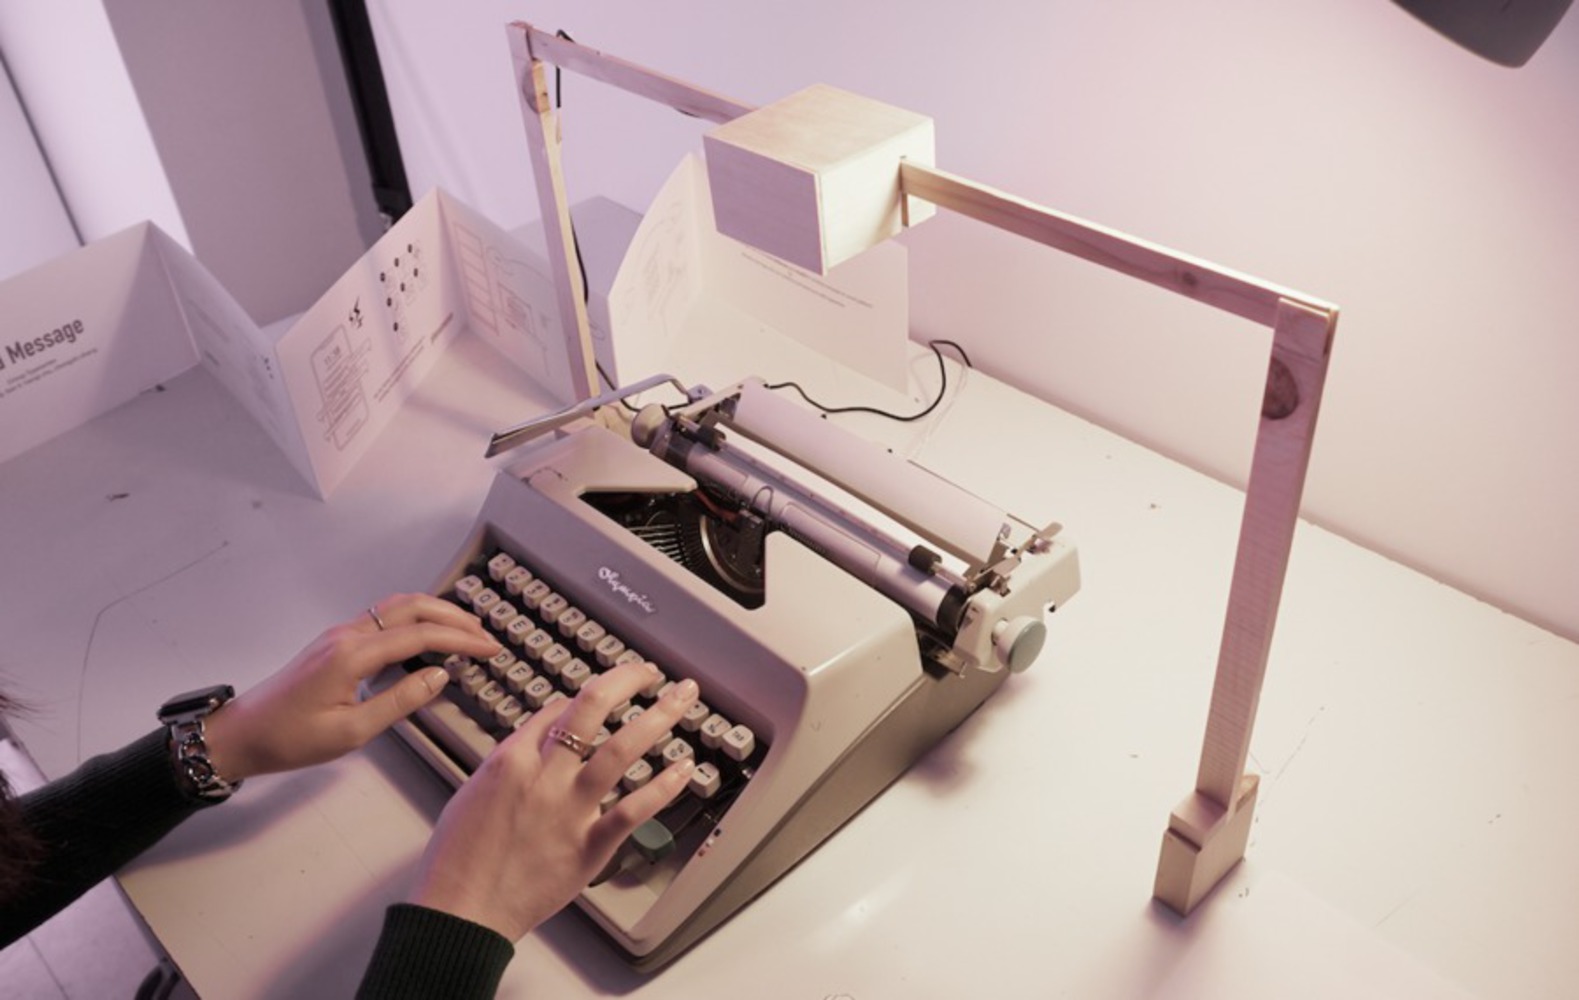
We received the typewriter. After a long journey from Maine to Pittsburgh, the machine looked good and we spent some time learning how to use it. We started looking for methods about how to transfer the information of the keys typed on the machine to computers, Arduino, or other computing devices. After the research, we found 2 ways to achieve the wanted functionality. The first method is to put a PCB board under the machine. More specifically, since the base bars of the keys on the typewriter will reach the same level after being pressed, we were able to utilize the metal base bars as the conductor to connect two separated resistors on the circuit board. Thus different combinations of key pressing can help us form different circus, which helps to send signals to the computer. The other way is using OpenCV and Tesseract(a machine learning-based text recognizing software). The webcam connected to the raspberry pi will collect the image of texts typed with the machine, and the Tesseract will recognize the texts being typed and parse the texts into lines of meaningful information. Since there were only 12 days before the final exhibition of our projects, nobody could guarantee that the PCB board will be produced and delivered in time. In this case, we began to dive into the implementation of the camera.
April 25th
Being worried about whether the performance of raspberry pi could install Tesseract software successfully and function as expected, we started our experiment of setting up the runtime environment and testing the functionality. Being a relatively large software, it took half an hour to install Tesseract and the supporting libraries. Though not performing perfectly in the first several trials, we made it clear that the path we selected was totally feasible.
April 28th
We got our thermal printer. Due to unknown reasons, it kept printing out random characters under the circumstances where we believe we had set up the codes correctly. We thought it to be a problem with our own printer. But when we borrowed another one from IdeAte, it also did not work properly. With the problem unresolved, we decided to complete the code which would be uploaded to particle board first.
April 30th
The problem with our printer turns out to be the adapter. The old adapter cannot provide enough voltage to power the printer. When we used a 15V adapter to drive it, the printer worked just as expected. Then we started combining the whole system at both sides: particle board and thermal printer, raspberry pi and the typewriter. The system worked fine after several tests.
May 1nd
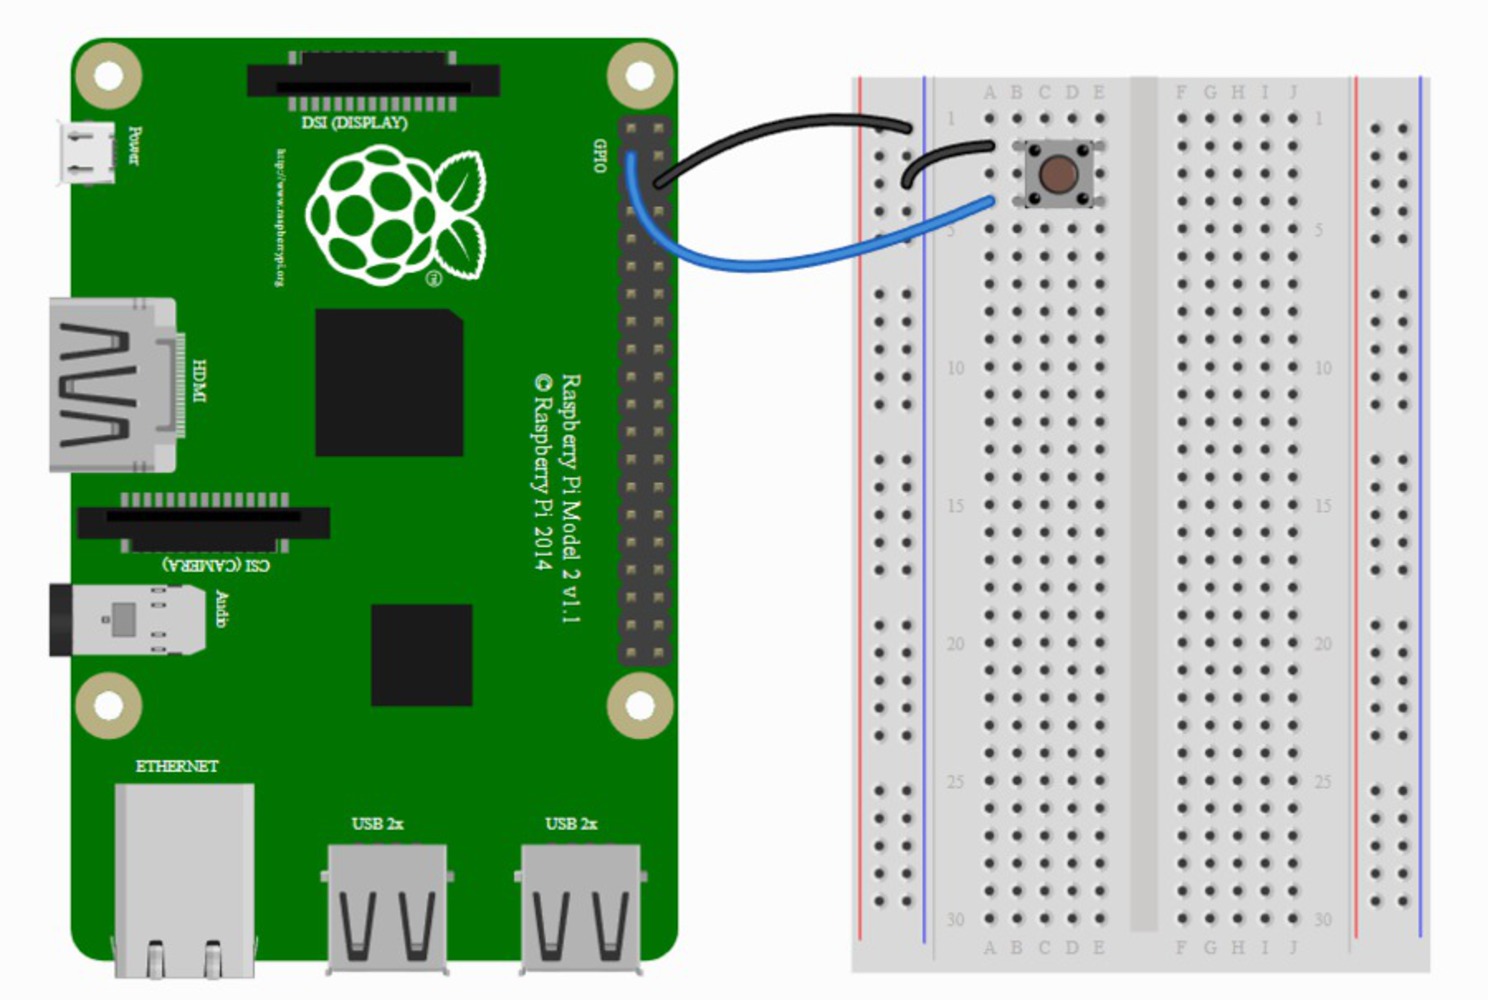
To make the final product look better, we decide to make wooden shells for all the naked components to create a more natural and warm texture. The work went on smoothly and we were satisfactory about the wooden shells that we created. There was one final step left: setting up button to let user send the message. We were using the GPIO ports on the raspberry pi. When the connected button is pressed, the message will be sent to the particle board on the other side and transfer data for the printer to print.
May 4th
Install and set up in the exhibition site.
If we have more time, like working during the summer break, which items should we consider to improve and refine?
The first aspect that we would like to involve is to adjust the camera bridge above the typewriter and make it more suitable to the moving of platen knob of the machine, as for now the bridge might influence the working efficiency when people type. A good idea is enlarge the bridge and make it thinner or change another material for the camera bridge.
The second thing that we could engage is to improve the text recognition system. Currently, we use Open CV for Python as the library to recognize the texts printed by the typewriter. But sometimes, it is not very accurate due to the lens focus of the camera or the CV recognition system. It would be a potential to regularize the training process and also fix the lens focus to improve the whole system more sensitive.
The last aspect is the typewriter itself. As the machine is relatively old (more than 60 years old), some of the keys are not working very well, which lead the printed notes a bit blur sometimes. From this point of view, we would fix the ink tape or deep clean the key hammer to make the printing more clear and sharper.
One reflection and feedback from the users is the user-friendly design can be improved. When the sender plan to send a note to the receiver, he or she has to figure out how to load paper via the roller. Besides, how strong to type the keys is also an element to consider, as we found out that if the user type a bit light, the camera detection system will not work perfectly. When the user finish the note and about to send out, they have to find out the sending out button, which is not very obvious.
Another feedback is the detection size limitation of the printed note. Some users may tend to type a long message rather than a one or two sentences' note. The camera detecting area is about one fourth of the letter size paper. Therefore, it would be difficult to detect a long message via the camera and the users need to move the paper twice in order to capture the whole message that they input via the typewriter. We may adjust the camera distance between the paper or change the detection area via Python to realize a larger area detection.
STEP TO RUN CODES:

01. Setting up the correct device ID and token in the ./testAndSending.py
02. Connect the circuit at both sides according to pictures in this repo.
03. Flashing particle board with a app based on 3 files: printer.ino, tt.cpp, tt.h
04. On a terminal, run $ python3 ./gpioInterface.py
05. Setting up the location and focus of your camera, then push the button.

If you have any problem, please feel free to reach out to me: xinyew@andrew.cmu.edu# gpioInterface.py
# main routin for controlling execution with button press
from gpiozero import Button
from signal import pause
from datetime import datetime
button = Button(2)
f = open("final.py", "r")
s = f.read()
f.close()
def capture():
print(datetime.now().isoformat())
exec(s)
button.when_pressed = capture
pause()/* tt.cpp */
// Main routine for connecting particle with thermal printer
// This #include statement was automatically added by the Particle IDE.
#include "tt.h"
// This #include statement was automatically added by the Particle IDE.
#include <neopixel.h>
// Icon for birthday messages
#ifndef _cakeline_h_
#define _cakeline_h_
#define cakeline_width 400
#define cakeline_height 54
#endif // _cakeline2_h_
// icon for messages from Silver Lining team
#ifndef _Buddy_h_
#define _Buddy_h_
#define Buddy_width 400
#define Buddy_height 60
#endif // _Buddy_h_
#define PIXEL_COUNT 1
#define PIXEL_PIN D7
#define PIXEL_TYPE WS2812B
Adafruit_NeoPixel strip(PIXEL_COUNT, PIXEL_PIN, PIXEL_TYPE);
int redValue = 255;
int greenValue = 255;
int blueValue = 255;
Thermal printer;
int sendMessage01(String cmd) {
printer.println(cmd);
return 1;
}
void setup()
{
// Initialize printer
Serial1.begin(19200);
printer.begin(&Serial1);
printSth();
Particle.function("message", sendMessage01);
}
void loop()
{
delay(1);
}
void printSth(void) {
printer.println();
printer.println();
printer.println("--------------------------------");
printer.println("Surprise!!!");
printer.println("================================");
printer.println();
printer.println();
}import cv2
from pytesseract import pytesseract
from pytesseract import Output
cam = cv2.VideoCapture(0)
img_counter = 0
words = []
ret, frame = cam.read()
if not ret:
print("failed to grab frame")
img_name = "opencv_frame_{}.png".format(img_counter)
cv2.imwrite(img_name, frame)
print("{} written!".format(img_name))
img_counter += 1
img = cv2.imread(img_name)
(h, w) = img.shape[:2]
center = (w//2, h//2)
M = cv2.getRotationMatrix2D(center, 180, 1.0)
rotated = cv2.warpAffine(img, M, (w,h))
cv2.imwrite(img_name, rotated)
cam.release()
cv2.destroyAllWindows()
pytesseract.tesseract_cmd = "/bin/tesseract"
WINDOW_NAME = "win"
img = cv2.imread("opencv_frame_0.png")
imageData = pytesseract.image_to_data(img, output_type=Output.DICT)
for i, word in enumerate(imageData['text']):
if word != "":
x, y, w, h = imageData['left'][i], imageData['top'][i], imageData['width'][i], imageData['height'][i]
cv2.putText(img, word, (x, y - 16), cv2.FONT_HERSHEY_COMPLEX, 0.5, (100, 100, 255), 1)
print(word)
nw = ''
for le in word:
if le == "'" or le == '"':
continue
nw += le
words.append(nw)
cat = ""
for w in words:
cat += w
cat +=' '
url = "curl https://api.particle.io/v1/devices/e00fce68af794bddadf369e7/message -d arg='\n\n" + cat + "\n\n\n\n\n\n\n\n\n\n\n\n ' -d access_token=b2bc473484175c1f4f1f3bb864d9a633c9c05c45"
print()
print(cat)
print()
print(url)
print()
import os
stream = os.popen('echo Returned otput')
os.system(url)
output = stream.read()/*************************************************************************
This is an Arduino library for the Adafruit Thermal Printer.
Pick one up at --> http://www.adafruit.com/products/597
These printers use TTL serial to communicate, 2 pins are required.
Adafruit invests time and resources providing this open source code.
Please support Adafruit and open-source hardware by purchasing products
from Adafruit!
Written by Limor Fried/Ladyada for Adafruit Industries.
MIT license, all text above must be included in any redistribution.
This file was modified by Przemysław Grzywacz <nexather@gmail.com>
in order to run on Spark Core.
*************************************************************************/
#include "application.h"
#include "tt.h"
// Though most of these printers are factory configured for 19200 baud
// operation, a few rare specimens instead work at 9600. If so, change
// this constant. This will NOT make printing slower! The physical
// print and feed mechanisms are the limiting factor, not the port speed.
#define BAUDRATE 19200
// Number of microseconds to issue one byte to the printer. 11 bits
// (not 8) to accommodate idle, start and stop bits. Idle time might
// be unnecessary, but erring on side of caution here.
#define BYTE_TIME (11L * 1000000L / BAUDRATE)
// Because there's no flow control between the printer and Arduino,
// special care must be taken to avoid overrunning the printer's buffer.
// Serial output is throttled based on serial speed as well as an estimate
// of the device's print and feed rates (relatively slow, being bound to
// moving parts and physical reality). After an operation is issued to
// the printer (e.g. bitmap print), a timeout is set before which any
// other printer operations will be suspended. This is generally more
// efficient than using delay() in that it allows the parent code to
// continue with other duties (e.g. receiving or decoding an image)
// while the printer physically completes the task.
// This method sets the estimated completion time for a just-issued task.
void Thermal::timeoutSet(unsigned long x) {
resumeTime = micros() + x;
}
// This function waits (if necessary) for the prior task to complete.
void Thermal::timeoutWait() {
while((long)(micros() - resumeTime) < 0L); // Rollover-proof
}
// Printer performance may vary based on the power supply voltage,
// thickness of paper, phase of the moon and other seemingly random
// variables. This method sets the times (in microseconds) for the
// paper to advance one vertical 'dot' when printing and feeding.
// For example, in the default initialized state, normal-sized text is
// 24 dots tall and the line spacing is 32 dots, so the time for one
// line to be issued is approximately 24 * print time + 8 * feed time.
// The default print and feed times are based on a random test unit,
// but as stated above your reality may be influenced by many factors.
// This lets you tweak the timing to avoid excessive delays and/or
// overrunning the printer buffer.
void Thermal::setTimes(unsigned long p, unsigned long f) {
dotPrintTime = p;
dotFeedTime = f;
}
// Constructor
Thermal::Thermal() {
}
// The next four helper methods are used when issuing configuration
// commands, printing bitmaps or barcodes, etc. Not when printing text.
void Thermal::writeBytes(uint8_t a) {
timeoutWait();
PRINTER_PRINT(a);
timeoutSet(BYTE_TIME);
}
void Thermal::writeBytes(uint8_t a, uint8_t b) {
timeoutWait();
PRINTER_PRINT(a);
PRINTER_PRINT(b);
timeoutSet(2 * BYTE_TIME);
}
void Thermal::writeBytes(uint8_t a, uint8_t b, uint8_t c) {
timeoutWait();
PRINTER_PRINT(a);
PRINTER_PRINT(b);
PRINTER_PRINT(c);
timeoutSet(3 * BYTE_TIME);
}
void Thermal::writeBytes(uint8_t a, uint8_t b, uint8_t c, uint8_t d) {
timeoutWait();
PRINTER_PRINT(a);
PRINTER_PRINT(b);
PRINTER_PRINT(c);
PRINTER_PRINT(d);
timeoutSet(3 * BYTE_TIME);
}
// The underlying method for all high-level printing (e.g. println()).
// The inherited Print class handles the rest!
size_t Thermal::write(uint8_t c) {
if(c != 0x13) { // Strip carriage returns
timeoutWait();
PRINTER_PRINT(c);
unsigned long d = BYTE_TIME;
if((c == '\n') || (column == maxColumn)) { // If newline or wrap
d += (prevByte == '\n') ?
((charHeight+lineSpacing) * dotFeedTime) : // Feed line
((charHeight*dotPrintTime)+(lineSpacing*dotFeedTime)); // Text line
column = 0;
c = '\n'; // Treat wrap as newline on next pass
} else {
column++;
}
timeoutSet(d);
prevByte = c;
}
return 1;
}
void Thermal::begin(SERIAL_IMPL* serial, int heatTime) {
_printer = serial;
// The printer can't start receiving data immediately upon power up --
// it needs a moment to cold boot and initialize. Allow at least 1/2
// sec of uptime before printer can receive data.
timeoutSet(500000L);
wake();
reset();
// Description of print settings from page 23 of the manual:
// ESC 7 n1 n2 n3 Setting Control Parameter Command
// Decimal: 27 55 n1 n2 n3
// Set "max heating dots", "heating time", "heating interval"
// n1 = 0-255 Max printing dots, Unit (8dots), Default: 7 (64 dots)
// n2 = 3-255 Heating time, Unit (10us), Default: 80 (800us)
// n3 = 0-255 Heating interval, Unit (10us), Default: 2 (20us)
// The more max heating dots, the more peak current will cost
// when printing, the faster printing speed. The max heating
// dots is 8*(n1+1). The more heating time, the more density,
// but the slower printing speed. If heating time is too short,
// blank page may occur. The more heating interval, the more
// clear, but the slower printing speed.
writeBytes(27, 55); // Esc 7 (print settings)
writeBytes(20); // Heating dots (20=balance of darkness vs no jams)
writeBytes(heatTime); // Library default = 255 (max)
writeBytes(250); // Heat interval (500 uS = slower, but darker)
// Description of print density from page 23 of the manual:
// DC2 # n Set printing density
// Decimal: 18 35 n
// D4..D0 of n is used to set the printing density. Density is
// 50% + 5% * n(D4-D0) printing density.
// D7..D5 of n is used to set the printing break time. Break time
// is n(D7-D5)*250us.
// (Unsure of the default value for either -- not documented)
#define printDensity 14 // 120% (? can go higher, text is darker but fuzzy)
#define printBreakTime 4 // 500 uS
writeBytes(18, 35); // DC2 # (print density)
writeBytes((printBreakTime << 5) | printDensity);
dotPrintTime = 30000; // See comments near top of file for
dotFeedTime = 2100; // an explanation of these values.
maxChunkHeight = 255;
}
// Reset printer to default state.
void Thermal::reset() {
prevByte = '\n'; // Treat as if prior line is blank
column = 0;
maxColumn = 32;
charHeight = 24;
lineSpacing = 8;
barcodeHeight = 50;
writeBytes(27, 64);
}
// Reset text formatting parameters.
void Thermal::setDefault(){
online();
justify('L');
inverseOff();
doubleHeightOff();
setLineHeight(32);
boldOff();
underlineOff();
setBarcodeHeight(50);
setSize('s');
}
void Thermal::test(){
println("Hello World!");
feed(2);
}
void Thermal::testPage() {
writeBytes(18, 84);
timeoutSet(
dotPrintTime * 24 * 26 + // 26 lines w/text (ea. 24 dots high)
dotFeedTime * (8 * 26 + 32)); // 26 text lines (feed 8 dots) + blank line
}
void Thermal::setBarcodeHeight(int val) { // Default is 50
if(val < 1) val = 1;
barcodeHeight = val;
writeBytes(29, 104, val);
}
void Thermal::printBarcode(char * text, uint8_t type) {
int i = 0;
byte c;
writeBytes(29, 72, 2); // Print label below barcode
writeBytes(29, 119, 3); // Barcode width
writeBytes(29, 107, type); // Barcode type (listed in .h file)
do { // Copy string + NUL terminator
writeBytes(c = text[i++]);
} while(c);
timeoutSet((barcodeHeight + 40) * dotPrintTime);
prevByte = '\n';
feed(2);
}
// === Character commands ===
#define INVERSE_MASK (1 << 1)
#define UPDOWN_MASK (1 << 2)
#define BOLD_MASK (1 << 3)
#define DOUBLE_HEIGHT_MASK (1 << 4)
#define DOUBLE_WIDTH_MASK (1 << 5)
#define STRIKE_MASK (1 << 6)
void Thermal::setPrintMode(uint8_t mask) {
printMode |= mask;
writePrintMode();
charHeight = (printMode & DOUBLE_HEIGHT_MASK) ? 48 : 24;
maxColumn = (printMode & DOUBLE_WIDTH_MASK ) ? 16 : 32;
}
void Thermal::unsetPrintMode(uint8_t mask) {
printMode &= ~mask;
writePrintMode();
charHeight = (printMode & DOUBLE_HEIGHT_MASK) ? 48 : 24;
maxColumn = (printMode & DOUBLE_WIDTH_MASK ) ? 16 : 32;
}
void Thermal::writePrintMode() {
writeBytes(27, 33, printMode);
}
void Thermal::normal() {
printMode = 0;
writePrintMode();
}
void Thermal::inverseOn(){
setPrintMode(INVERSE_MASK);
}
void Thermal::inverseOff(){
unsetPrintMode(INVERSE_MASK);
}
void Thermal::upsideDownOn(){
setPrintMode(UPDOWN_MASK);
}
void Thermal::upsideDownOff(){
unsetPrintMode(UPDOWN_MASK);
}
void Thermal::doubleHeightOn(){
setPrintMode(DOUBLE_HEIGHT_MASK);
}
void Thermal::doubleHeightOff(){
unsetPrintMode(DOUBLE_HEIGHT_MASK);
}
void Thermal::doubleWidthOn(){
setPrintMode(DOUBLE_WIDTH_MASK);
}
void Thermal::doubleWidthOff(){
unsetPrintMode(DOUBLE_WIDTH_MASK);
}
void Thermal::strikeOn(){
setPrintMode(STRIKE_MASK);
}
void Thermal::strikeOff(){
unsetPrintMode(STRIKE_MASK);
}
void Thermal::boldOn(){
setPrintMode(BOLD_MASK);
}
void Thermal::boldOff(){
unsetPrintMode(BOLD_MASK);
}
void Thermal::justify(char value){
uint8_t pos = 0;
switch(toupper(value)) {
case 'L': pos = 0; break;
case 'C': pos = 1; break;
case 'R': pos = 2; break;
}
writeBytes(0x1B, 0x61, pos);
}
// Feeds by the specified number of lines
void Thermal::feed(uint8_t x){
// The datasheet claims sending bytes 27, 100, <x> will work, but
// it feeds much more than that. So it's done manually:
while(x--) write('\n');
}
// Feeds by the specified number of individual pixel rows
void Thermal::feedRows(uint8_t rows) {
writeBytes(27, 74, rows);
timeoutSet(rows * dotFeedTime);
}
void Thermal::flush() {
writeBytes(12);
}
void Thermal::setSize(char value){
uint8_t size;
switch(toupper(value)) {
default: // Small: standard width and height
size = 0x00;
charHeight = 24;
maxColumn = 32;
break;
case 'M': // Medium: double height
size = 0x01;
charHeight = 48;
maxColumn = 32;
break;
case 'L': // Large: double width and height
size = 0x11;
charHeight = 48;
maxColumn = 16;
break;
}
writeBytes(29, 33, size, 10);
prevByte = '\n'; // Setting the size adds a linefeed
}
// Underlines of different weights can be produced:
// 0 - no underline
// 1 - normal underline
// 2 - thick underline
void Thermal::underlineOn(uint8_t weight) {
writeBytes(27, 45, weight);
}
void Thermal::underlineOff() {
underlineOn(0);
}
// fromProgMem is ignored
void Thermal::printBitmap(
int w, int h, const uint8_t *bitmap, bool fromProgMem) {
int rowBytes, rowBytesClipped, rowStart, chunkHeight, x, y, i;
rowBytes = (w + 7) / 8; // Round up to next byte boundary
rowBytesClipped = (rowBytes >= 48) ? 48 : rowBytes; // 384 pixels max width
for(i=rowStart=0; rowStart < h; rowStart += maxChunkHeight) {
// Issue up to 255 rows at a time:
chunkHeight = h - rowStart;
if(chunkHeight > maxChunkHeight) chunkHeight = maxChunkHeight;
writeBytes(18, 42, chunkHeight, rowBytesClipped);
for(y=0; y < chunkHeight; y++) {
for(x=0; x < rowBytesClipped; x++, i++) {
PRINTER_PRINT(*(bitmap+i));
}
i += rowBytes - rowBytesClipped;
}
timeoutSet(chunkHeight * dotPrintTime);
}
prevByte = '\n';
}
void Thermal::printBitmap(int w, int h, Stream *stream) {
int rowBytes, rowBytesClipped, rowStart, chunkHeight, x, y, i, c;
rowBytes = (w + 7) / 8; // Round up to next byte boundary
rowBytesClipped = (rowBytes >= 48) ? 48 : rowBytes; // 384 pixels max width
for(rowStart=0; rowStart < h; rowStart += maxChunkHeight) {
// Issue up to 255 rows at a time:
chunkHeight = h - rowStart;
if(chunkHeight > maxChunkHeight) chunkHeight = maxChunkHeight;
writeBytes(18, 42, chunkHeight, rowBytesClipped);
for(y=0; y < chunkHeight; y++) {
for(x=0; x < rowBytesClipped; x++) {
while((c = stream->read()) < 0);
PRINTER_PRINT((uint8_t)c);
}
for(i = rowBytes - rowBytesClipped; i>0; i--) {
while((c = stream->read()) < 0);
}
}
timeoutSet(chunkHeight * dotPrintTime);
}
prevByte = '\n';
}
void Thermal::printBitmap(Stream *stream) {
uint8_t tmp;
uint16_t width, height;
tmp = stream->read();
width = (stream->read() << 8) + tmp;
tmp = stream->read();
height = (stream->read() << 8) + tmp;
printBitmap(width, height, stream);
}
// Take the printer offline. Print commands sent after this will be
// ignored until 'online' is called.
void Thermal::offline(){
writeBytes(27, 61, 0);
}
// Take the printer back online. Subsequent print commands will be obeyed.
void Thermal::online(){
writeBytes(27, 61, 1);
}
// Put the printer into a low-energy state immediately.
void Thermal::sleep() {
sleepAfter(1);
}
// Put the printer into a low-energy state after the given number
// of seconds.
void Thermal::sleepAfter(uint8_t seconds) {
writeBytes(27, 56, seconds);
}
// Wake the printer from a low-energy state.
void Thermal::wake() {
// Printer may have been idle for a very long time, during which the
// micros() counter has rolled over. To avoid shenanigans, reset the
// timeout counter before issuing the wake command.
timeoutSet(0);
writeBytes(255);
// Datasheet recomments a 50 mS delay before issuing further commands,
// but in practice this alone isn't sufficient (e.g. text size/style
// commands may still be misinterpreted on wake). A slightly longer
// delay, interspersed with ESC chars (no-ops) seems to help.
for(uint8_t i=0; i<10; i++) {
writeBytes(27);
timeoutSet(10000L);
}
}
// Tell the soft serial to listen. Needed if you are using multiple
// SoftSerial interfaces.
void Thermal::listen() {
//_printer->listen();
}
// Check the status of the paper using the printers self reporting
// ability. Doesn't match the datasheet...
// Returns true for paper, false for no paper.
bool Thermal::hasPaper() {
writeBytes(27, 118, 0);
char stat = 0;
// Some delay while checking.
// Could probably be done better...
for (int i = 0; i < 1000; i++) {
if (_printer->available()) {
stat = _printer->read();
break;
}
}
// Mask the 3 LSB, this seems to be the one we care about.
stat = stat & 0b000100;
// If it's set, no paper, if it's clear, we have paper.
if (stat == 0b000100) {
return false;
} else if (stat == 0b000000){
return true;
}
return false;
}
void Thermal::setLineHeight(int val) {
if(val < 24) val = 24;
lineSpacing = val - 24;
// The printer doesn't take into account the current text height
// when setting line height, making this more akin to inter-line
// spacing. Default line spacing is 32 (char height of 24, line
// spacing of 8).
writeBytes(27, 51, val);
}
void Thermal::setMaxChunkHeight(int val) {
maxChunkHeight = val;
}
////////////////////// not working?
void Thermal::tab() {
PRINTER_PRINT(9);
}
void Thermal::setCharSpacing(int spacing) {
writeBytes(27, 32, 0, 10);
}
/////////////////////////
// #if ARDUINO < 100
// void *operator new(size_t size_) { return malloc(size_); }
// void* operator new(size_t size_,void *ptr_) { return ptr_; }
// #endif/*************************************************************************
This is an Arduino library for the Adafruit Thermal Printer.
Pick one up at --> http://www.adafruit.com/products/597
These printers use TTL serial to communicate, 2 pins are required.
Adafruit invests time and resources providing this open source code.
Please support Adafruit and open-source hardware by purchasing products
from Adafruit!
Written by Limor Fried/Ladyada for Adafruit Industries.
MIT license, all text above must be included in any redistribution.
This file was modified by Przemysław Grzywacz <nexather@gmail.com>
in order to run on Spark Core.
*************************************************************************/
#ifndef Thermal_h
#define Thermal_h
// Barcode types
#define UPC_A 0
#define UPC_E 1
#define EAN13 2
#define EAN8 3
#define CODE39 4
#define I25 5
#define CODEBAR 6
#define CODE93 7
#define CODE128 8
#define CODE11 9
#define MSI 10
#define PRINTER_PRINT(a) _printer->write(a);
#define SERIAL_IMPL Stream
class Thermal : public Print {
public:
Thermal();
void
begin(SERIAL_IMPL* serial, int heatTime=200),
reset(),
setDefault(),
test(),
testPage(),
normal(),
inverseOn(),
inverseOff(),
upsideDownOn(),
upsideDownOff(),
doubleHeightOn(),
doubleHeightOff(),
doubleWidthOn(),
doubleWidthOff(),
boldOn(),
boldOff(),
underlineOn(uint8_t weight=1),
underlineOff(),
strikeOn(),
strikeOff(),
justify(char value),
feed(uint8_t x=1),
feedRows(uint8_t),
flush(),
online(),
offline(),
sleep(),
sleepAfter(uint8_t seconds),
wake(),
listen(),
setSize(char value),
setLineHeight(int val=32),
printBarcode(char * text, uint8_t type),
setBarcodeHeight(int val=50),
printBitmap(int w, int h, const uint8_t *bitmap, bool fromProgMem = true),
printBitmap(int w, int h, Stream *stream),
printBitmap(Stream *stream),
timeoutSet(unsigned long),
timeoutWait(),
setTimes(unsigned long, unsigned long),
setMaxChunkHeight(int val),
setCharSpacing(int spacing), // Not working
tab(); // Not working
bool hasPaper();
size_t write(uint8_t c);
protected:
SERIAL_IMPL
*_printer;
uint8_t
prevByte, // Last character issued to printer
column, // Last horizontal column printed
maxColumn, // Page width (output 'wraps' at this point)
charHeight, // Height of characters, in 'dots'
lineSpacing, // Inter-line spacing (not line height), in dots
barcodeHeight; // Barcode height in dots, not including text
unsigned long
resumeTime, // Wait until micros() exceeds this before sending byte
dotPrintTime, // Time to print a single dot line, in microseconds
dotFeedTime; // Time to feed a single dot line, in microseconds
int
printMode,
maxChunkHeight;
void
setPrintMode(uint8_t mask),
unsetPrintMode(uint8_t mask),
writePrintMode(),
writeBytes(uint8_t a),
writeBytes(uint8_t a, uint8_t b),
writeBytes(uint8_t a, uint8_t b, uint8_t c),
writeBytes(uint8_t a, uint8_t b, uint8_t c, uint8_t d);
};
#endif // Thermal_hAs part of this project-based course, we’ll get hands-on with emerging technologies, concepts and applications in the internet of things through a critical socio-technical lens. Over it’s 14-weeks,...more
Solid message reflects on how we receive and send messages, retrieves the old-fashioned way of sending messages and finds alternatives for the fast-paced message sending and receiving in social media. By allowing the end user to send only one message a day and physically prints the message out, we seek more deliberate, mindful ways of communicating.