Final Project: Smart Pour-Over Kettle
Made by Nik Kim, Justin Slusher, Stephanie Ho and Darshil Shastri
Made by Nik Kim, Justin Slusher, Stephanie Ho and Darshil Shastri
Created: December 6th, 2023
Intention: Why did you make what you made?
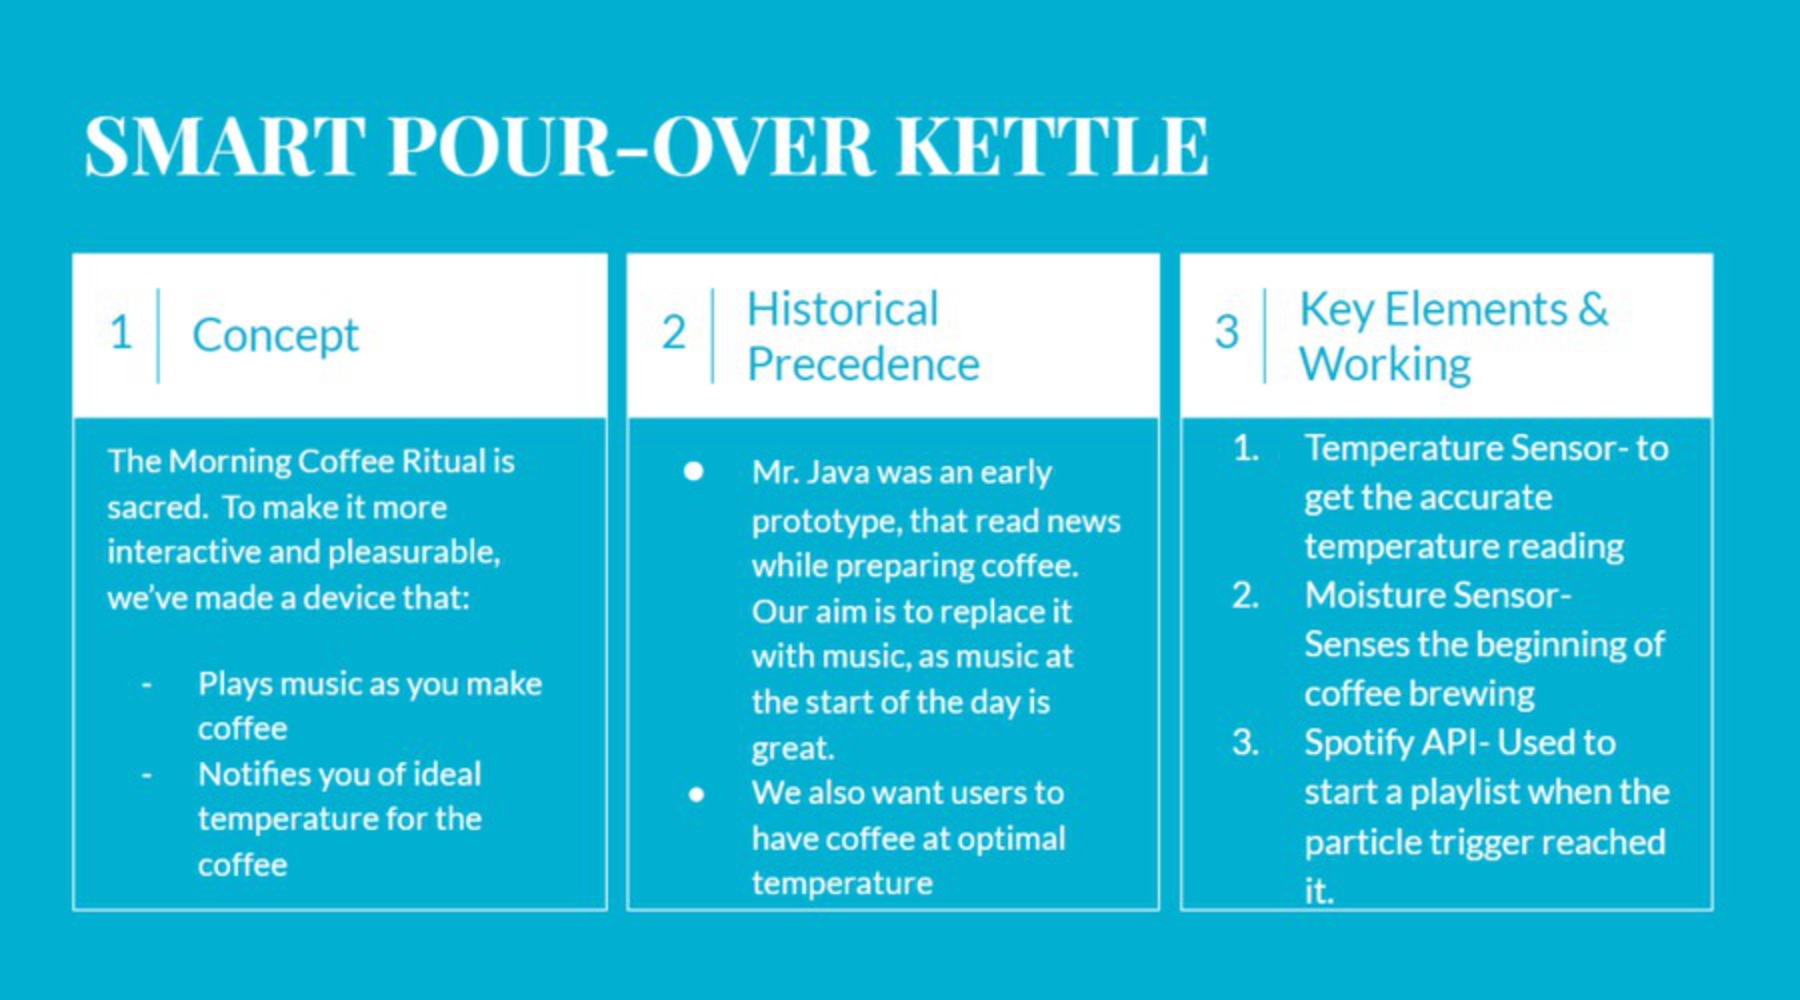
Our proposal is a solution to provide a more comforting morning coffee routine. Our smart device will illustrate how integrating moisture and temperature sensors to track the pour-over brewing process will engage the household in a calming yet interactive experience. Your music will start to play as you start to make coffee, and a light will let you know if your coffee is at an optimal temperature. If it's cooled down too much, it will let you know it's time to reheat or remake your cup of coffee.
Historical Case: Provide an analysis of the case and your rationale for selecting it.
“A similar project is Mr. Java.77 Mr. Java is a smart coffee machine: place your coffee cup with a thin tag glued to the base under the spout and it makes you the coffee that you want and gives you the news you want, too. Joseph Kaye gets the news from London and a double tall latte; others choose an espresso with their sports scores, or a cappuccino with the latest weather report. Again, this project aims to transform the act of making coffee from a transaction into an experience. It also suggests a different sort of convergence in the domestic sphere—a convergence not of devices, but of experiences.”
Designing Technology for Domestic Spaces: A Kitchen Manifesto, Genevieve Bell and Joseph
https://www.media.mit.edu/ci/projects/mrjava.html
We liked the idea of making coffee or having coffee as being a more engaging experience in the morning and wanted to bring this to life. Coffee often signals "waking up" or the start of one's day, so music would be a fitting accompaniment to making one's morning cup.
Approach: How did you approach the rebuilding the device (i.e. what aspects have you chosen to revive and why)
We chose to focus on the 'experience' part of having coffee but using music as the output for having coffee. In order to do this, we knew we needed sensors to inform us when the coffee was being made and triggers to start the music.
Originally, we imagined the temperature sensor affixed to the kettle but realized that it might be difficult for this to sense the actual temperature based on the kettle's material and construction. We then decided to place the temperature sensor in the carafe - this was moved to an exterior piece of foil upon further testing.
We also originally imagined a second notification or trigger happening when the coffee had cooled to ~140 degrees Fahrenheit, an optimal temperature for consuming coffee. However, we realized that the temperature sensor reading in the carafe was often much lower than this, even after immediately pouring boiling liquid. We then switched to the light sensor, which notifies us when the coffee is too cool or hot for ideal consumption.
Process: How did you arrive at this outcome? What happened (and changed) as you experimented with restoring this device?
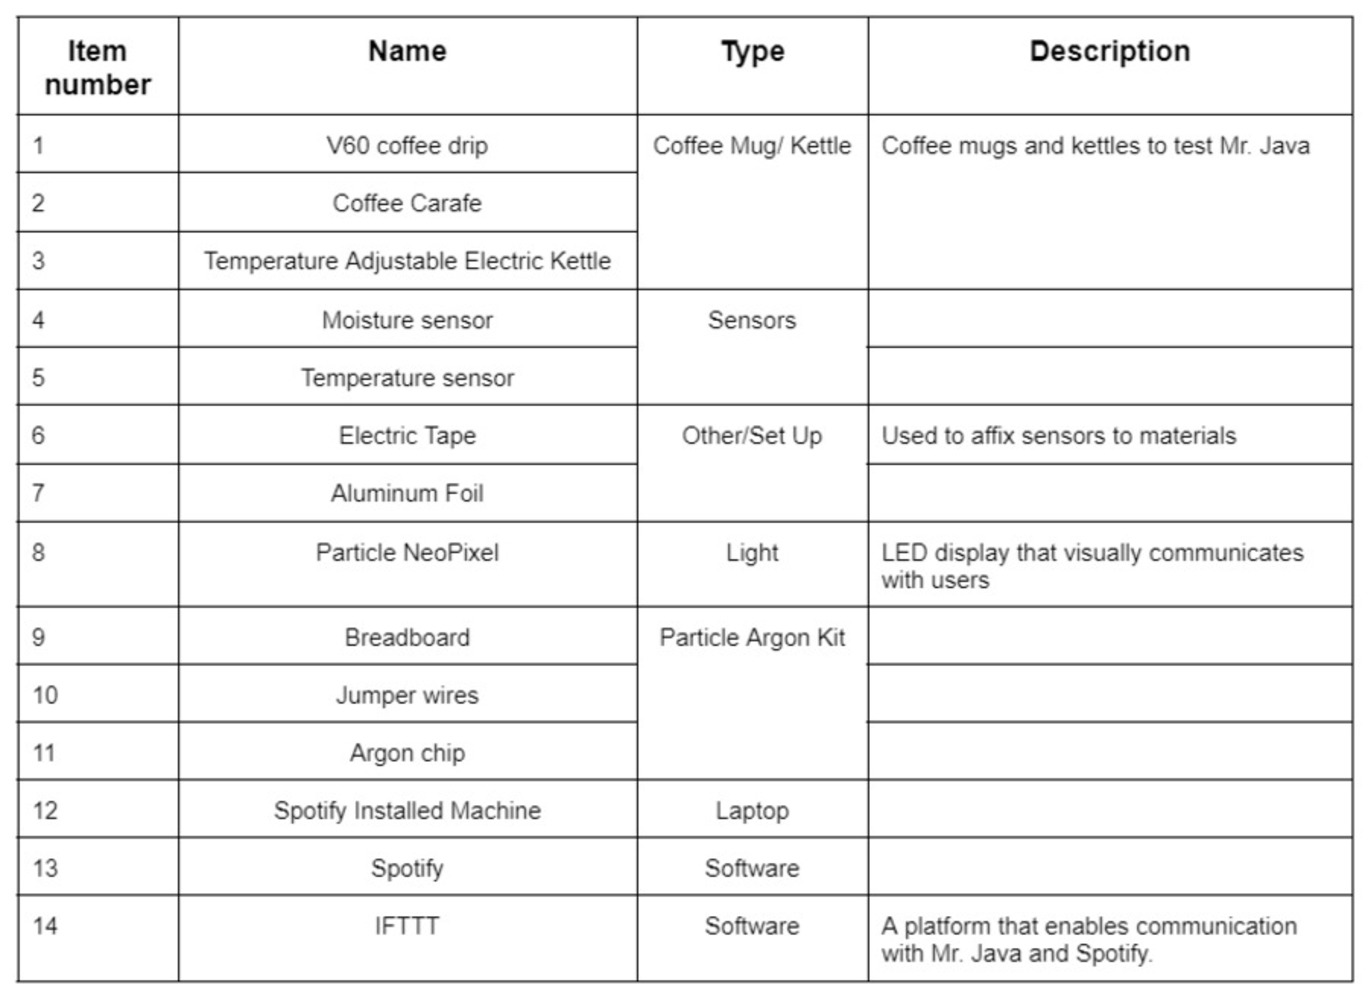
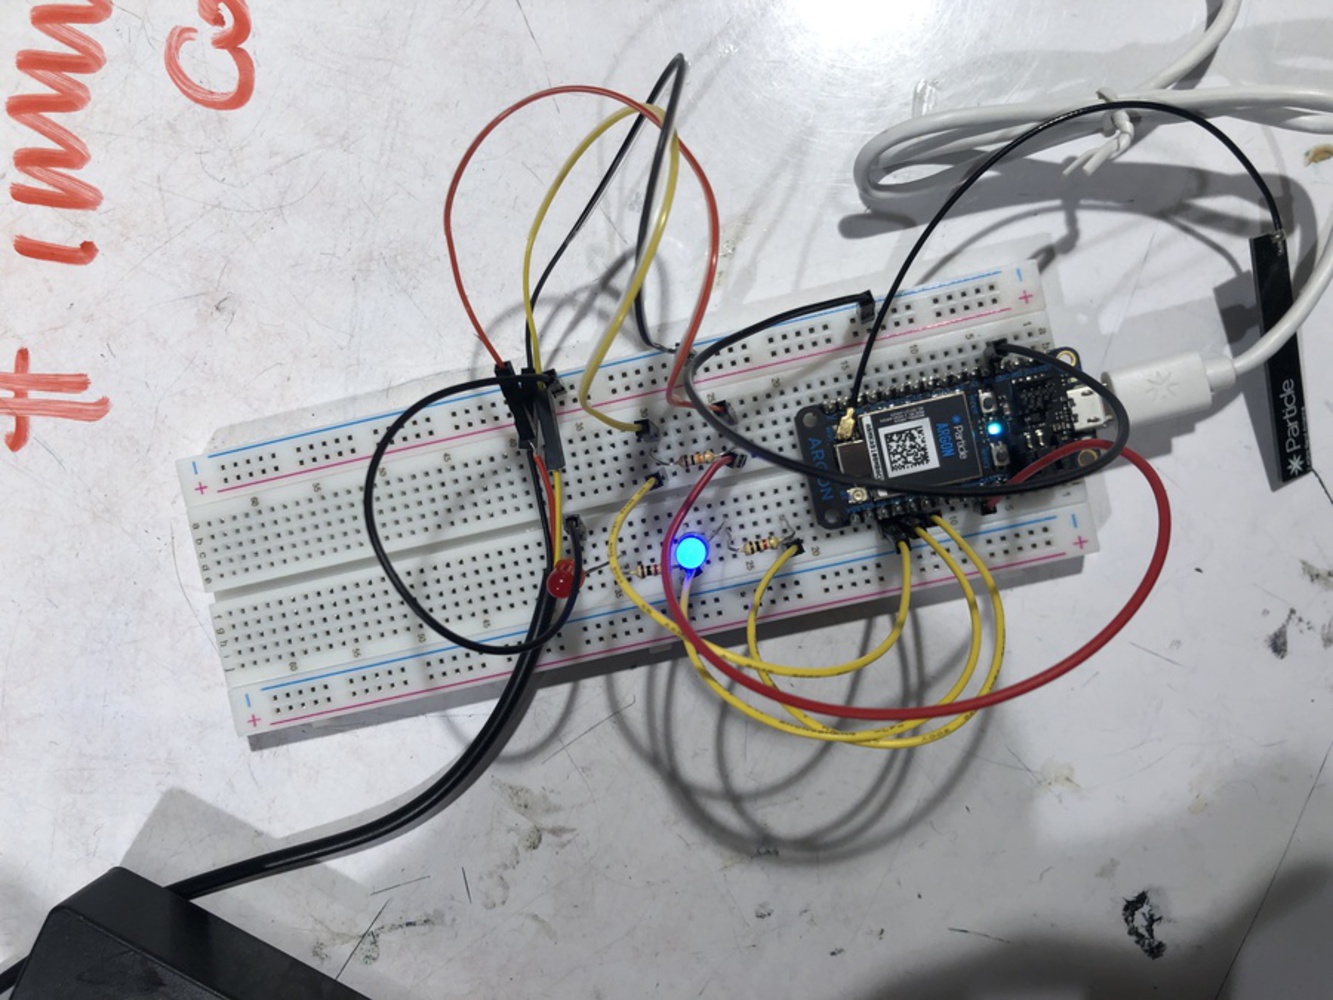
We broke down the device into three components for testing purposes:
1) The temperature sensor
2) The moisture sensor
3) The Spotify API Webhook
The testing of each component is below:
// This #include statement was automatically added by the Particle IDE.
#include <spark-dallas-temperature.h>
// This #include statement was automatically added by the Particle IDE.
#include <OneWire.h>
// -----------------
// Read temperature
// -----------------
// Data wire is plugged into port 0 on the Arduino
// Setup a oneWire instance to communicate with any OneWire devices (not just Maxim/Dallas temperature ICs)
OneWire oneWire( D2 );
// Pass our oneWire reference to Dallas Temperature.
DallasTemperature dallas(&oneWire);
// Create a variable that will store the temperature value
double temperature = 0.0;
double temperatureF = 0.0;
int redLed = D3;
int bluLed = D4;
void setup()
{
// Register a Particle variable here
Particle.variable("temperature", &temperature, DOUBLE);
Particle.variable("temperatureF", &temperatureF, DOUBLE);
pinMode(redLed, OUTPUT);
pinMode(bluLed, OUTPUT);
digitalWrite(redLed, LOW);
digitalWrite(bluLed, LOW);
// setup the library
dallas.begin();
}
void loop()
{
// Request temperature conversion
dallas.requestTemperatures();
// get the temperature in Celcius
float tempC = dallas.getTempCByIndex(0);
// convert to double
temperature = (double)tempC;
// convert to Fahrenheit
float tempF = DallasTemperature::toFahrenheit( tempC );
// convert to double
temperatureF = (double)tempF;
blinkLed(temperature);
delay(5000);
}
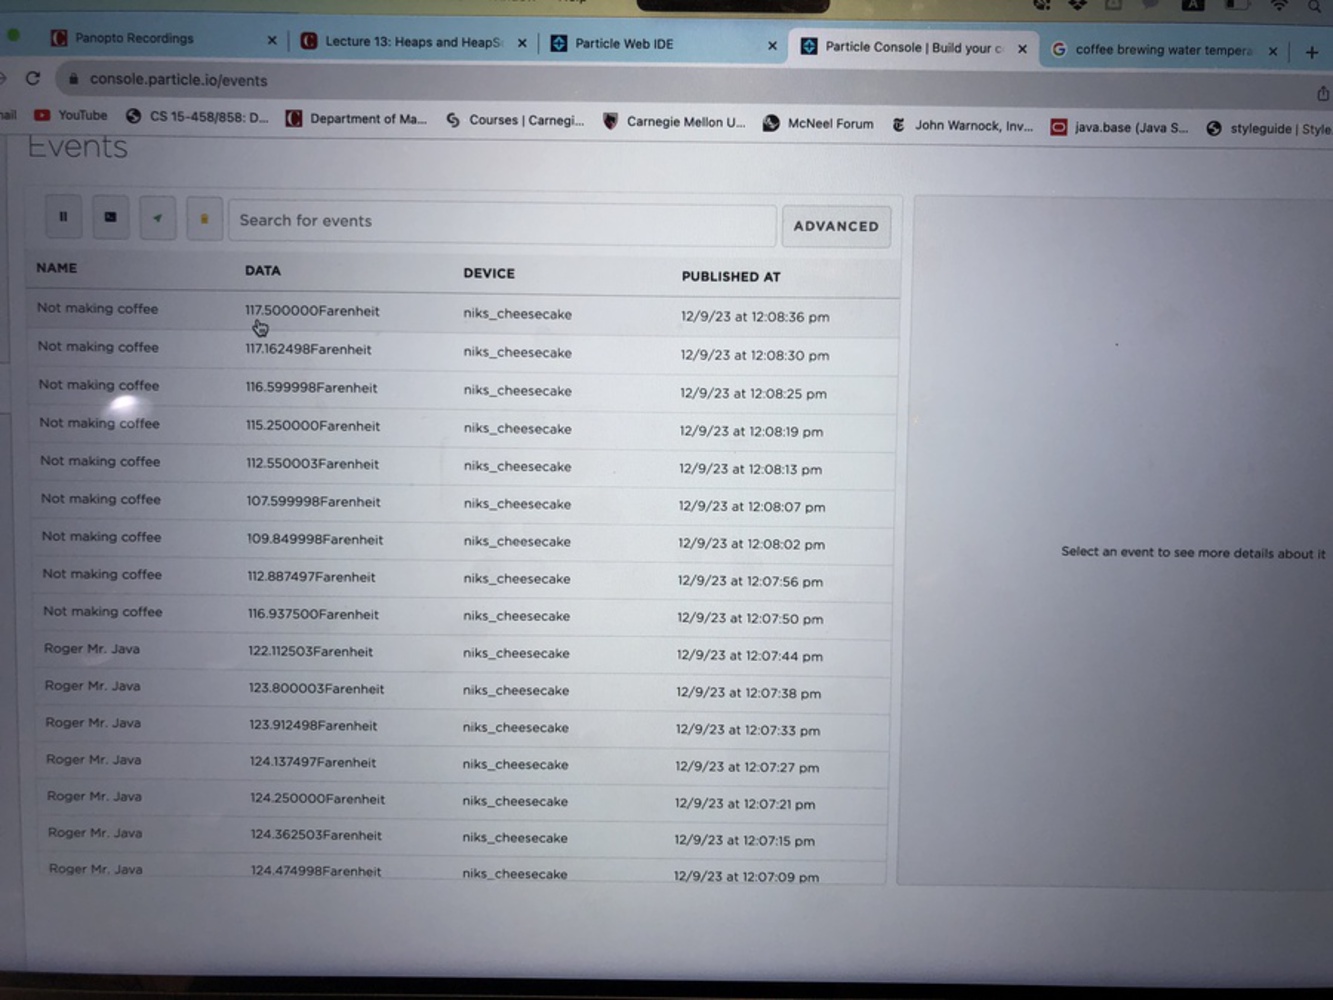
void blinkLed(float temp) {
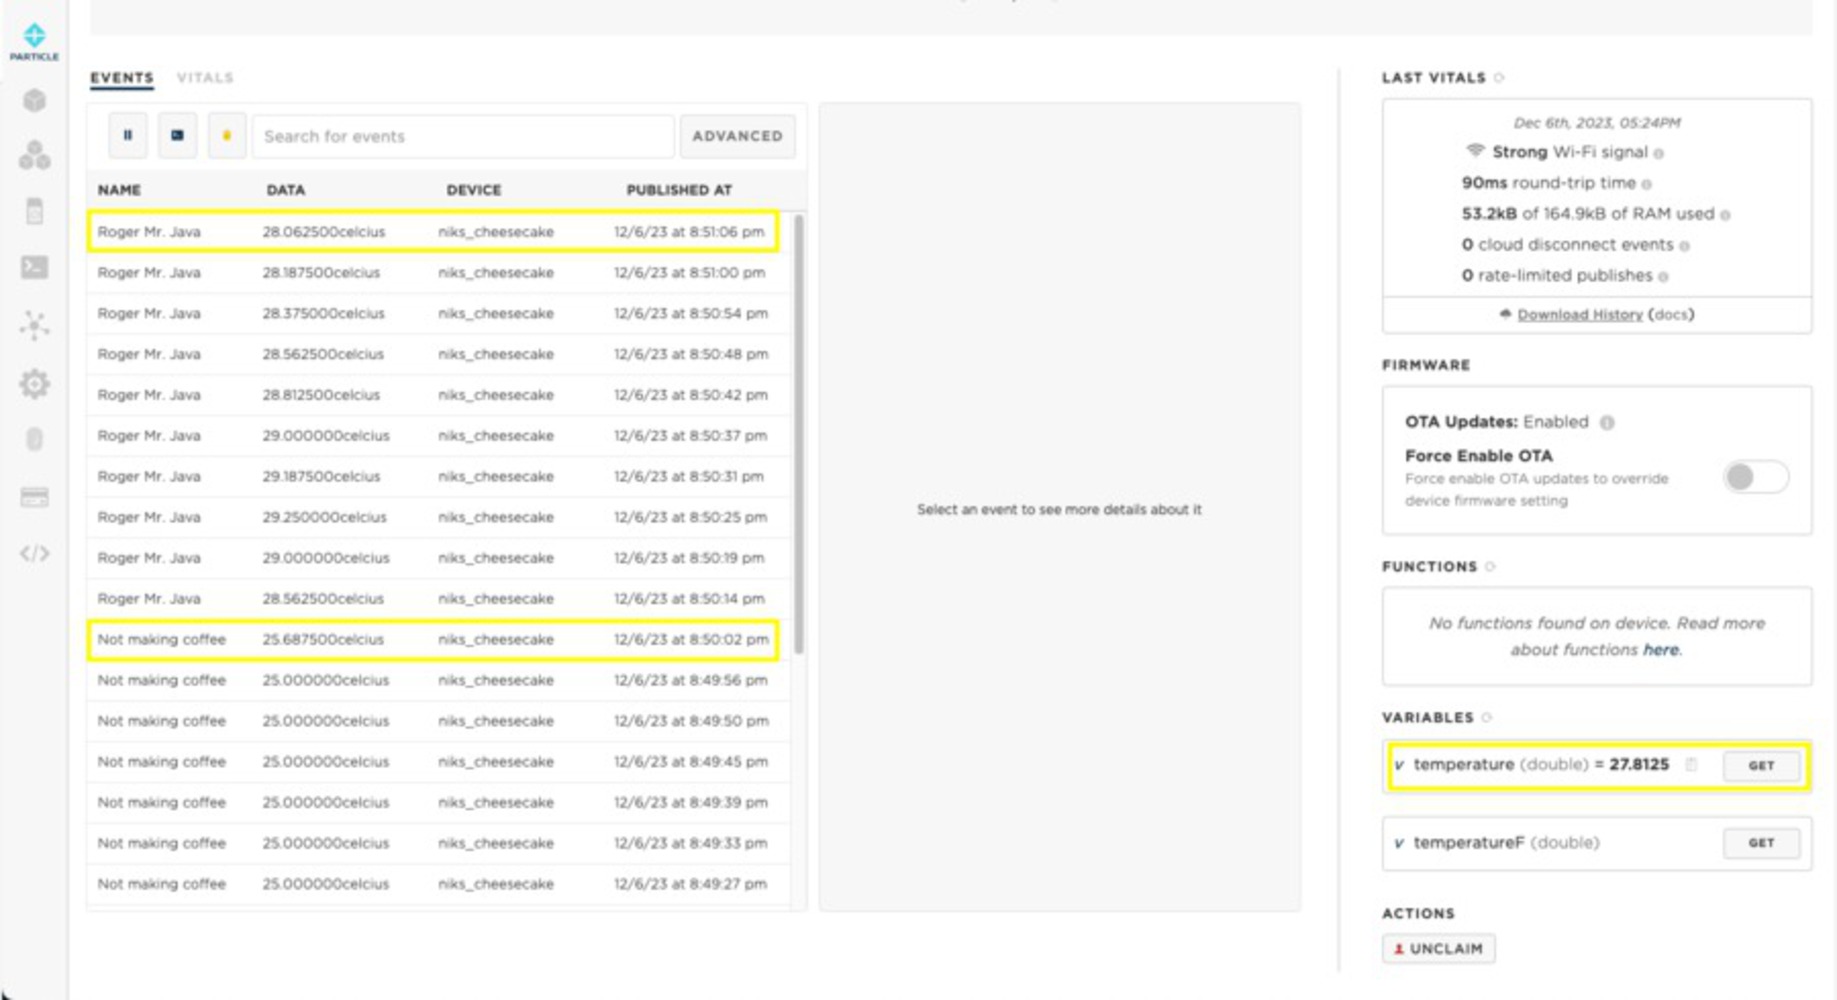
if (temp >= 28) {
Particle.publish("Roger Mr. Java", String(temp) + "celcius");
digitalWrite(redLed, HIGH);
} else if (temp <=26) {
Particle.publish("Not making coffee", String(temp) + "celcius");
digitalWrite(bluLed, HIGH);
}
}// This #include statement was automatically added by the Particle IDE.
#include <spark-dallas-temperature.h>
// This #include statement was automatically added by the Particle IDE.
#include <OneWire.h>
// -----------------
// Read temperature
// -----------------
// Data wire is plugged into port 0 on the Arduino
// Setup a oneWire instance to communicate with any OneWire devices (not just Maxim/Dallas temperature ICs)
OneWire oneWire( D2 );
// Pass our oneWire reference to Dallas Temperature.
DallasTemperature dallas(&oneWire);
// Create a variable that will store the temperature value
double temperature = 0.0;
double temperatureF = 0.0;
int redLed = D3;
int bluLed = D4;
void setup()
{
// Register a Particle variable here
Particle.variable("temperature", &temperature, DOUBLE);
Particle.variable("temperatureF", &temperatureF, DOUBLE);
pinMode(redLed, OUTPUT);
pinMode(bluLed, OUTPUT);
digitalWrite(redLed, LOW);
digitalWrite(bluLed, LOW);
// setup the library
dallas.begin();
}
void loop()
{
// Request temperature conversion
dallas.requestTemperatures();
// get the temperature in Celcius
float tempC = dallas.getTempCByIndex(0);
// convert to double
temperature = (double)tempC;
// convert to Fahrenheit
float tempF = DallasTemperature::toFahrenheit( tempC );
// convert to double
temperatureF = (double)tempF;
blinkLed(temperatureF);
delay(5000);
}
void blinkLed(float temp) {
if ( temp >= 120 and temp <= 140) {
Particle.publish("Roger Mr. Java", String(temp) + "Farenheit");
digitalWrite(redLed, HIGH);
digitalWrite(bluLed, LOW);
} else if (temp < 120) {
Particle.publish("Not making coffee", String(temp) + "Farenheit");
digitalWrite(redLed, LOW);
digitalWrite(bluLed, HIGH);
}
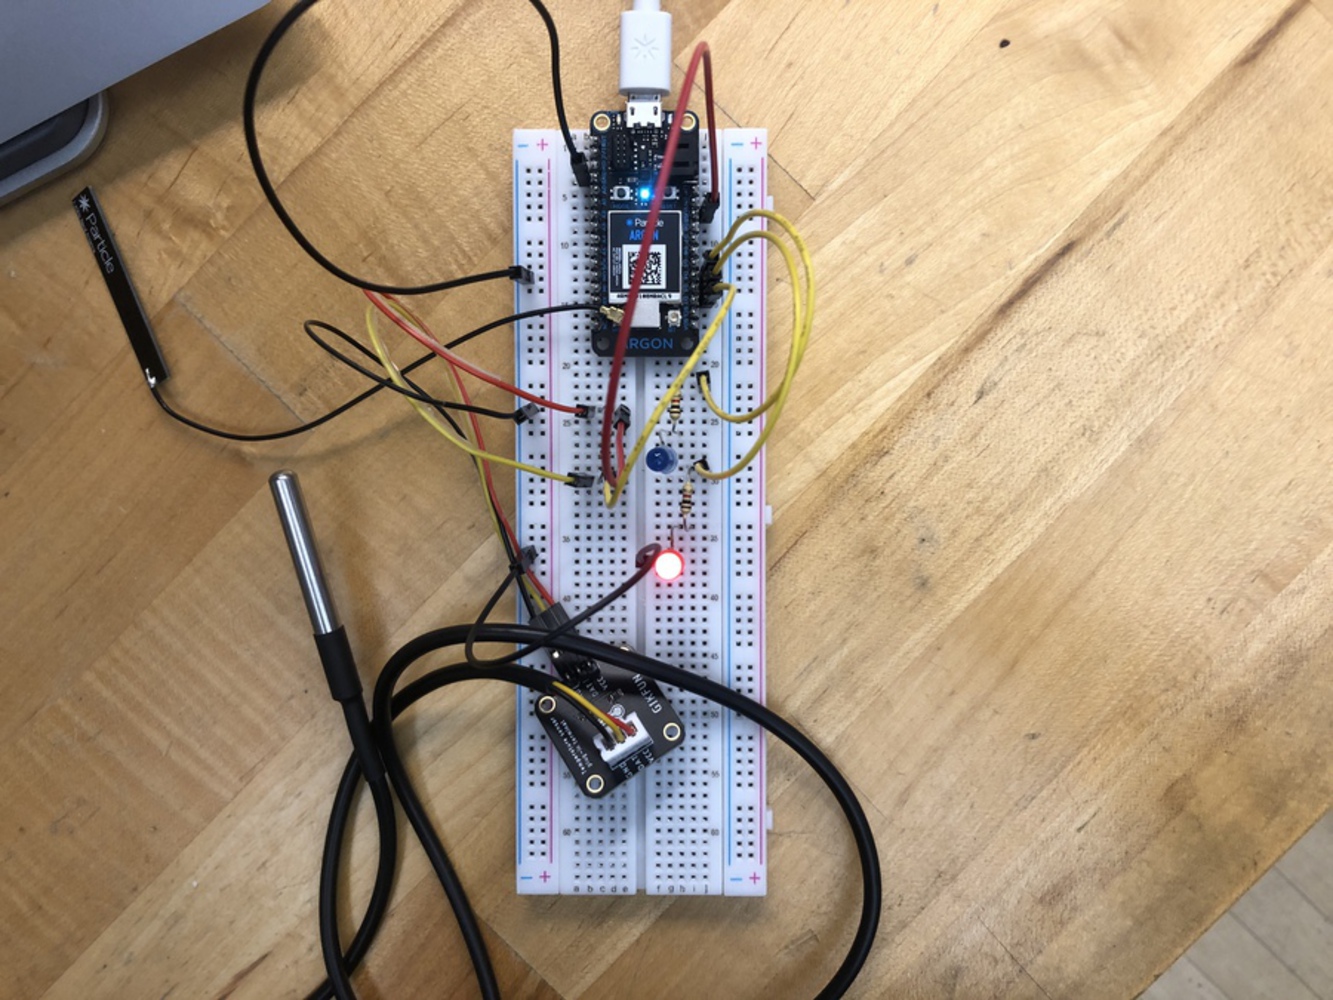
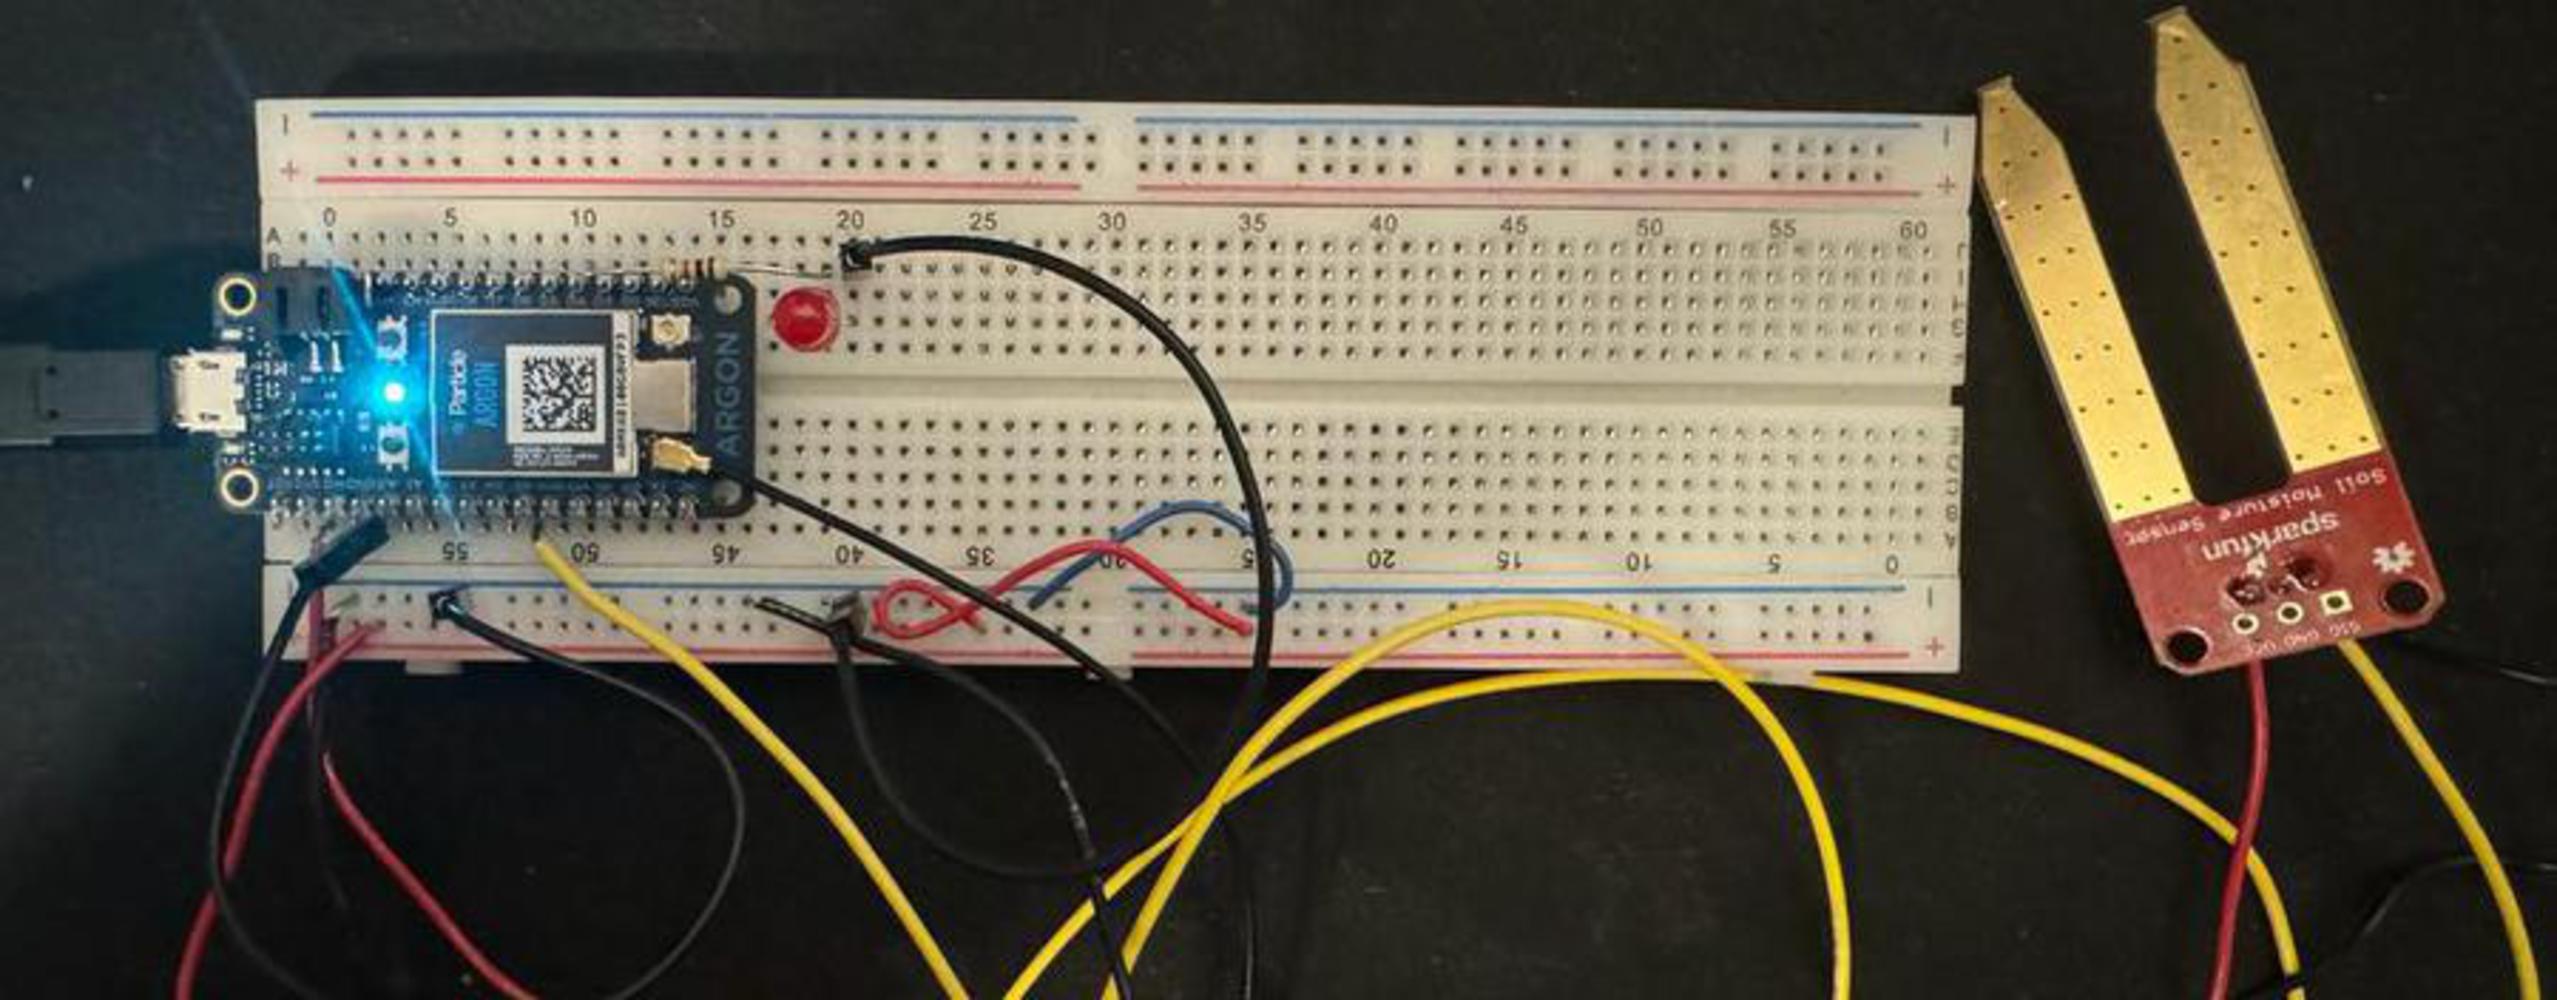
}The moisture sensor is connected to pin A5, and the LED light is connected to pin D4. The moisture sensor is also connected to the ground and the Argon board's 3v3 pin.
The code was programmed (as shown below) so that when the moisture level read greater than 50%, the LED would turn on. The picture below shows the wiring layout, and the video displays a successful test. The video demonstrates the moisture sensor being placed against a wet coffee filter to cause the sensor to read the moisture.
// Moisture sensor and LED light
int moisture_pin = A5;
int led_pin = D4;
void setup() {
pinMode(led_pin, OUTPUT); // Set the LED pin as output
pinMode(moisture_pin, INPUT); // Set the moisture sensor pin as input
}
void loop() {
// Reading the moisture level
int moisture_analog = analogRead(moisture_pin);
// Calculate moisture percentage
float moisture_percentage = (moisture_analog / 4095.00) * 100;
// Turn on the LED if moisture is 50% or more
if (moisture_percentage >= 50) {
digitalWrite(led_pin, HIGH);
} else {
digitalWrite(led_pin, LOW);
}
// Delay for 2 seconds before the next loop
delay(2000);
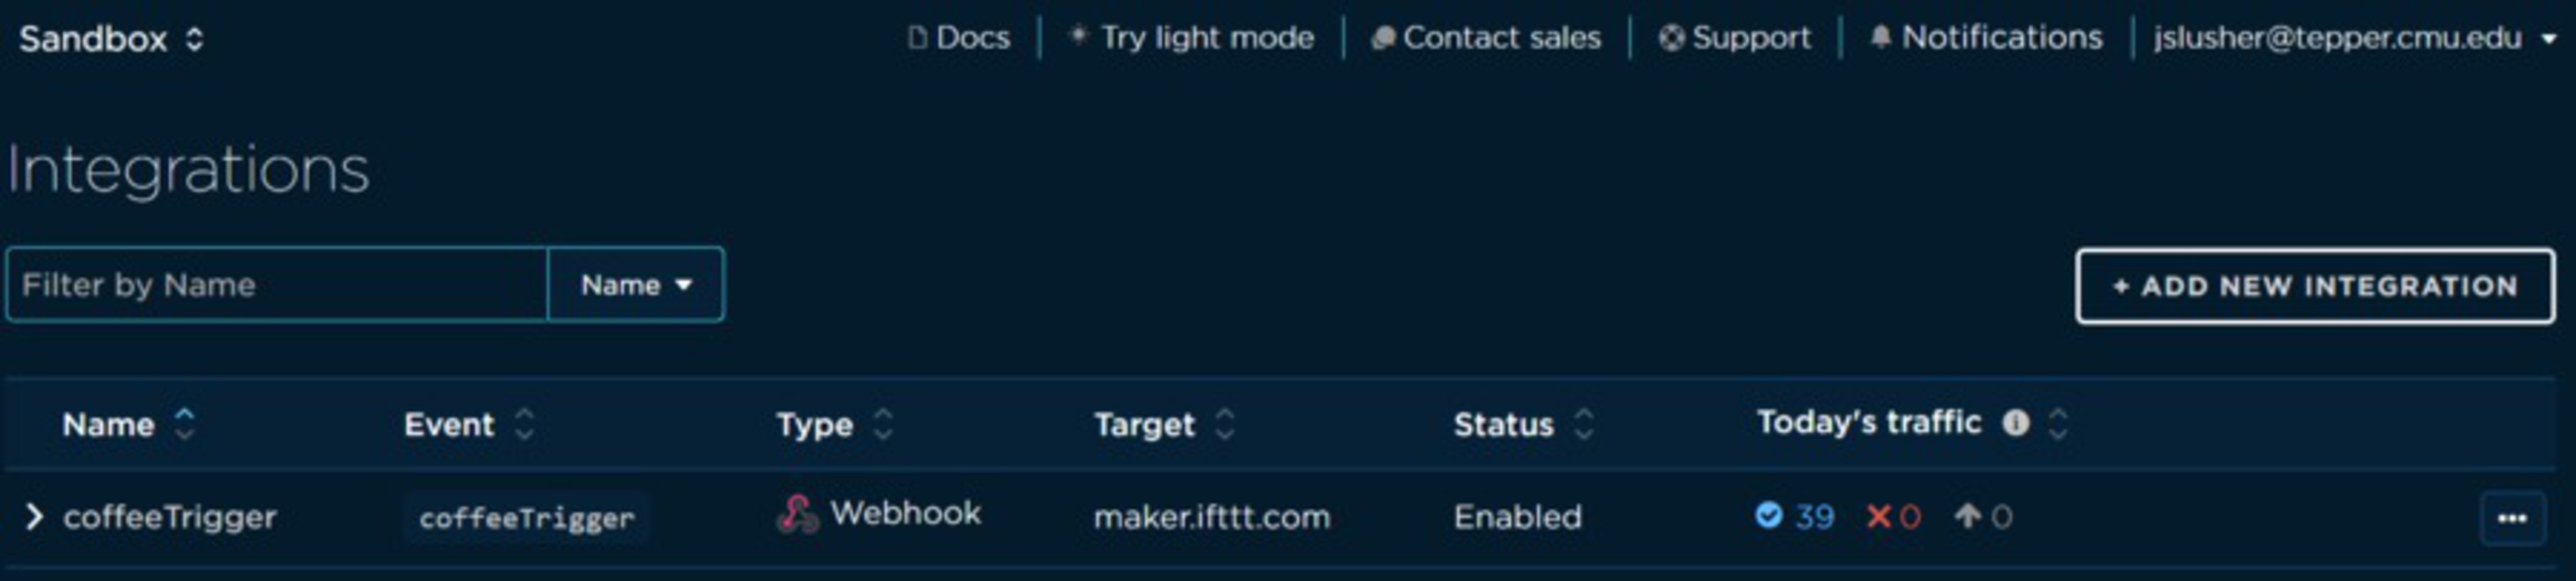
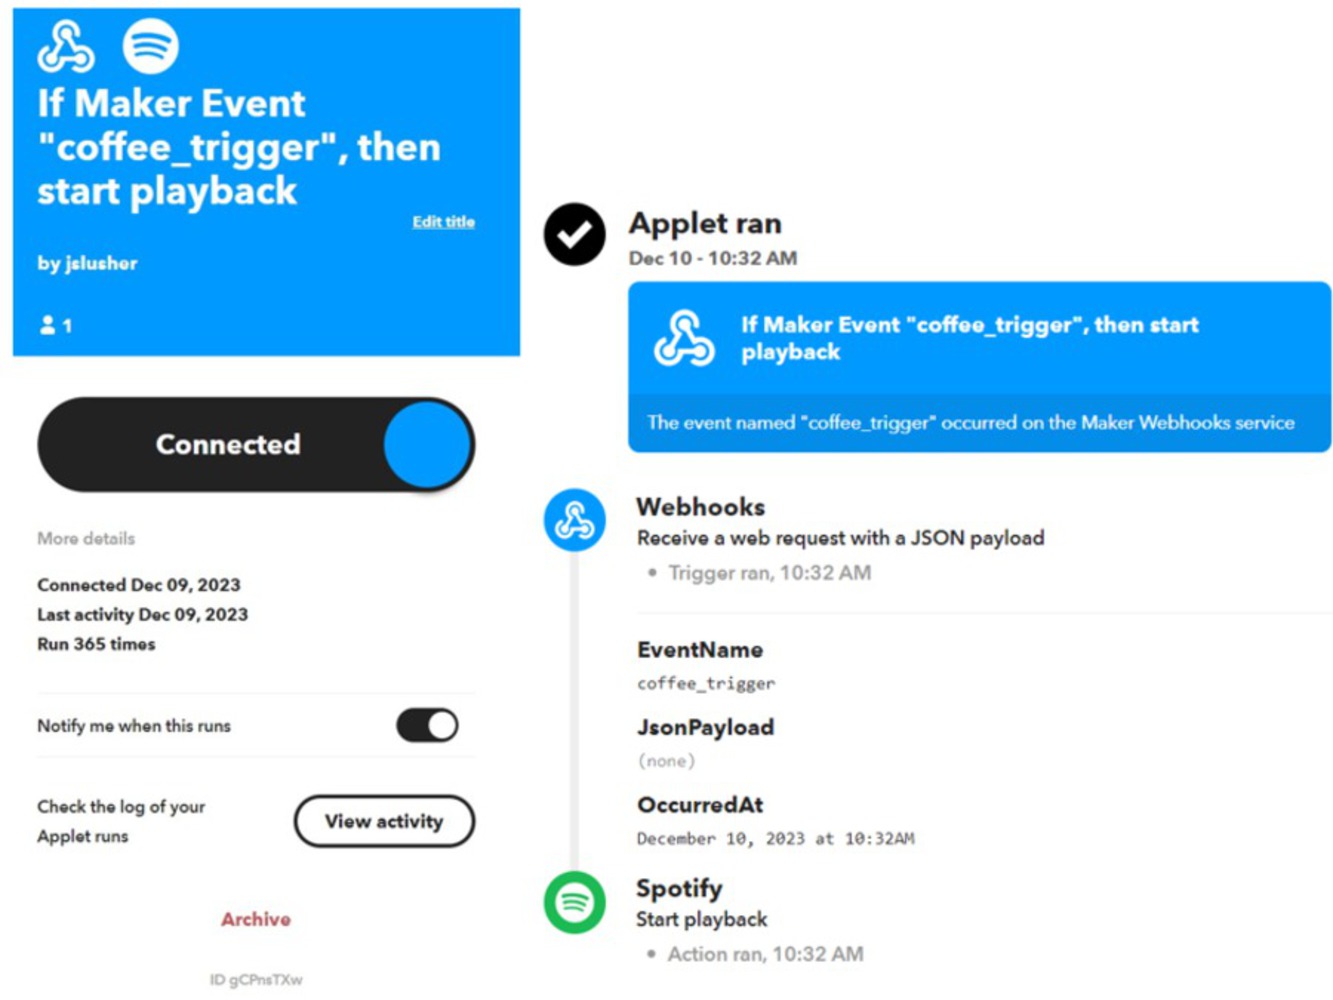
}Testing Active Pushbutton to activate JSON Payload Webhook to trigger IFTTT & Spotify Playback
We tested using a push button so we could easily signal and check if the webhook was in fact working.
There were four key parts:
1) A Particle.Publish in the code to publish "coffeeTrigger"
2) A Particle Console webhook integration, using the inputs from:
3) Documentation from IFTTT (Profile Icon > My Services > Webhooks > Documentation)
4) An IFTTT applet with a Maker Event "coffeeTrigger"
// Mr Java: Push button -> JSON Payload -> IFTTT -> Spotify

// Switch button
int pushBtn = D3;

void setup() {
    Serial.begin(9600);

    // Push button
    pinMode(pushBtn, INPUT_PULLUP);
}

void loop() {
    int switchState = digitalRead(pushBtn);

    // Check if the button is pressed
    if (switchState == LOW) {
        // Publish event
        Particle.publish("coffeeTrigger");

        // Delay to avoid multiple triggers
        delay(500);
    }
}// Testing Mr. Java
// Libraries
#include <spark-dallas-temperature.h>
#include <OneWire.h>
#include "neopixel.h"
// NeoPixel Config
#define PIXEL_PIN D2
#define PIXEL_COUNT 16
#define PIXEL_TYPE WS2812
Adafruit_NeoPixel strip = Adafruit_NeoPixel(PIXEL_COUNT, PIXEL_PIN, PIXEL_TYPE);
// Dallas Temperature Sensor Config
OneWire oneWire( D3 );
DallasTemperature dallas(&oneWire);
double temperatureF = 0.0;
// Moisture Sensor & Button Setup
int moisture_pin = A5; // Moisture sensor pin
int pushBtn = D4; // Pushbutton pin
void setup() {
strip.begin();
strip.show();
Particle.variable("temperatureF", &temperatureF, DOUBLE);
dallas.begin();
Serial.begin(9600);
pinMode(moisture_pin, INPUT);
pinMode(pushBtn, INPUT_PULLUP);
}
void loop() {
// Temperature reading & LED update
dallas.requestTemperatures();
float tempC = dallas.getTempCByIndex(0);
temperatureF = (double)DallasTemperature::toFahrenheit(tempC);
updateLedColor(temperatureF);
Particle.publish("here", String(temperatureF) + "F");
// Moisture reading and event triggering
int moisture_analog = analogRead(moisture_pin);
float moisture_percentage = (moisture_analog / 4095.00) * 100;
if (moisture_percentage >= 50) {
Particle.publish("coffeeTrigger");
delay(500);
}
// Button state reading & event triggering
int switchState = digitalRead(pushBtn);
if (switchState == LOW) {
Particle.publish("coffeeTrigger");
delay(500);
}
}
void updateLedColor(double tempF) {
if (tempF <= 70.0) {
setStripColor(strip.Color(0, 0, 255));
} else {
uint8_t redIntensity = map((int)tempF, 50, 120, 0, 255);
setStripColor(strip.Color(redIntensity, 0, 0));
}
}
void setStripColor(uint32_t color) {
for (int i = 0; i < strip.numPixels(); i++) {
strip.setPixelColor(i, color);
}
strip.show();
}Reflection + Critique: What insights did it generate? What would you do next?
Learnings:
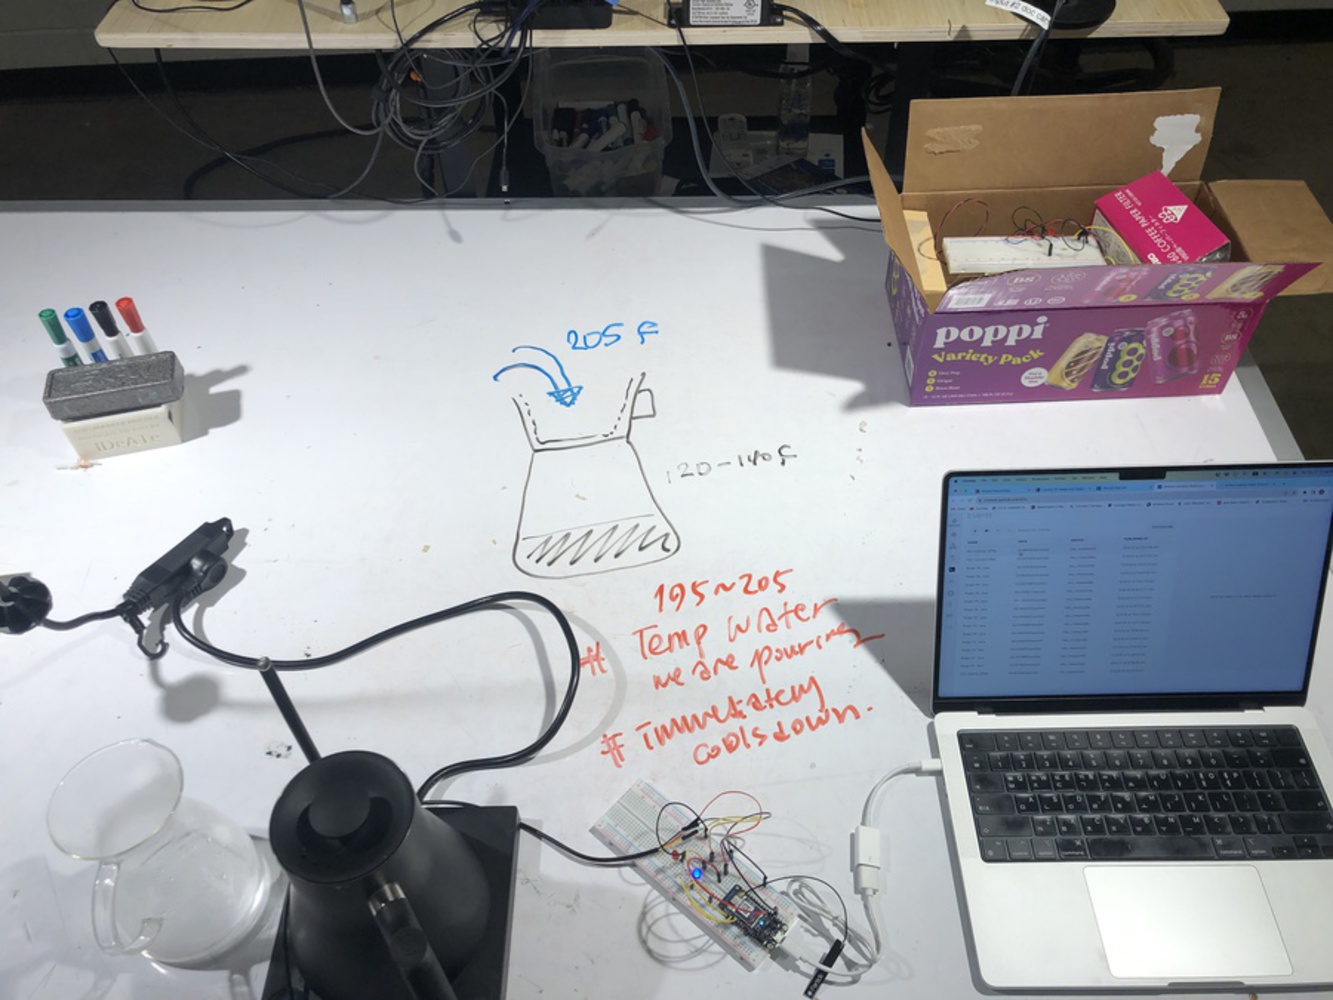
We had to play with a few different temperatures when handling the neopixel and temperature sensor, since the water cooled significantly from 205 F (the temperature it was heated to) once it reached the bottom of the carafe/the alumnium foil where we moved the temperature sensor to, but the foil also held its temperature for a while.
Ultimately we set the noepixel to change color when the temperature was greater than 70 F, so the sensor would easily indicate when there was hot coffee in the carafe, and when it had cooled past room temperature and someone would need to make another pot.
From the feedback received from demos, we would consider ways to better integrate the neopixel. This could include: using a neopixel strip in the back of the case, or at the bottom front of the stand and using variable lighting (loading, changing colors, pulsing) to indicate the brewing is in process. This would provide a more holistic experience with the light and the music with the coffee making process.
Future Applications:
It would be interesting to test different variations on the Mr. Java, for example playing different music based on the amount of coffee that is made - more excitable music when more coffee is brewed to wake the person up, or calmer music when a smaller cup is brewed.
This temperature + moisture sensor and output could also be applied in a number of different household applications to enhance the experience. For example, starting music when shower or bath water has heated up to a comfortable temperature, or playing music while watering one's plants.
A list of references and resources utilized for the project:
Data Inputs
API/Spotify:
Examples:
A hands-on introductory course exploring the Internet of Things and connected product experiences.
~