Nick's Connected LED - Lab 1
Made by Nick Possi-Moses · UNLISTED (SHOWN IN POOLS)
Made by Nick Possi-Moses · UNLISTED (SHOWN IN POOLS)
The goal of this project is to create a simple connected LED device. There are four iterations of this project: 1) The foundational version is to pass in some value (i.e. on or off) to turn the the light on or off 2) The first exercise, which aims to blink the light on and off three times 3) The second exercise, which aims to blink the light on and off a certain number of times, based on the value that is passed through 4) The third exercise, which aims to control two different lights
Created: November 17th, 2022
The goal of this project is to create a simple connected LED device. There are four iterations of this project:
LAB 1 - BASE SET UP: The foundational version is to pass in some value (i.e. on or off) to turn the the light on or off
LAB 1 - EXERCISE 01: The first exercise, which aims to blink the light on and off three times
LAB 1 - EXERCISE 02: The second exercise, which aims to blink the light on and off a certain number of times, based on the value that is passed through
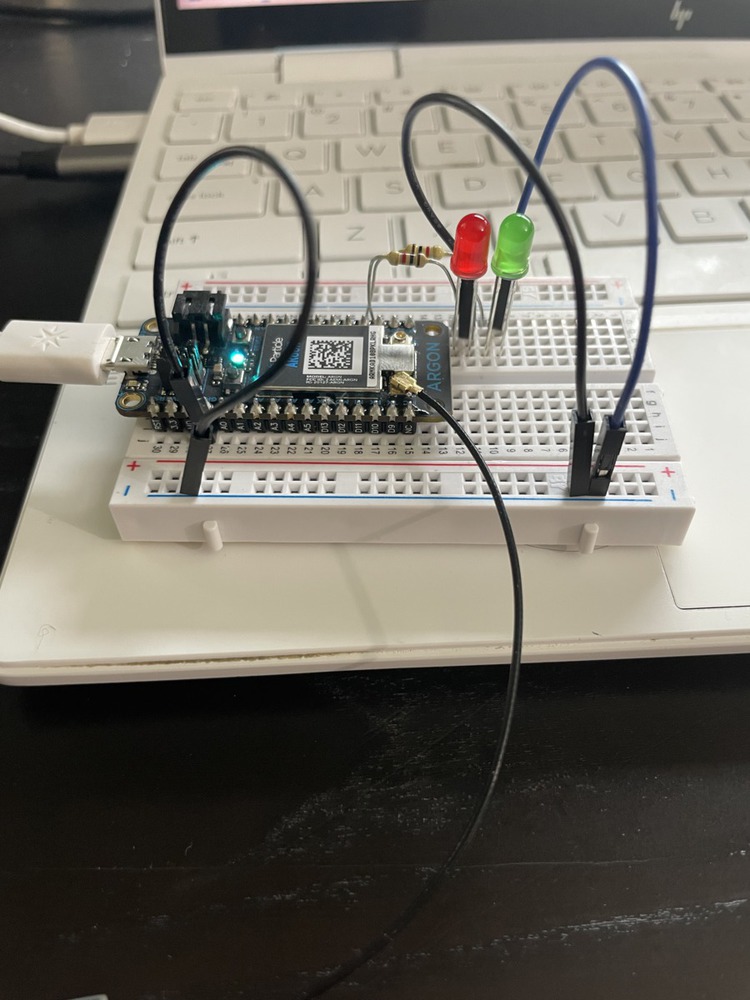
LAB 1 - EXERCISE 03: The third exercise, which aims to control two different lights. Here, I set up the code such that users can control how many times the duo blink. Basically, this builds on exercise 2 but with an additional light in play.
Describe the process you underwent to reach the outcome (problems encountered, how you resolved them, as well as, experiments, hacks, tests, refinements, iterations, failures)
Given that I don't have any foundation in physical computing, this project was initially very challenging. Setting up the breadboard in such a way that the circuit worked was my biggest hurdle to completing the project. I had to troubleshoot quite a bit to discover why my circuit did not seem to work - and after much poking around on the internet and asking my colleagues, I found that the reason the circuit was not working was because one of the wires was not connected to the 'Ground' node on the Photon chip. I had not realized that one of the wires needed to be connected to ground - I thought it could be connected to any position so long as it was on the 'negative' side of the breadboard.
The coding was simple enough; i played around a bit with the timing (i.e. delay), but other than that, no issues.
Reflect on the process of making this project. What did you learn? What would you do differently?
My biggest learning was after overcoming my biggest barrier to getting the circuit to work: you need to have the wired connected to ground! I also learned some basic functions that can be used with the Photon computer.
I think I would ask for help a bit sooner - I was stuck on the circuit for an embarrassingly long amount of time.
//LAB 1 - BASE SET UP

//GLOBAL VARIABLES

// Set up global variable for pin so that any configuration changes
// changes can easily and quickly be applied throughout the code
int led = D2;

//Set up status variable to check the state of the power - is it on
//or is it off?
bool status = LOW;


//PROGRAM

//Setup function configures the initial state of the microcontroller
//In this case, the microcontroller will be set to off when
//the program first runs.
void setup() {
    pinMode(led, OUTPUT);

    //This code makes the functiona accessible via the cloud
    Particle.function("ledControl", ledControl);
}

//Loop function repeats the actions in it repeatedly
//until the microcontroller is turned off (removed from power)
void loop() {
    digitalWrite(led, status);
    delay(500);
}

//If the command "on" is received, the LED is turned on
//If the command "off" is received, the LED is turned off
int ledControl (String command) {

    if(command.equals("on")) {
        status = HIGH;
        return 1; // This indicates that the 'on' command was successfully received and exectued
    }

    if(command.equals("off")) {
        status = LOW;
        return -1; // This indicates that the 'off' command was successfully received and exectued
    }

    return 401; //This indicates that there is an error
}//LAB 1 - EXERCISE 1
//PROGRAM OBJECTIVE
//Change the program to blink on and off every 3 seconds
//GLOBAL VARIABLES
// Set up global variable for pin so that any configuration changes can easily and quickly be applied throughout the code
int led = D2;
//Set up status variable to check the state of hte power - is it on or off?
bool status = LOW;
//PROGRAM
//Setup function configures the initial state of the microcontroller
//In this case, the microcontroller will be set to off when the program first runs.
void setup() {
pinMode(led, OUTPUT);
//This code sets the starting LED status to off
digitalWrite(led, LOW);
//This code makes the functiona accessible via the cloud
Particle.function("ledControl", ledControl);
}
//Loop function repeats the actions in it repeatedly until the microcontroller is turned off (removed from power)
void loop() {
}
int ledControl (String command) {
if(command.equals("on")) {
status = HIGH;
////Version 1 - the easy approach
////Blink on and off every 3 seconds
//digitalWrite(led, HIGH);
//delay(500);
//digitalWrite(led, LOW);
//delay(500);
//digitalWrite(led, HIGH);
//delay(500);
//digitalWrite(led, LOW);
//delay(500);
//digitalWrite(led, HIGH);
//delay(500);
//digitalWrite(led, LOW);
//delay(500);
//return 1;
//This indicates that the 'on' command was successfully received and exectued
////Version 2 - the harder approach
////Blink on and off every 3 seconds using loop
//Using variable i, if i is less than 3, increment by 1
for (int i = 1; i <=3; i++) {
digitalWrite(led, HIGH);
delay(500);
digitalWrite(led, LOW);
delay(500);
}
//Return led to off state
digitalWrite(led, LOW);
//This indicates that the 'on' command was successfully received and exectued
return 1;
}
if(command.equals("off")) {
status = LOW;
return -1; // This indicates that the 'off' command was successfully received and exectued
}
return 401; //This indicates that there is an error
}
//If the command "on" is received, the LED is turned on and blinks 3x
//If the command "off" is received, the LED is turned off//LAB 1 - EXERCISE 2
//PROGRAM OBJECTIVE
//Change the program to blink on and off every 3 seconds
//GLOBAL VARIABLES
// Set up global variable for pin so that any configuration changes can easily and quickly be applied throughout the code
int led = D2;
//PROGRAM
//Setup function configures the initial state of the microcontroller
//In this case, the microcontroller will be set to off when the program first runs.
void setup() {
pinMode(led, OUTPUT);
//This code sets the starting LED status to off
digitalWrite(led, LOW);
//This code makes the functiona accessible via the cloud
Particle.function("ledControl", ledControl);
}
//Loop function repeats the actions in it repeatedly until the microcontroller is turned off (removed from power)
void loop() {
}
int ledControl (String command) {
//converts string to integer number
int value = command.toInt();
if(value > 0) {
//Using variable i, if i is less than the entered value, increment by 1
for (int i = 1; i <= value; i++) {
digitalWrite(led, HIGH);
delay(500);
digitalWrite(led, LOW);
delay(500);
}
//Return led to off state
digitalWrite(led, LOW);
//This indicates that the 'on' command was successfully received and exectued
return 1;
}
return 401; //This indicates that there is an error
}//LAB 1 - EXERCISE 3
//PROGRAM OBJECTIVE
//Change the program to blink on and off every 3 seconds
//GLOBAL VARIABLES
// Set up global variable for pin so that any configuration changes can easily and quickly be applied throughout the code
int redLed = D2;
int greenLed = D3;
//PROGRAM
//Setup function configures the initial state of the microcontroller
//In this case, the microcontroller will be set to off when the program first runs.
void setup() {
pinMode(redLed, OUTPUT);
pinMode(greenLed, OUTPUT);
//This code sets the starting LED status to off
digitalWrite(redLed, LOW);
digitalWrite(greenLed, LOW);
//This code makes the functiona accessible via the cloud
Particle.function("ledControl", ledControl);
}
//Loop function repeats the actions in it repeatedly until the microcontroller is turned off (removed from power)
void loop() {
}
int ledControl (String command) {
//converts string to integer number
int value = command.toInt();
if(value > 0) {
//Using variable i, if i is less than the entered value, increment by 1
for (int i = 1; i <= value; i++) {
digitalWrite(redLed, HIGH);
delay(500);
digitalWrite(redLed, LOW);
delay(500);
digitalWrite(greenLed, HIGH);
delay(500);
digitalWrite(greenLed, LOW);
delay(500);
}
//Return led to off state
digitalWrite(redLed, LOW);
digitalWrite(greenLed, LOW);
//This indicates that the 'on' command was successfully received and exectued
return 1;
}
return 401; //This indicates that there is an error
}This project is only listed in this pool. Be considerate and think twice before sharing.
The goal of this project is to create a simple connected LED device. There are four iterations of this project:
1) The foundational version is to pass in some value (i.e. on or off) to turn the the light on or off
2) The first exercise, which aims to blink the light on and off three times
3) The second exercise, which aims to blink the light on and off a certain number of times, based on the value that is passed through
4) The third exercise, which aims to control two different lights