Reality Computing: Kinect Video in Virtual Reality
Made by Cody Soska
Made by Cody Soska
For this project I intended to record video data (color, depth) from a Microsoft Kinect 2.0 and render this video as a 3D object in virtual reality space.
Created: May 15th, 2017
This project uses recorded depth and color video from a kinect 2.0 to render an object (in this case, me) in 3D using homemade "pixels" to remap the depth and color data. Each pixel can be manipulated by a corresponding depth value and create a 3 dimensional object in virtual reality space. This creates a virtual reality video experience.
All code and resources on this project and open source. They are free to use, distribute, modify, and adapt.
1254 B · Download / View
1971 B · Download / View
1595 B · Download / View
The first step of this project was to record data from the kinect. I used a program built on the node.js framework called electron. Electron allowed to me to stream kinect data to a viewing window. This was the easiest part. Now I had to record this video. I used screen recording software called OBS Studio. Unfortunately, I could not record the feed directly from the electron applet and had to literally record my screen! I cropped the record size to the correct resolution and got what looked like usable footage.
At this point, I needed an object to "project" this data onto. To do this, I initially tried to use a subdivided plane object. I thought that if a plane has the correct number of squares, the resolution would work out. However, each square is not individually able to be manipulated. My instructor informed me that a better approach would be to generate a mesh object made of thousands of square faces (each is actually 2 triangles). To do this, I used the code below:
import numpy as np
import math
positions = []
uv = []
faces = []
offsets = [
np.array([-1.0, 1.0, 0.0]),
np.array([1.0, 1.0, 0.0]),
np.array([1.0, -1.0, 0.0]),
np.array([-1.0, -1.0, 0.0])
]
resolution_x = 512
resolution_y = 424
pointsize_x = 1.0 / (float(resolution_x) -1.0)
pointsize_y = 1.0 / (float(resolution_y) - 1.0)
pointsize = np.array([pointsize_x, pointsize_y, 1.0])
uv = []
vidx = 1
for (v,y) in zip(np.linspace(0.0, 1.0, resolution_y), np.linspace(-1.0, 1.0, resolution_y)):
for (u,x) in zip(np.linspace(0.0, 1.0, resolution_x), np.linspace(-1.0, 1.0, resolution_x)):
center = np.array([x, y, 0.0])
for offset in offsets:
p = center + (offset * pointsize)
positions.append("v {} {} {}\n".format(p[0], p[1], p[2]))
uv.append("vt {} {}\n".format(u, v))
faces.append("f {0}/{0} {1}/{1} {2}/{2}\n".format(vidx+0, vidx+1, vidx+2))
faces.append("f {0}/{0} {1}/{1} {2}/{2}\n".format(vidx+2, vidx+3, vidx+0))
vidx += 4
print("n faces: {}".format(len(faces)))
with open("kinect/examples/images/mesh.obj", "wt") as dest:
dest.write("".join(positions))
dest.write("".join(uv))
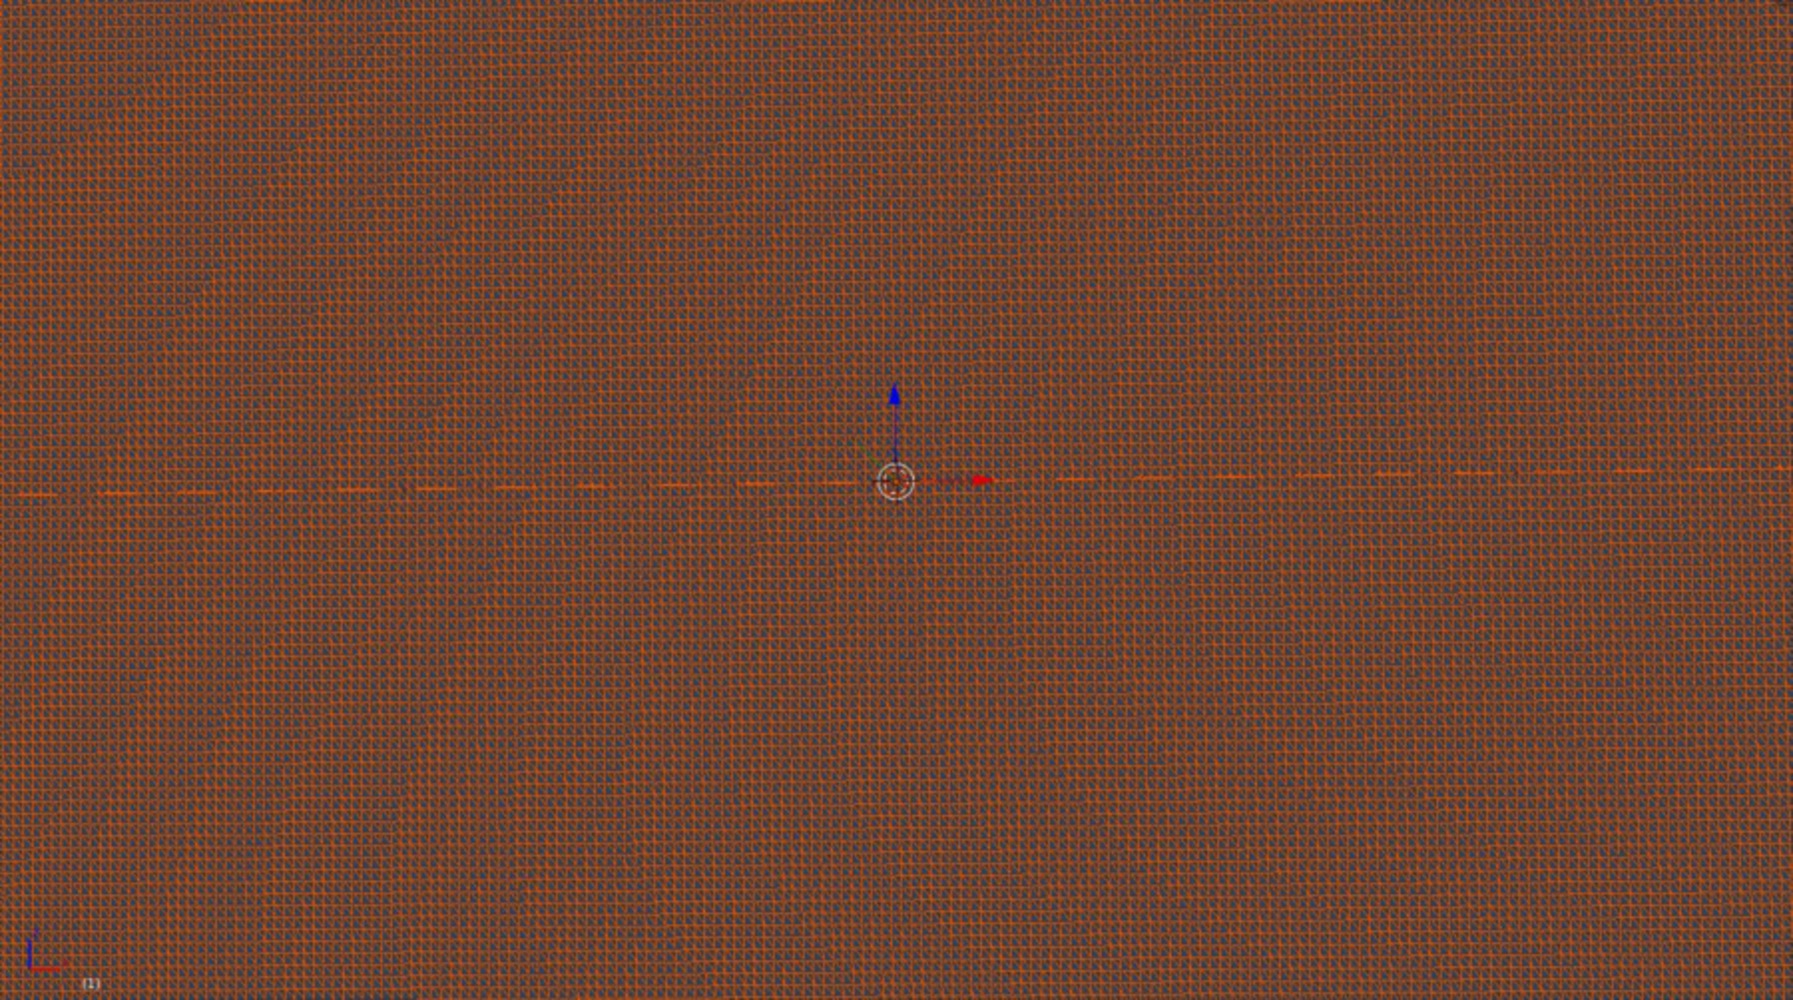
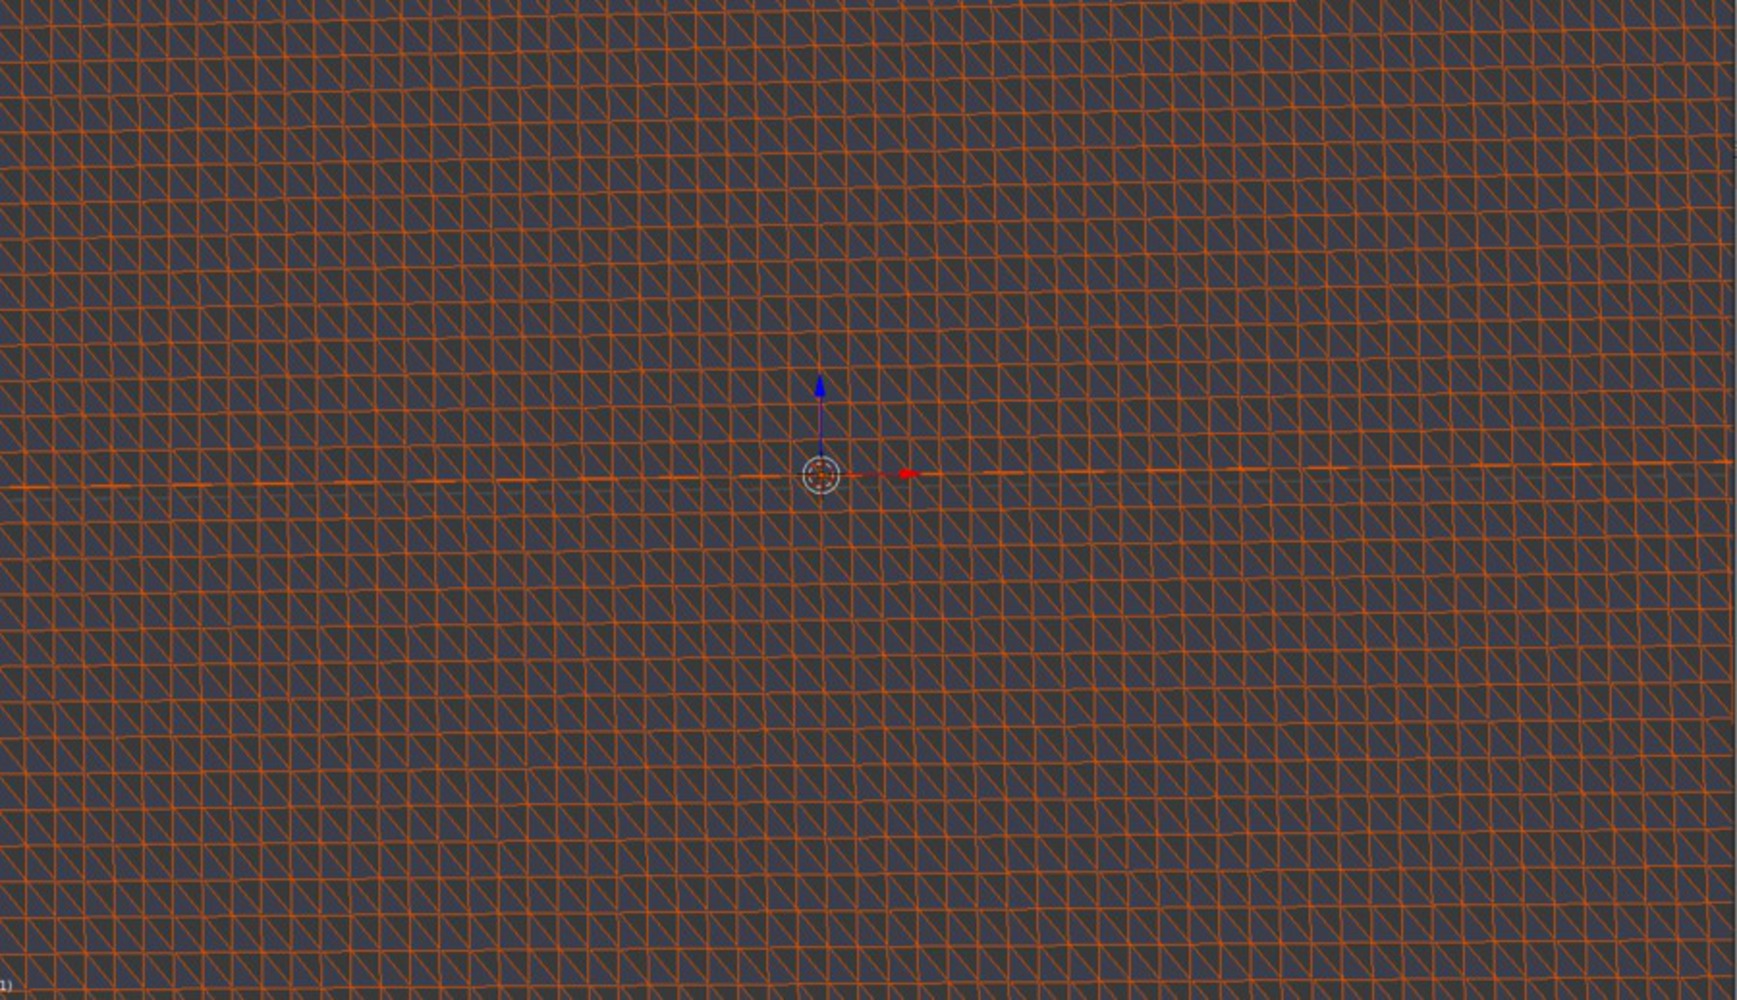
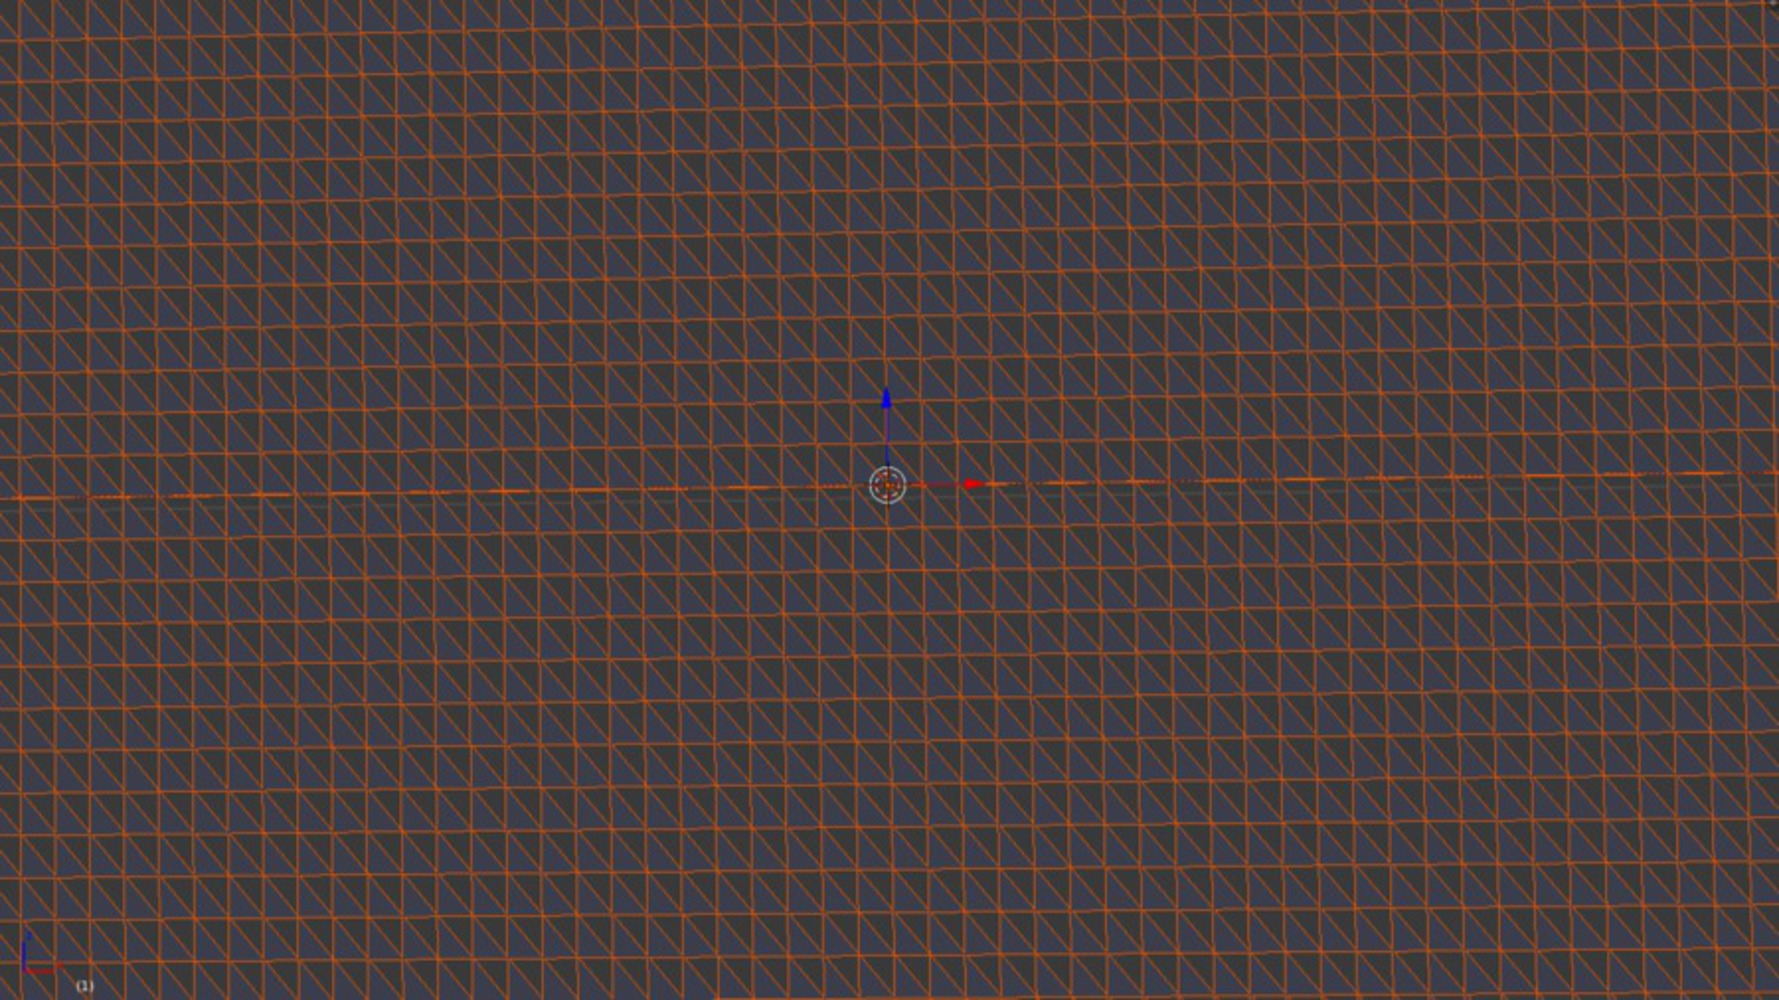
dest.write("".join(faces))This produced an appropriate canvas of squares that could function as pixels. Each square shares a vertex with its neighbor, so they are as close as possible (providing density to the images) while still having individual depth mobility. The following images show how dense the object looks from a distance.
At this point, I needed to do something to each of these faces. I had never written a shader before, but my instructor was immensely helpful in getting me through the process. There are two parts:
A vertex shader that applies data to every vertex in an object.
A fragment shader that takes depth and color data and outputs this data applied to a fragment for the next stage of the graphics pipeline.
The entire scene is rendered using Mozilla's A-frame VR framework. In A-frame, shaders can be registered and implemented in a scene. The code below is the shader I used for this project. It is written in WebGL, a javascript API that compile into GLSL (OpenGL Shader Langue), a C-like language that handles data in the graphics pipeline of the rendering process.
// use like:
// <a-entity material="shader: kinect-depth; src: #myvideo; depthParams: 1.0 0.2 0.4 0.5"></a-entity>
AFRAME.registerShader('kinect-shader', {
  schema: {
    src: {type: 'map', is: 'uniform'},
    depthParams: {type: 'vec4', is: 'uniform'}
  },

  vertexShader: [
    'uniform sampler2D src;',
    'varying vec2 vUV;',
    'void main(void) {',
    '  vec4 worldPos = modelMatrix * vec4(position, 1.0);',
    '  vec2 depthUV = vec2(uv.x*0.5 + 0.5, uv.y);',
    // this might not compile v because need to specify mip level
     //might be texture2DLOD(src, uv, mip)
    '  vec4 rawEncodedDepth = texture2DLod(src, depthUV, 0.0);',
    '  float worldDepth = 0.3529412 / (rawEncodedDepth.x + 0.1764);',
    '  vec4 basePos = vec4(position.xy, -.5, 1.0);',
     //want (basePos * mult).z = worldDepth
    //       mult = worldDepth / basePos.z
    '  float mult = worldDepth / basePos.z;',
    '  basePos.xyz *= mult;',
    '  gl_Position = projectionMatrix * modelViewMatrix * basePos;',
    '  vUV = vec2(uv.x * 0.5, uv.y);',
    '}'
  ].join('\n'),

  fragmentShader: [
    'uniform sampler2D src;',
    'varying vec2 vUV;',
    'void main() {',
    '  gl_FragColor.rgb = texture2D(src, vUV).rgb;',
    '  gl_FragColor.a = 1.0;',
    '}'
  ].join('\n')
});<html>
<head>
<script src="https://aframe.io/releases/0.5.0/aframe.min.js"></script>
<script src="../js/kinect_shader.js"></script>
</head>
<body>
<a-scene>
<a-assets>
<a-asset-item id="mesh-obj" src="images/mesh.obj"></a-asset-item>
<a-image id="kinect-video" src="images/test.png" autoplay loop="true"></a-image>
</a-assets>
<a-entity obj-model="obj: #mesh-obj"
position="0.0 0.0 -2" rotation="180 0 0" scale="0.577 0.708 1.0"
material="shader: kinect-shader; side: double; src: #kinect-video; depthParams: 1.0 1.0 1.0 1.0">
</a-entity>
<a-sky color="#555555"></a-sky>
<a-entity id="camparent" position="0 0 0">
<a-entity camera="userHeight: 0.1" rotation ="0 0 0" look-controls wasd-controls>
<a-entity cursor="fuse: true; fuseTimeout: 500"
position="0 0 -0.2"
geometry="primitive: ring; radiusInner: 0.005; radiusOuter: 0.008"
material="color: blue; shader: flat"
raycaster="far: 20; interval: 100; objects: .clickable">
<a-animation begin="click" easing="ease-in" attribute="scale"
fill="forwards" from="0.1 0.1 0.1" to="1 1 1" dur="100"></a-animation>
<a-animation begin="cursor-fusing" easing="ease-in" attribute="scale"
fill="forwards" from="1 1 1" to="0.1 0.1 0.1" dur="500"></a-animation>
</a-entity>
</a-entity>
</a-entity>
</a-scene>
</body>
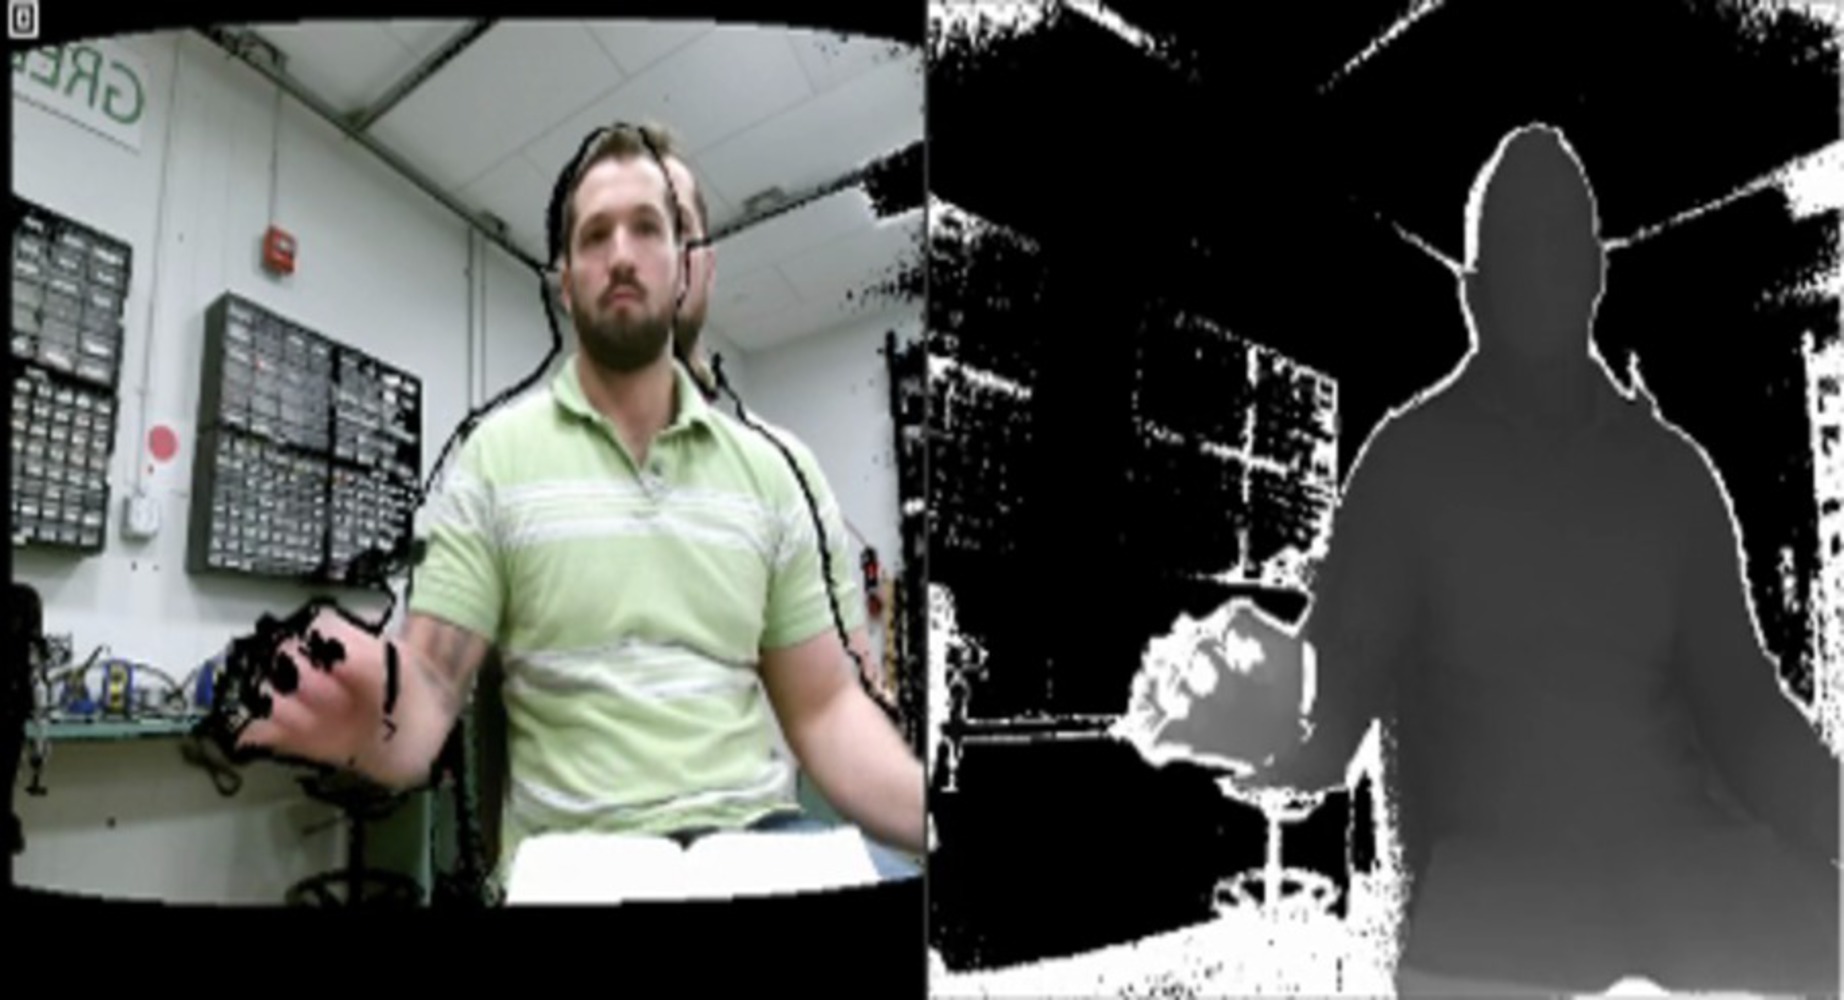
</html>After many iterations and changes, I had a working shader. The end result was still lackluster, however. This is for two reasons. The first is because I cannot find a way to actually record the kinect feed directly. No matter how closely I crop the video area, the color data on the left and the depth data on the right will never be perfectly aligned (as they would be from a direct feed).
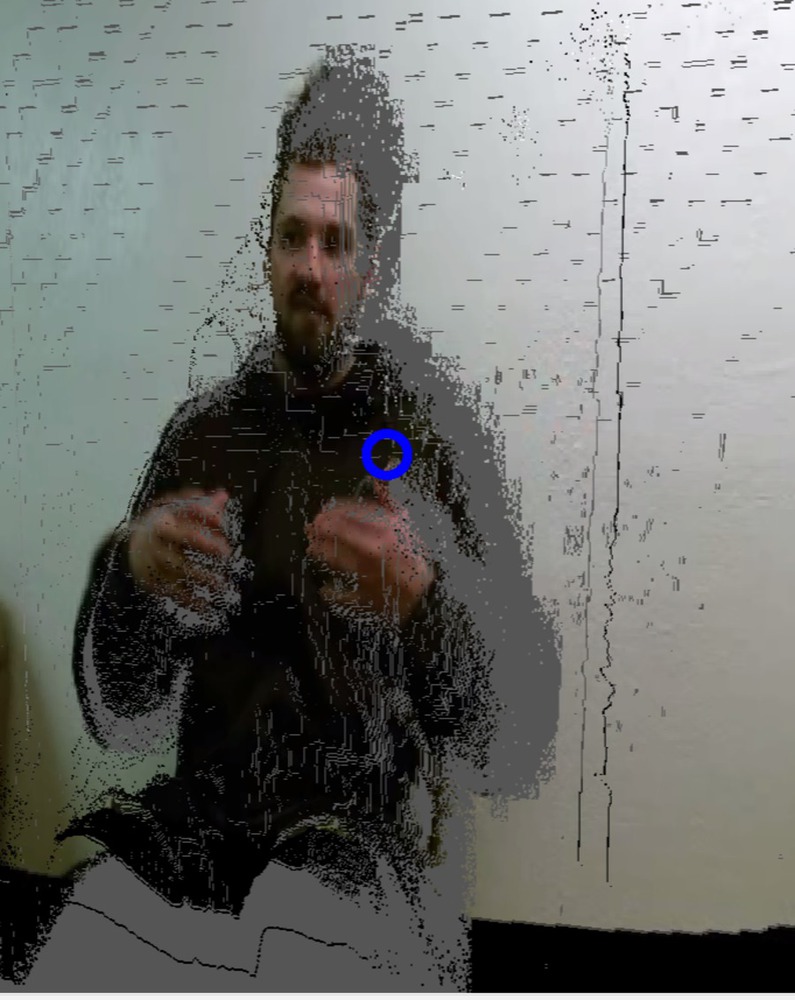
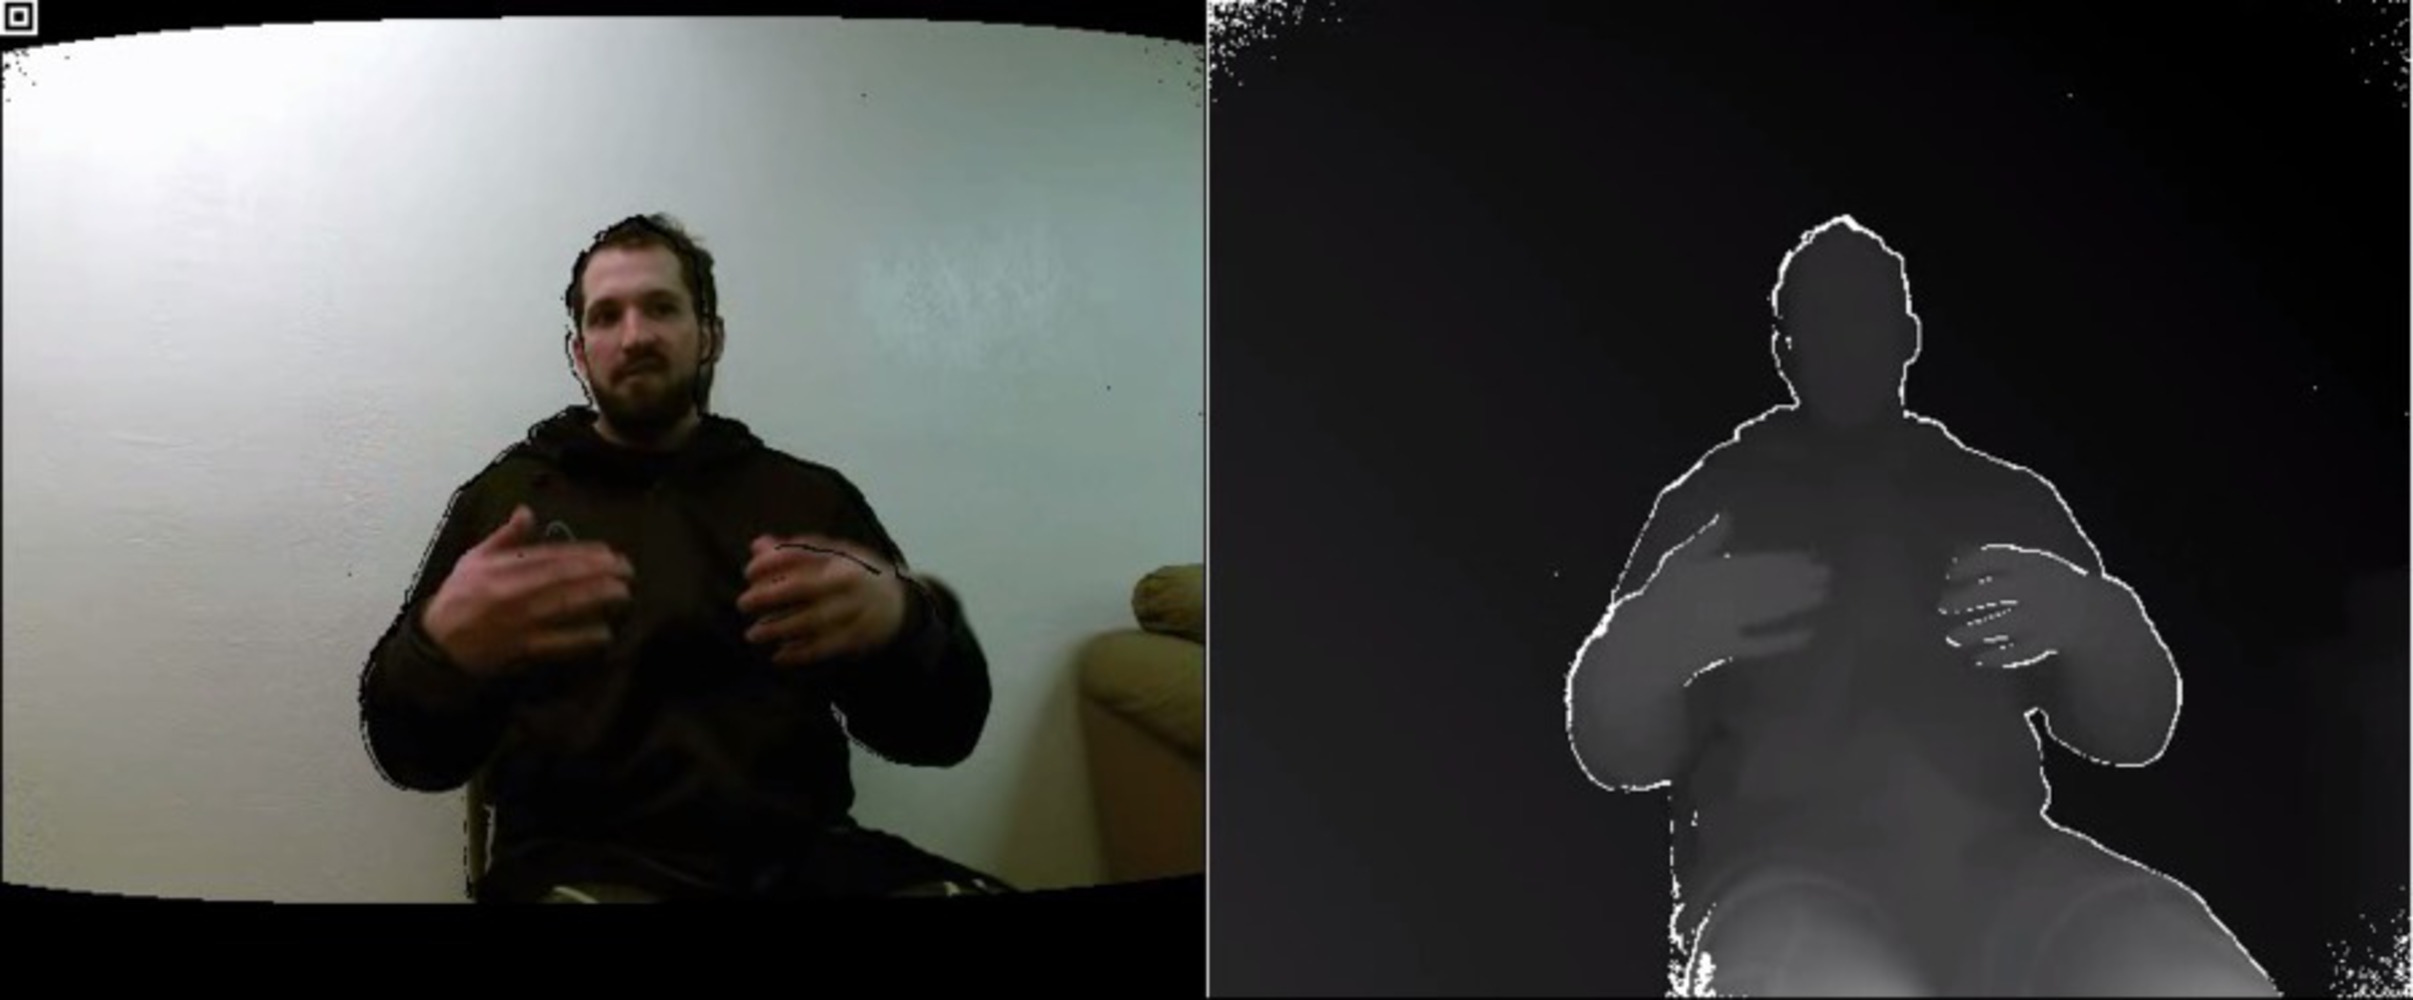
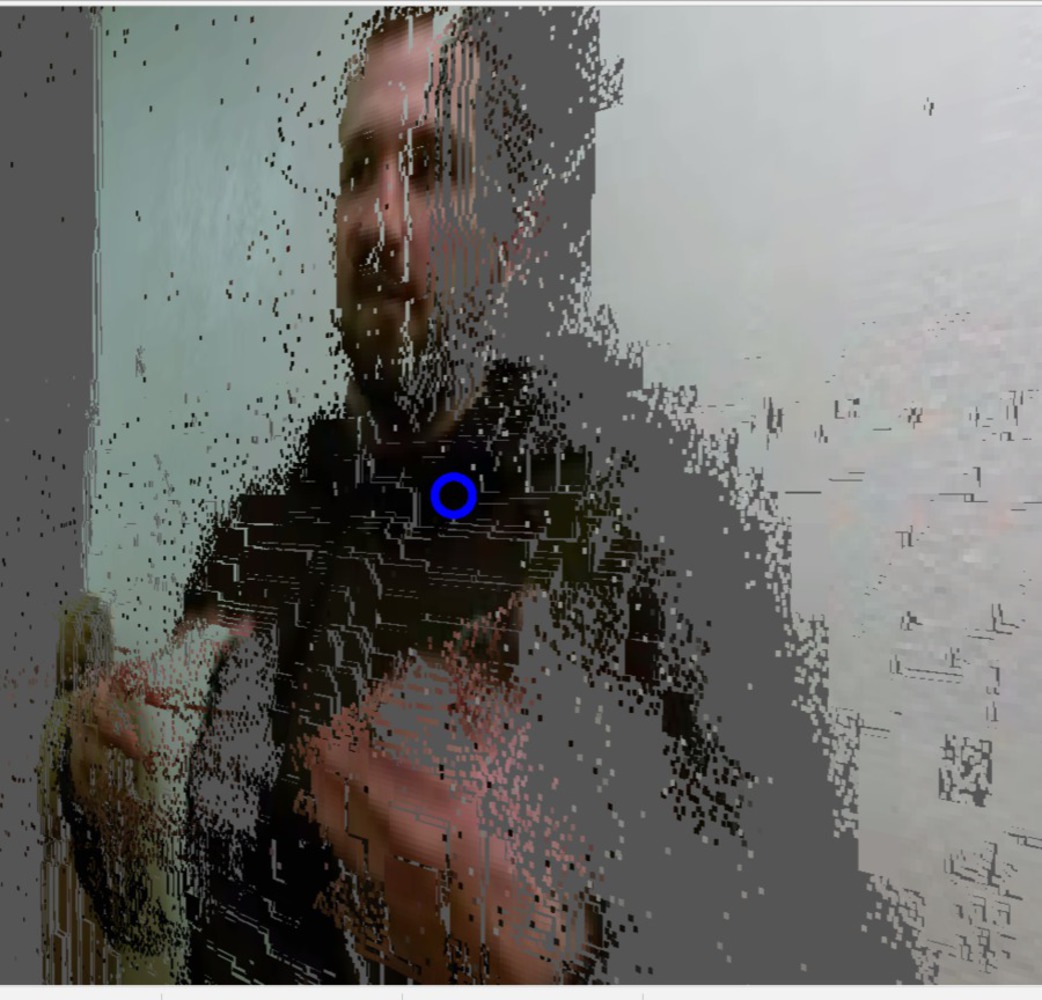
The other reason my results do not look so good, is because of the "halo" effect of depth data. If you look my outline on the right in the photo below, you will see a white halo. This results from being too close to the camera. However, if I am too far, there is no depth data for the rest of my body. The halo effect combined with slightly misaligned cropping throws all of the pixels widely around my rendering in the video. You can see this in the second photo below as well as how the depth data is mapped on every square face.
I would definitely like to continue working with the kinect. This is a very affordable and accessible tool to render 3D images/videos in a virtual reality setting.
As for my original plan, I would like to continue with higher quality video. I know there is a way to collect direct kinect output using electron. I would also like to use the libfreenect (or another library) to collect data from 2 kinects simultaneously.
Lastly, though I've been assured its impossible, I won't stop trying to have all of this data collected, processed and displayed live over the web. Virtual reality video chat can be here today; just as soon as I get all this together.
For this project I intended to record video data (color, depth) from a Microsoft Kinect 2.0 and render this video as a 3D object in virtual reality space.