The Hygiene Cup Sleeve
Made by Katherine Hua
Made by Katherine Hua
I wanted to create a cup sleeve with dual functionality that would enable you to drink hot drinks out of normal glass cups while also allowing you to dry cups in a more hygienic way.
Created: February 13th, 2019
I began the designing process by exploring what kind of things I could add to a cup to make the experience of drinking tea more enjoyable or convenient. I really enjoy drinking all types of tea – iced tea for those hot summer days, hot tea for those cold winter days to warm you up and help you relax after a long day of school and work, and bubble milk tea for those days to satisfy my sweet tooth cravings.
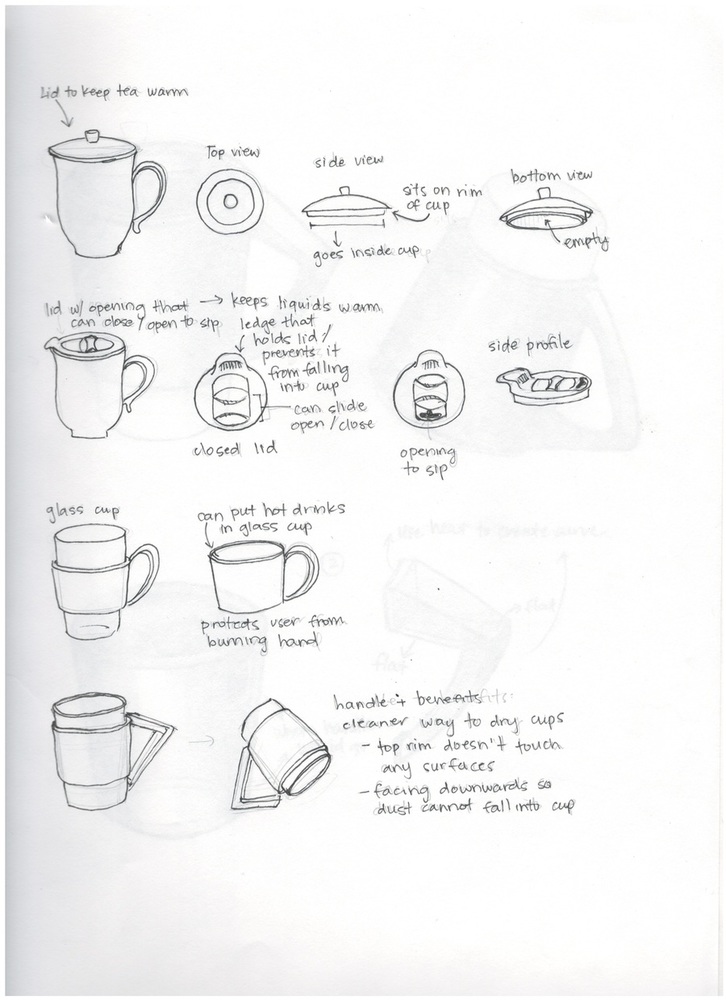
Since it is currently winter, I decided to focus on improving my hot tea experience. I tend to drink hot tea when I am home working on assignments for classes or simply relaxing watching binge-watching shows on Netflix or Hulu. Because my mind is always preoccupied, I often times forget to drink my tea while it is still hot and will end up with lukewarm tea that is just not as satisfying. So my first idea was to create a lid for the mugs that I use for tea to help prevent the tea from losing its temperature as quickly. I also am a pretty clumsy person as I spill and drop things quite easily, so a lid that could be airtight and keep the liquid inside the mug would be relatively useful for me.
My next idea was to create a cup sleeve with a handle. I share all my dishes with my housemate and she is the type of person to just leave all the dirty dishes in the sink until it piles up so the dishes that I want to use are frequently unavailable. When there are no more clean mugs, I end up using a glass cup to brew my hot tea in. Because glass cups provide no protection from the high temperatures of hot drinks, I have to use the sleeves of whatever I am wearing to cover and protect my hands before I can carry it anywhere. So I wanted to make a cup sleeve that could do that job for me in addition to adding a handle to it to create the "mug" experience.
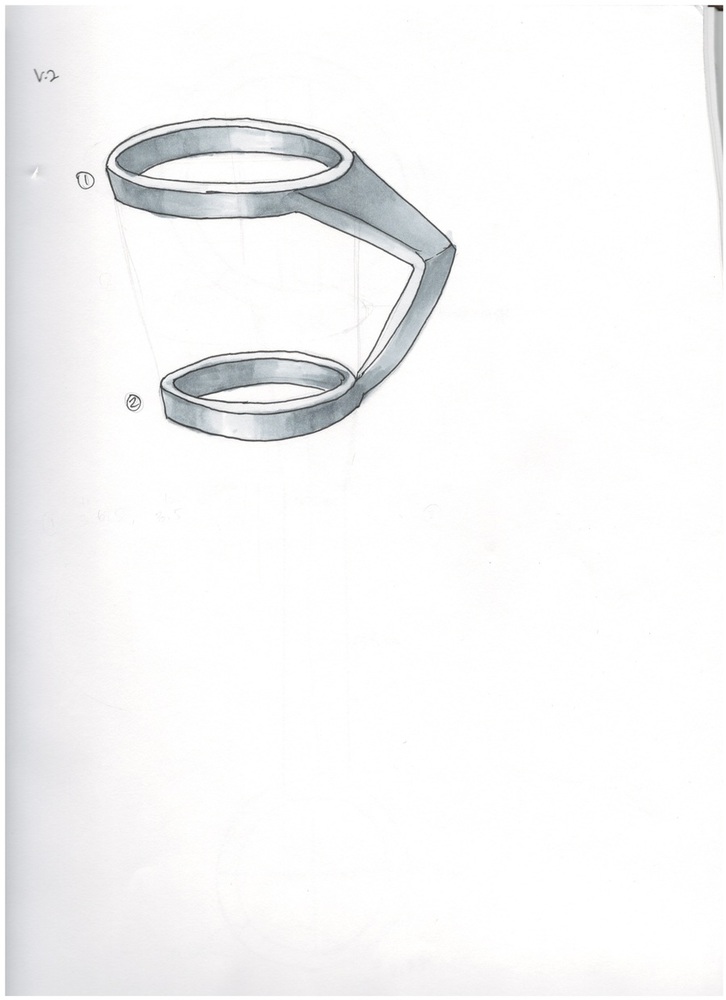
The idea that I finally ended up choosing was an iteration of the second idea. It has the same functionality but in this idea, the handle would would be designed so that it could help the cup stand on the handle when it is drying after being washed. I am a pretty clean person. Maybe not with my bedroom in terms of clothes lying always lying around on the carpet, but definitely when it comes to my kitchen and the items that come with it. I get easily grossed out when I find unknown substances on what is supposedly supposed to be a clean dish. Most of the time after washing a cup, it dries either standing upwards or downwards. When it is standing upwards, dust easily falls in and I have to wash it or rinse it out before I can use it. When it is standing downwards, the rim of the mug touches the surface and the surface could be dirty. So if it were to stand on the the handle instead, these two problems could be eliminated. It could act like a drying rack for cups, but just for a single cup.
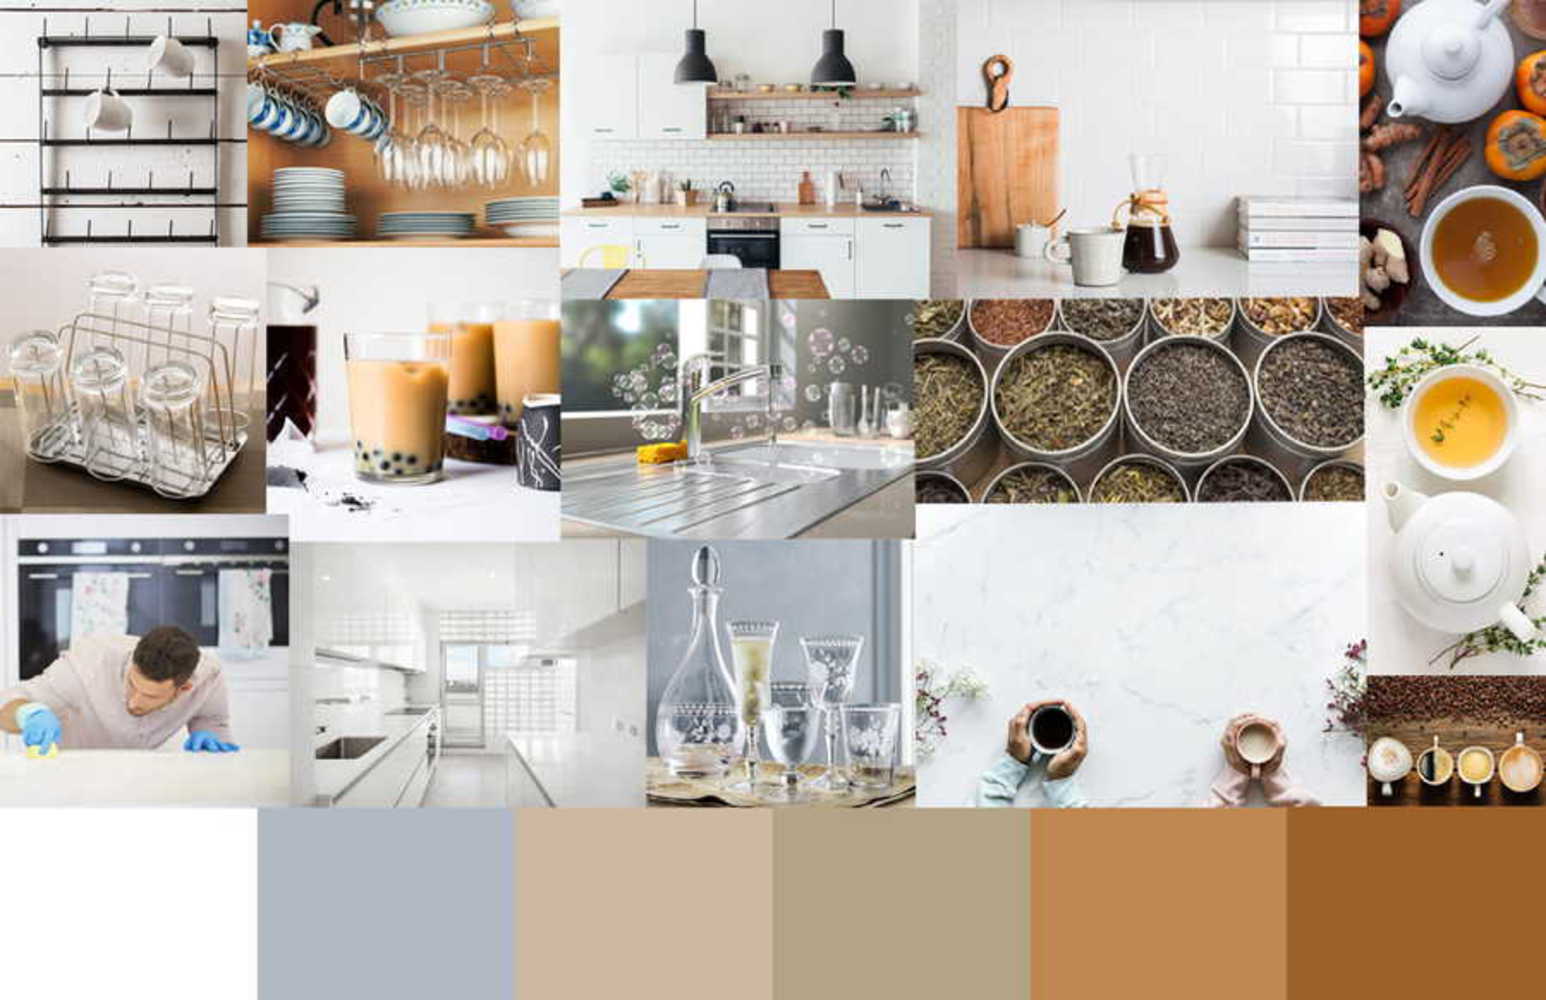
During my ideation process, I also created a mood board to help me with brainstorming and finding inspirations for this project. My mood board focuses on my love for tea, the relaxing and calming vibes tea brings for me, and clean and organized kitchens. This ultimately helped me come up with my hygienic cup handle idea.
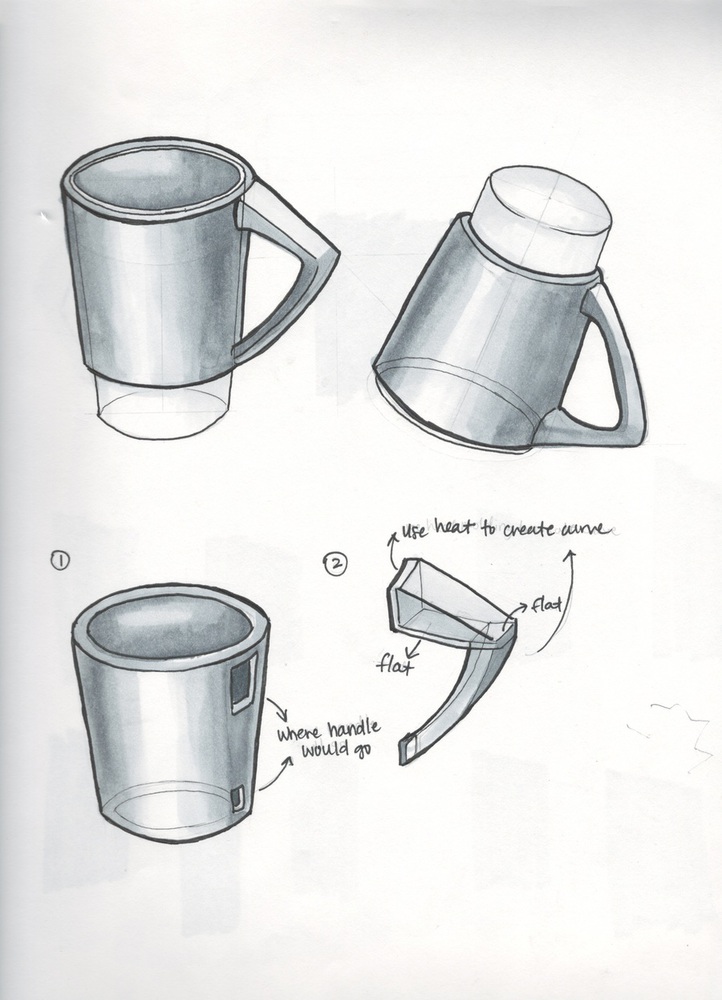
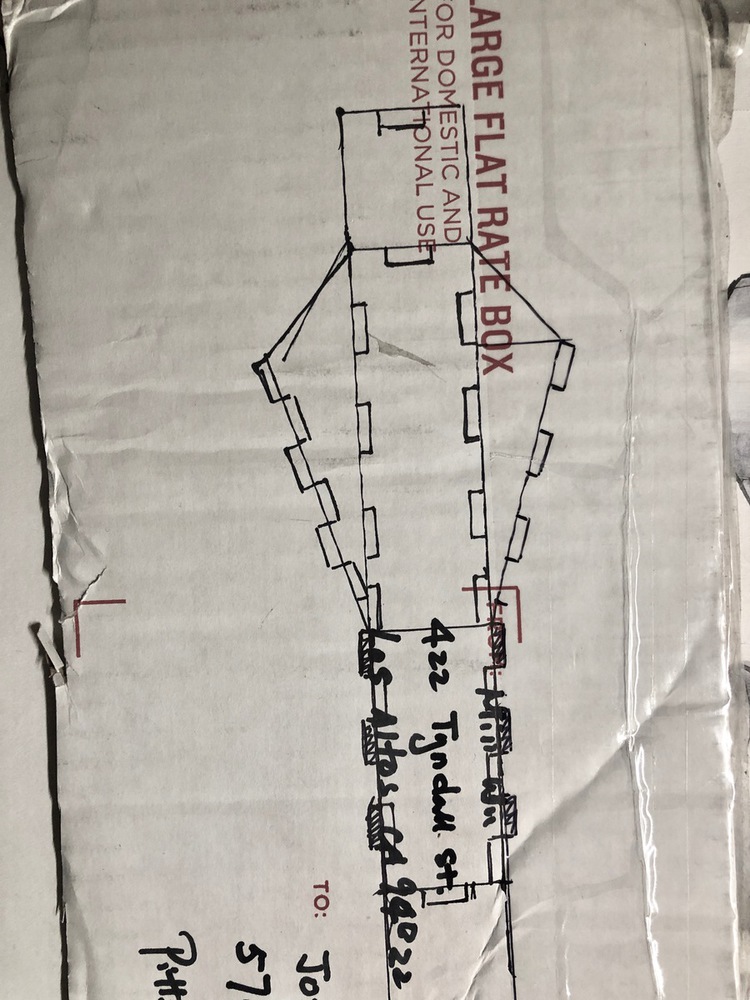
With my idea set on creating a hygienic cup sleeve with a handle, I generated the following sketches below for a glass cup. The project's guidelines asks us to use only cut and formed acrylic sheets, aside from bonding materials to create our final product prototype. The last time I created anything was probably when I was five years old playing with legos. Because this was my first time ever using laser cutters and acrylic sheets, I tried to think of ways of how to create pieces of the cup handle that could be glued together or heat formed to become a certain shape. I decided that I would begin by first creating the cup sleeve, and then making a hole in it for the handle to go into. The handle would be created separately through various 3-D shapes and then would be attached to the cup sleeve.
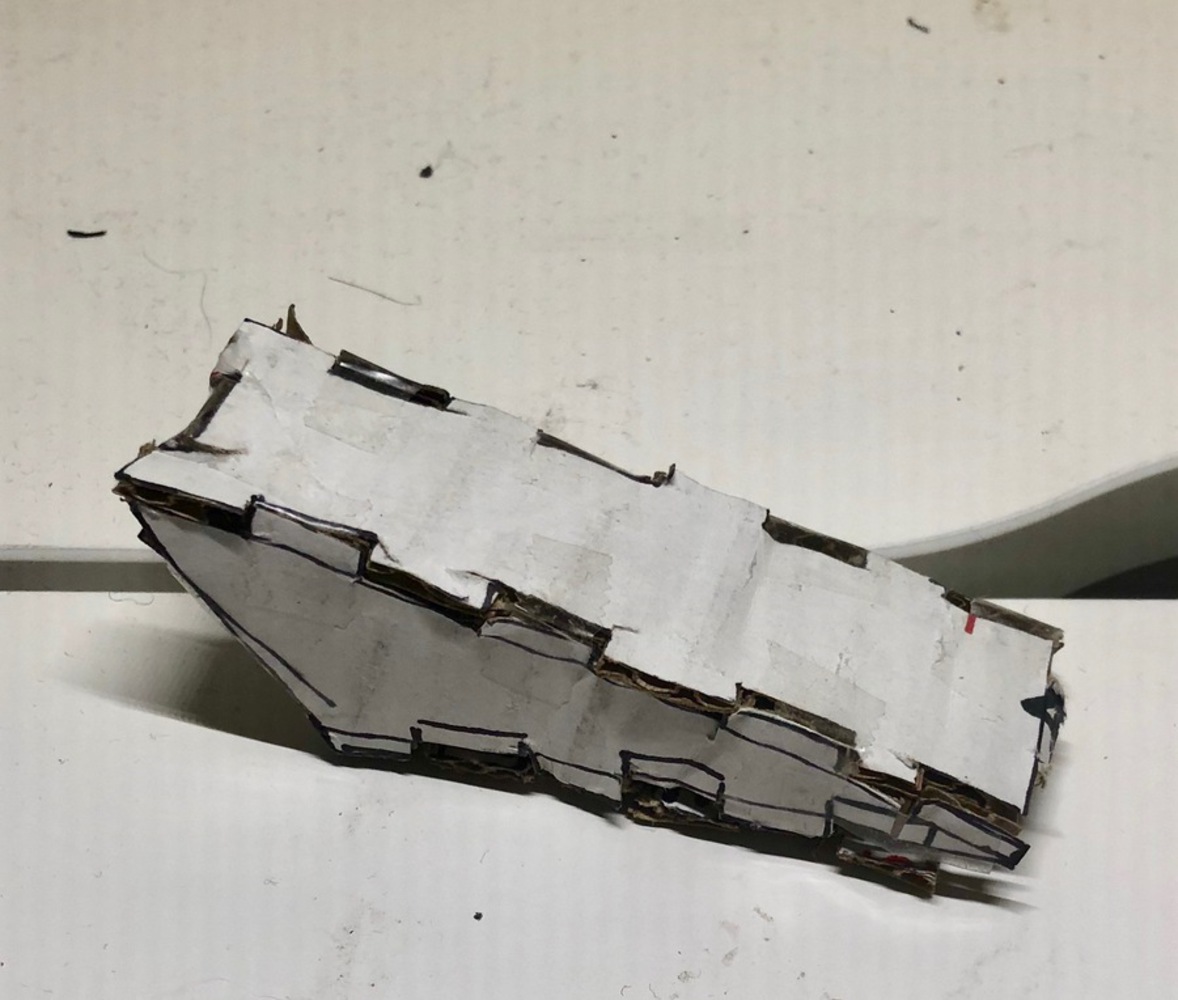
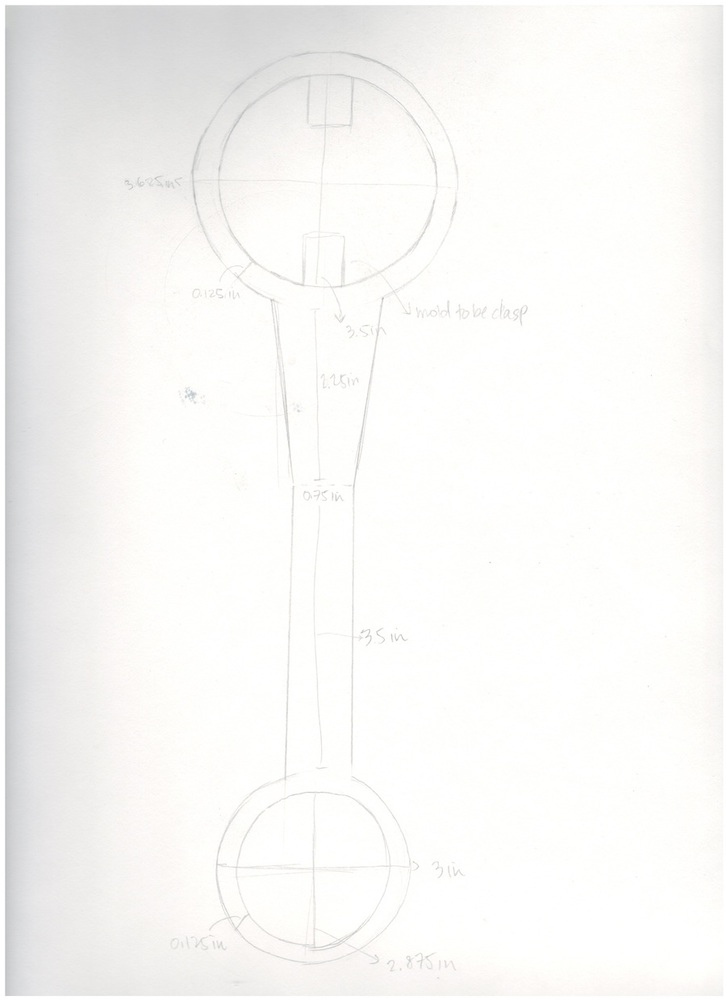
I used scissors, tape, and cardboard to begin my prototype. I thought the cardboard would be effective to work with because the acrylic sheets that I were planning to use were about the same thickness as cardboard, about 1/8th of an inch. I first began by trying to find the right measurements for the cup sleeve. Although it was easy to cut out the shape of the cut sleeve with the correct measurements, it took me a while to actually find what those measurements were because the cup sleeves were arc-ed instead of having straight edges, so I had to do quite a few calculations before I finally found the measurements. Then I attempted to begin making the upper half of the handle. I imagined it to be pretty much geometric and thought that it would hold better together if I made the sides all fit like a puzzle piece. I did not try to make the bottom half because even though it would also be a 3-D shape, I was planning on using a heat gun to make it a curved 3-D object and it was difficult to do that with just scissors and cardboard. I did not think the measurements would be precise enough.
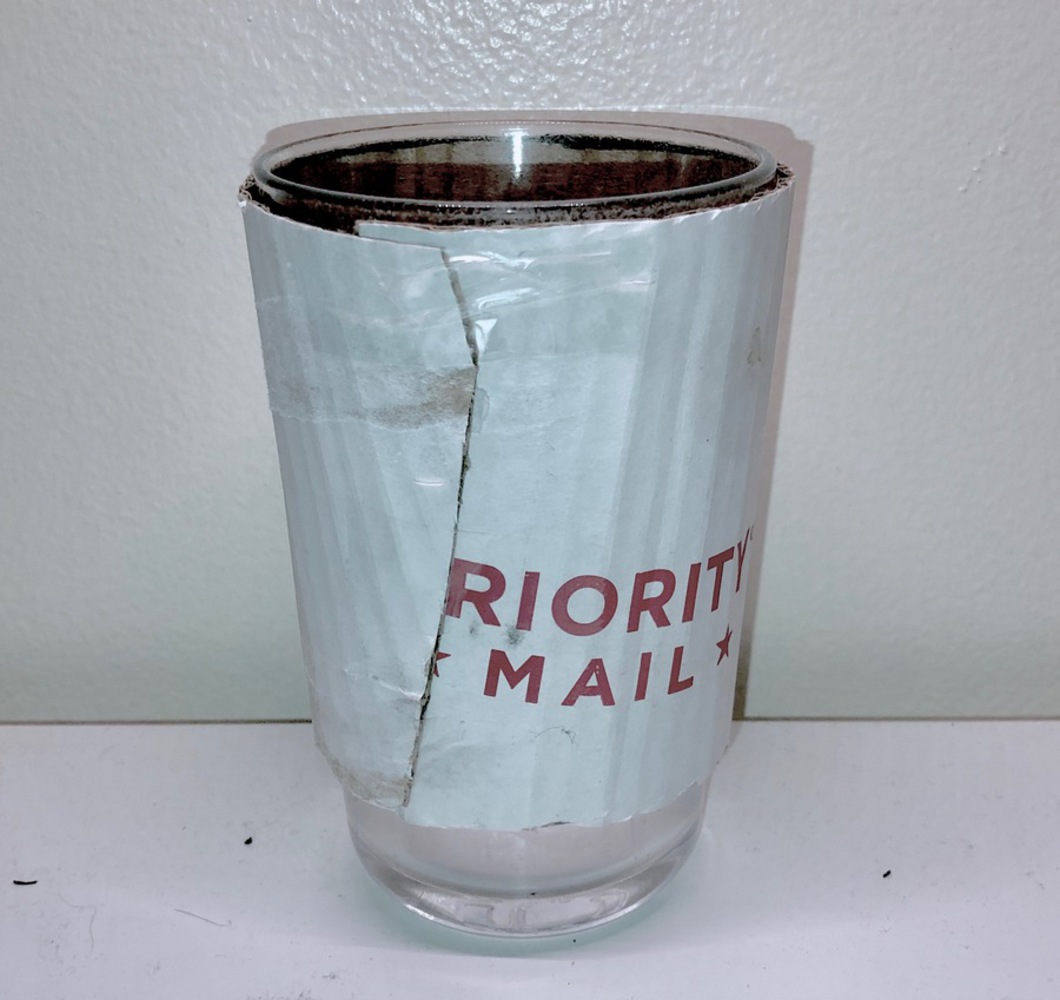
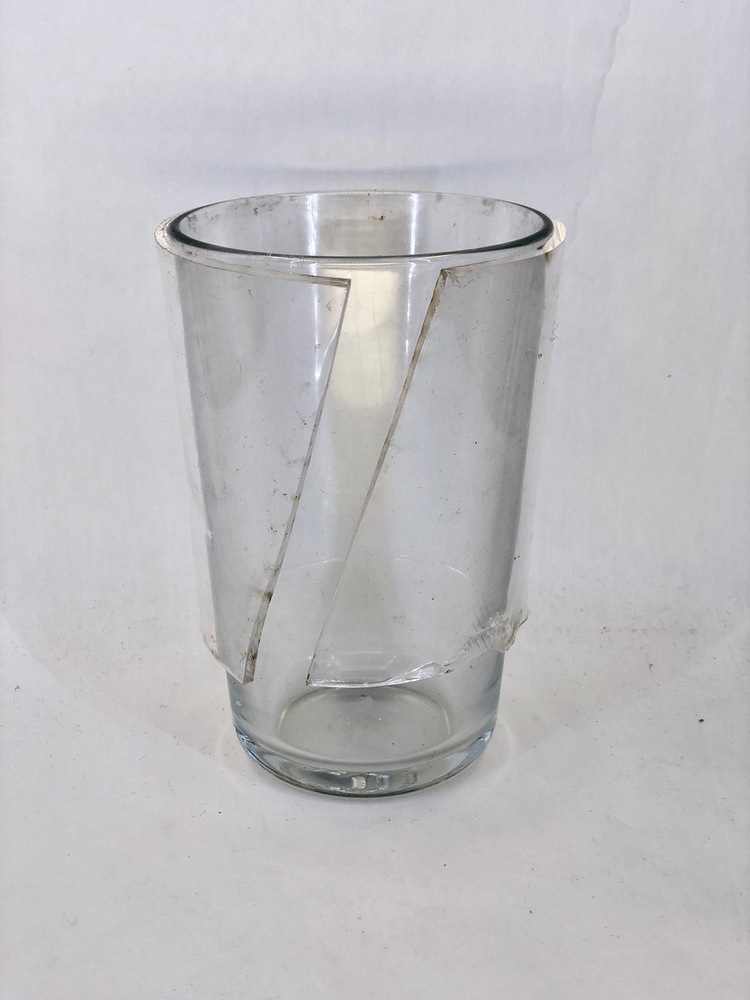
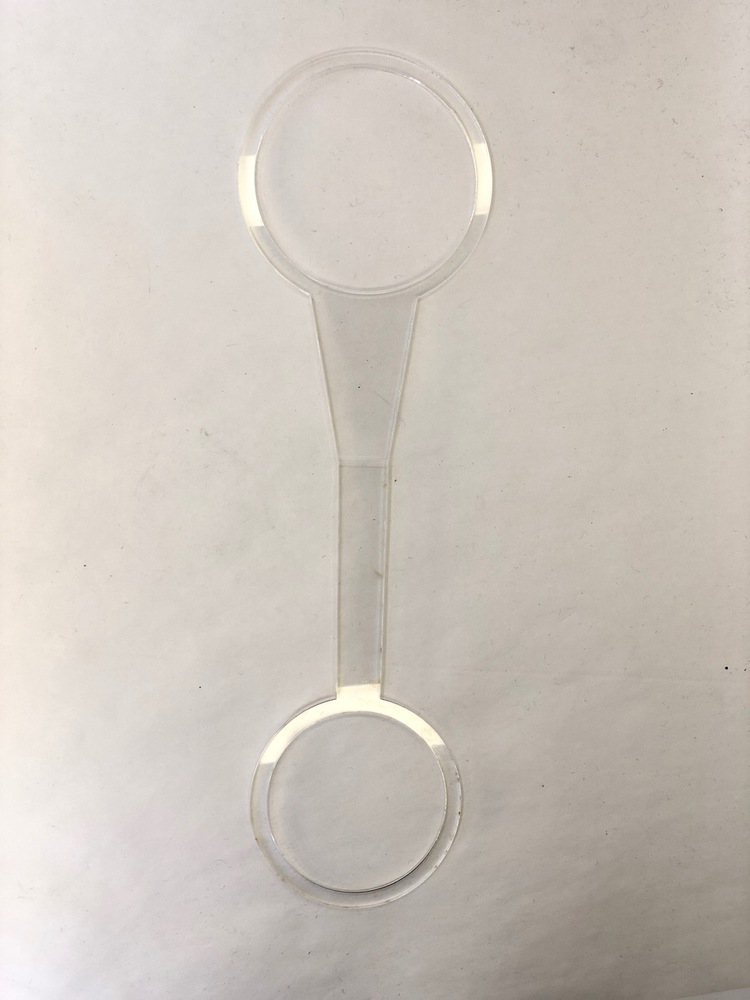
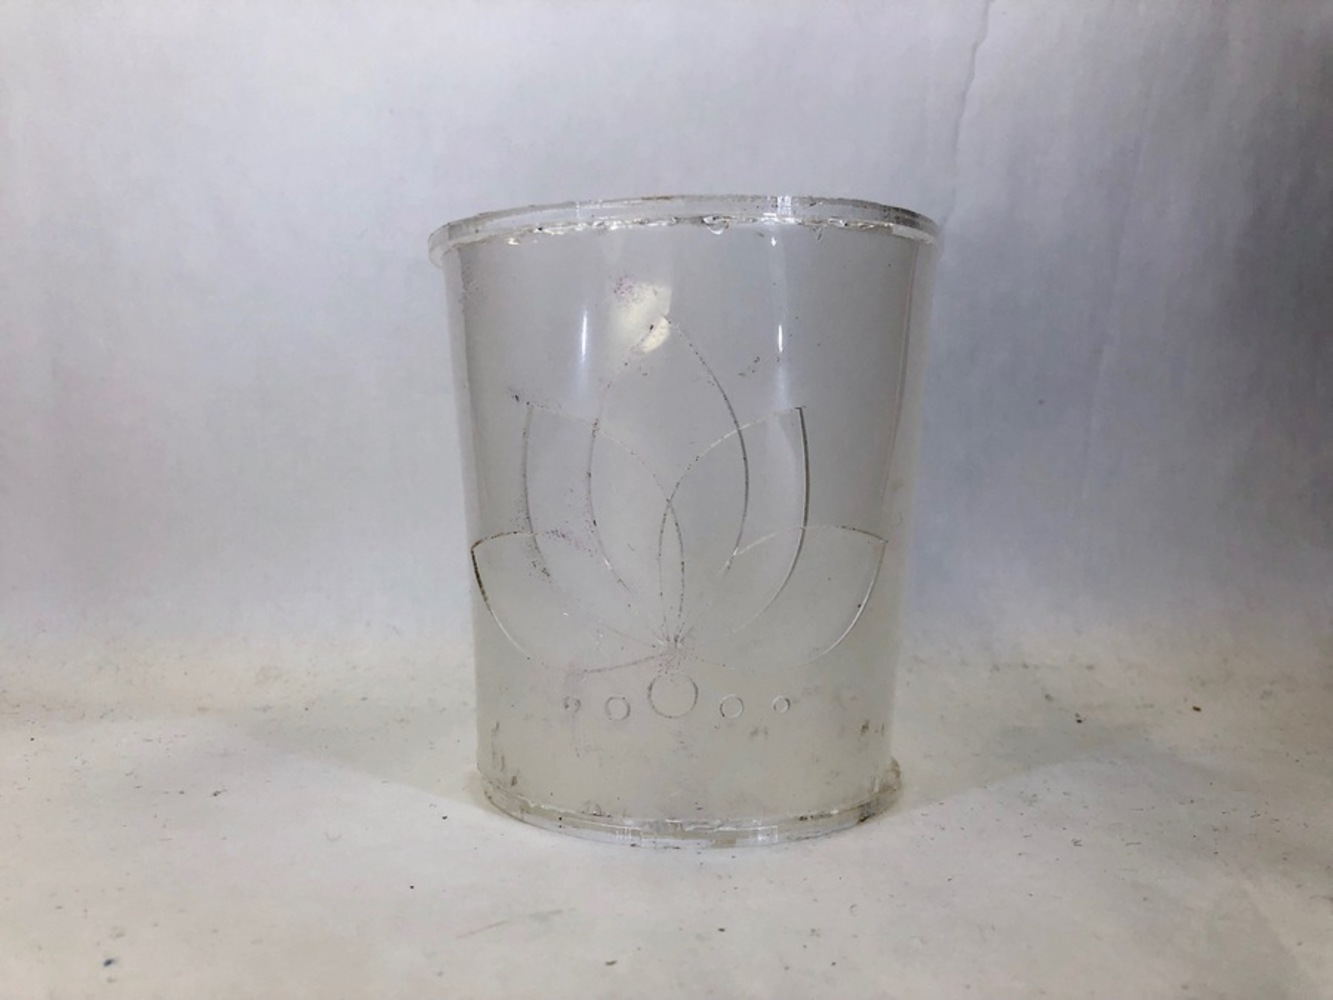
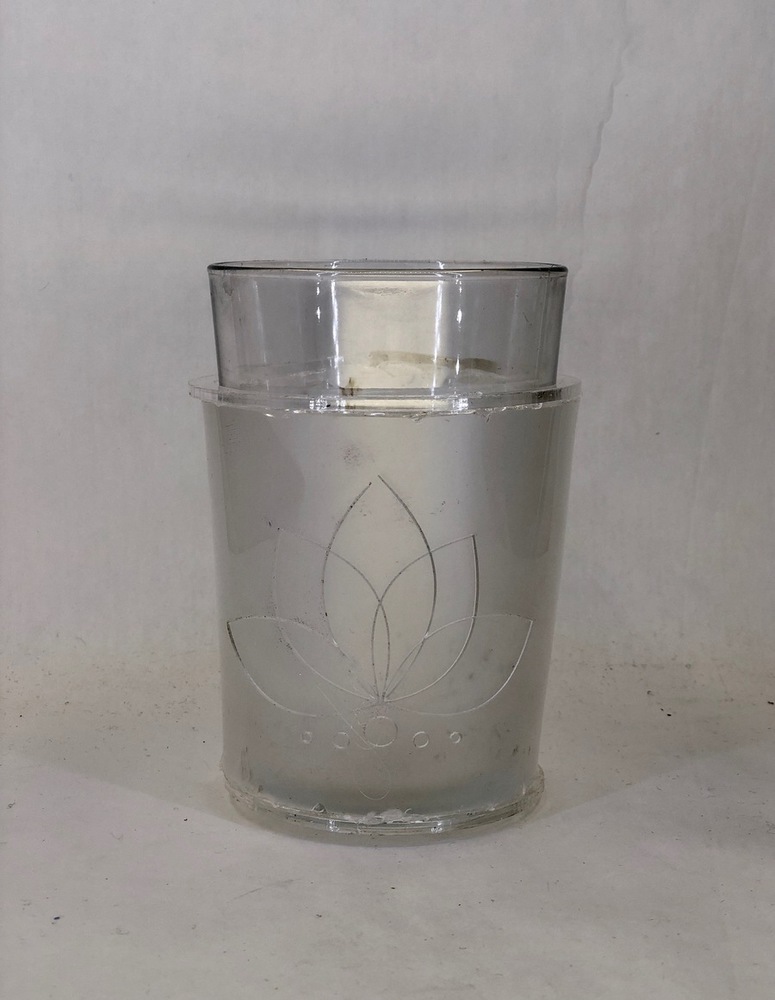
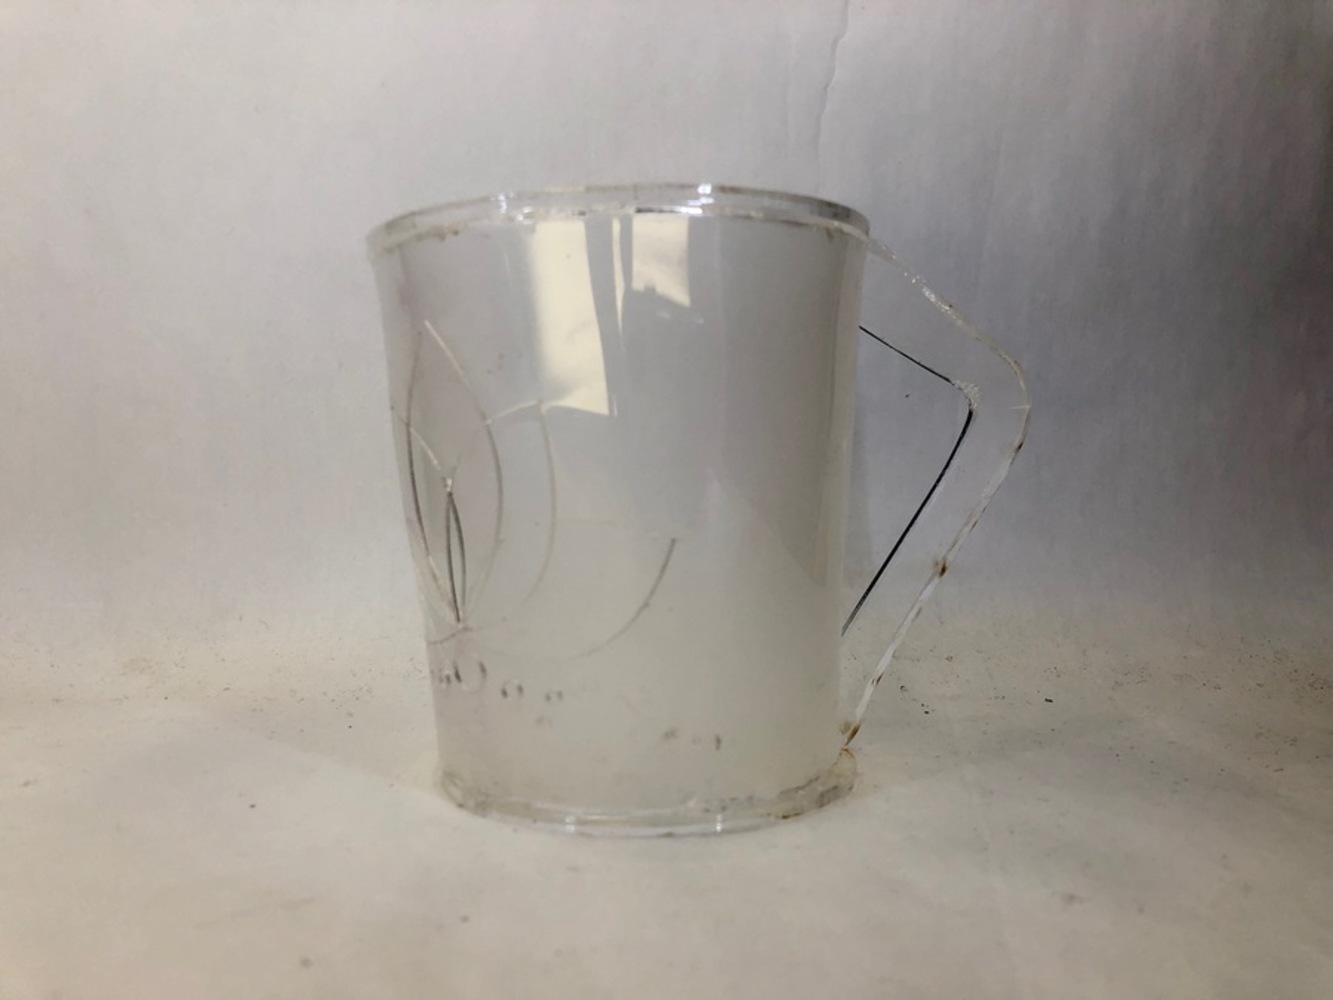
I chose two types of acrylic to use: clear and frosted. I really enjoy being able to see what I am drinking because I think that of all the many types of tea there are, the colors that they make are very beautiful. I made the shapes that I wanted to laser cut through Illustrator and saved it as a PDF file. I then moved it onto CorelDraw in the MakerSpace Lab to laser cut. Using the clear acrylic sheet, I cut the pieces that form the sleeve and handle. To make the cup sleeve, I used the heat gun to mold the sleeve into the shape of my glass cup. With this being my first time using a heat gun, I accidentally heated one part of the cup sleeve to much and it started melting. I also found it difficult to mold it perfectly against the cup so the circle I was trying to form was not perfect. In the end, my cup sleeve was too small. I also accidentally dropped the glass cup I was using to mold it with and it shattered. Luckily, I have several of these glass cups so it was okay. When trying to make the cup handle, I could not figure out a way to attach the handle I was envisioning. At first I thought I could make a hole into the sleeve and just insert the handles into the hole, but because the surface of the cup is rounded and the acrylic used to make the cup sleeve was so small, it was difficult to find the right measurements and the cup handle would not have enough support to stay attached to the sleeve.
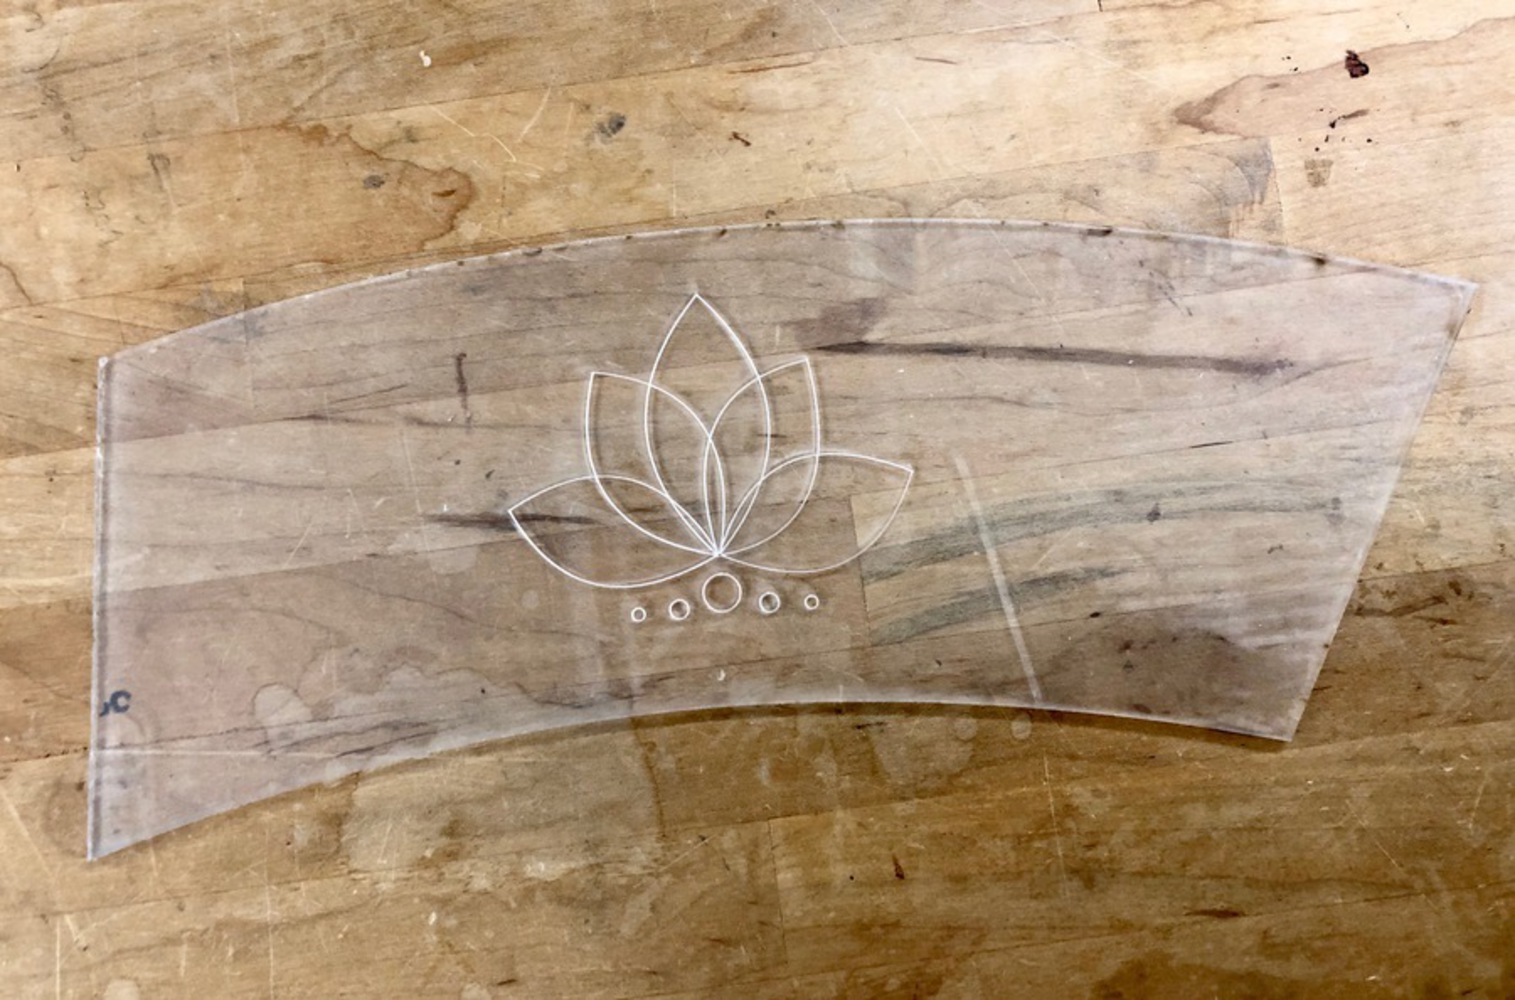
After increasing the lengths for the cup sleeve, I also decided to add an engraving to it to add to its design and give it my own personal flare. I chose to create a simple lotus flower because lotus tea is a favorite of mine. I chose to use the frosted glass to give it that etched glass effect. When I was heat forming the cup sleeve it ended up being too big this time so I had to reduce the measurements and try again. I also rethought how I would make the cup handle so that there would be more support for it as it attached to the cup. I sketched out my new cup handle idea.
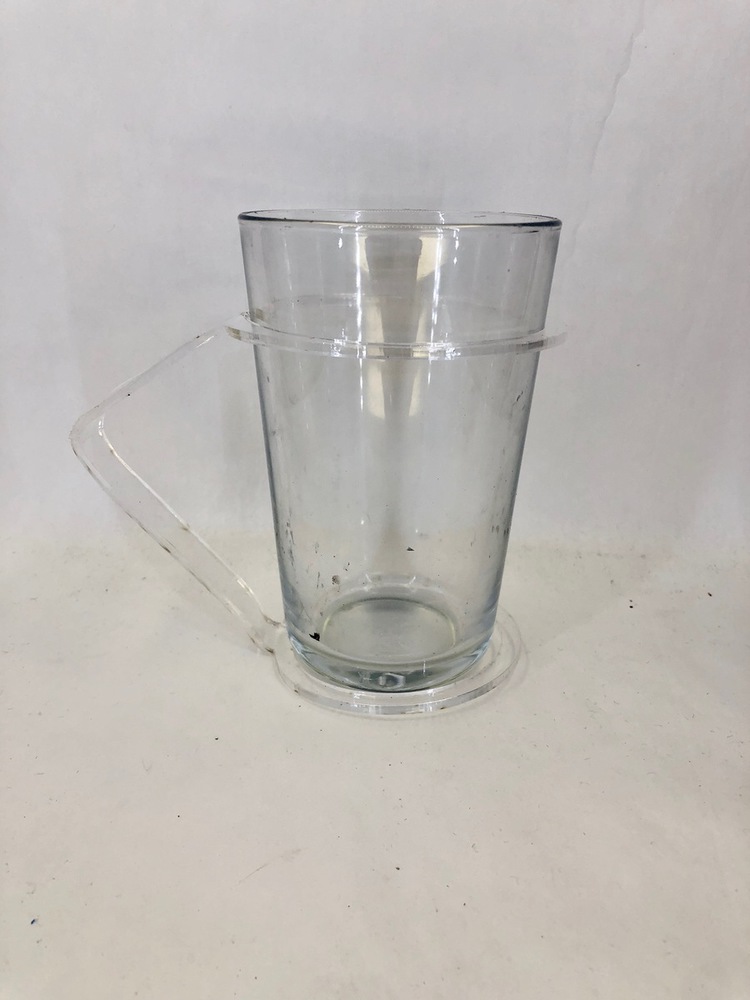
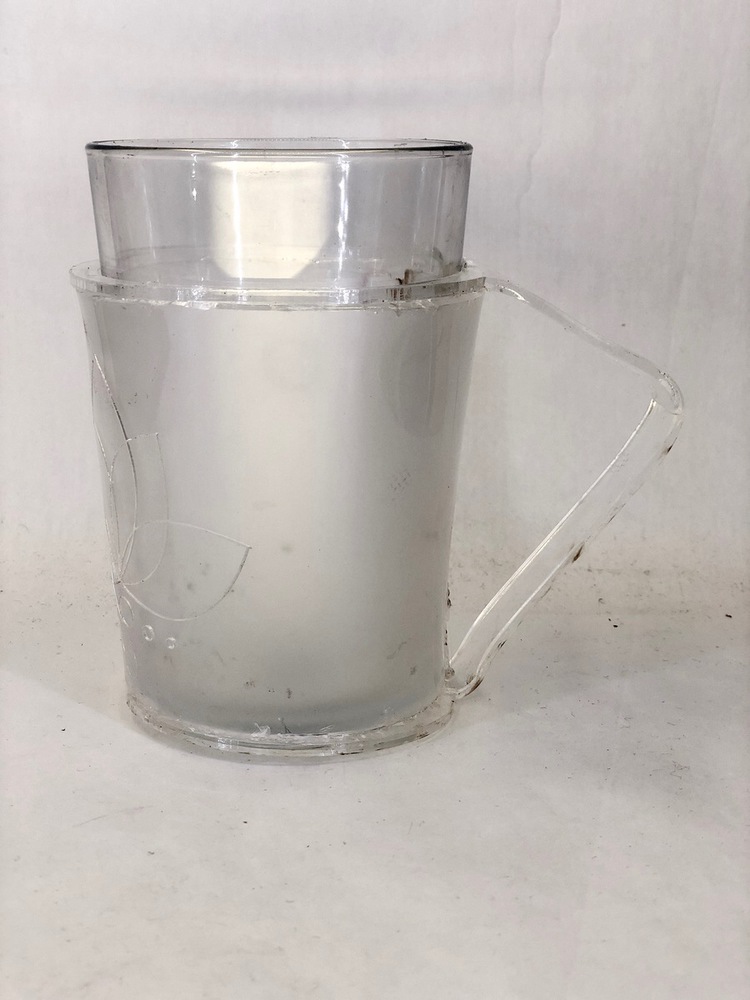
I reprinted the cup sleeve with the new measurements and finally got the cup sleeve to come together and close around the cup. After I glued the cup sleeve ends together, I used the heat gun on it as it was placed on the glass cup in an attempt to make the circles it formed more accurate, but I ended up burning the glue that was used so there are some brownish and orange-ish spots where the glue is. Creating the cup handle took around 10 iterations to get the measurements right for the circles sitting on the top and the bottom. After I found the right measurements for them, I made the cutout for the handle on CorelDraw. I used the heat gun to form the shape of the handle, and then glued it onto the cup sleeve with a hot glue gun. The glue was a little messy because I positioned the handle wrong at first and had to pry it apart and re-glue it together. However the end product came out pretty well for my first time building something that was not legos.
Even though I intended to have the cup sleeve be able to allow cups in it to sit on its handle, I did not take into account the physics of the weight and height of the glass cup so it is not able to stand on the cup sleeve's handle. Also, the cup sleeve sits too low on the cup for it to be even able to sit on the handle. Although it cannot work in the way it was supposed to in that aspect, it is still able to work perfectly well as a cup sleeve, and is therefore successful in that aspect.
Offers students hands-on experience in DIY product design and fabrication processes. Students work individually or in small groups to design customized and personalized products of their own and bu...more
I wanted to create a cup sleeve with dual functionality that would enable you to drink hot drinks out of normal glass cups while also allowing you to dry cups in a more hygienic way.